Inf
o
rm
at
io
n
an
d
Non
-c
o
nt
rac
tua
l v
isu
al
s.
Sub
je
ct
t
o
t
ec
hn
ic
al
c
ha
ng
e wi
tho
ut
no
ti
ce
.
This document is the property of IRFTS. It shall not be reproduced or shared with third party without agreement IRFTS
9.4.3)
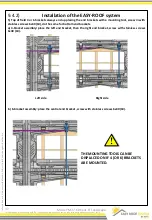
Installation of the EASY-ROOF system
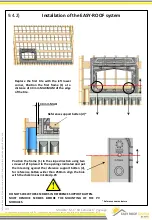
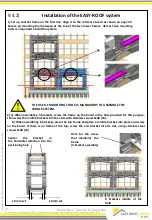
3) Slightly lift the frames on the left, drag the row of flashings under the frames.
4)
Align the last flashing with the top of the frame.
5) At the bottom, cut the part of the flashing which exceeds the frame.
6) Place a domed head screw 5 x 30 Inox (b) at each flashing overlap. Tighten moderately.
7) Place a domed head screw 5 x 30 Inox (b) centered on the oblong hole. Tighten moderately. VERY
IMPORTANT: unscrew one turn, it is essential for the thermal expansion of the part.
8) If there is no batten under the flashings overlap, add a batten under the overlap.
9) Fix all the left flashings using the previous 6, 7 and 8 guidelines.
40
DO NOT TOUCH
THE BOTTOM
FLASHING
Model "M-1" 60 Cells 6" Landscape


