2
Chapter 2
Basic Setup
This chapter provides details on how to setup and mount the camera.
System Requirement
The Iris™ camera requires the Iris™ smart hub for operation. To use the wireless
interface on the wireless model, other wireless devices must be compliant
with the IEEE802.11b, IEEE802.11g or IEEE 802.11n specifications. All Wireless
stations must use compatible settings.
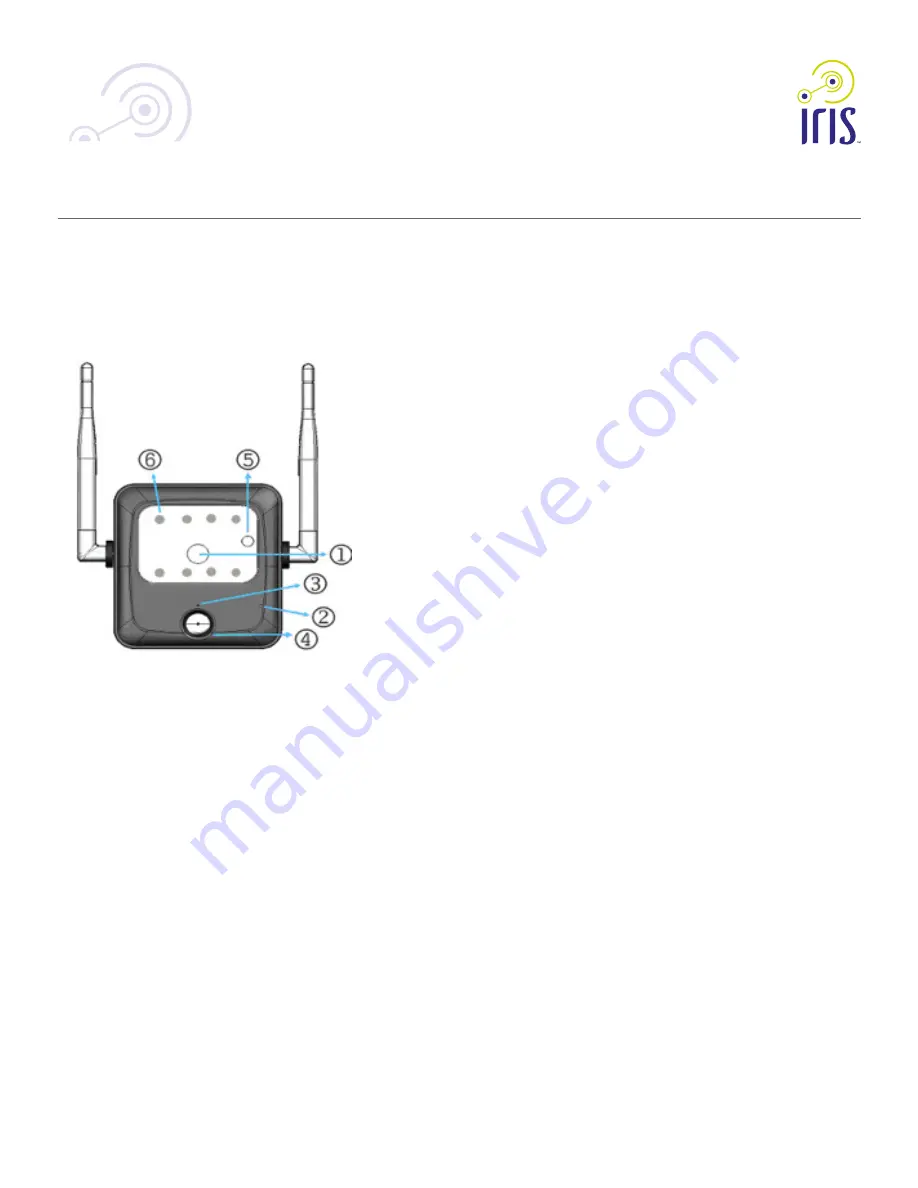
Front Panel
1. Lens
No physical adjustment is required or possible for the lens, but you should
ensure that the lens cover remains clean. The image quality is degraded if
the lens cover is dirty or smudged.
2. Infrared Motion Sensor
The infrared motion sensor is designed for human body detection.
3. Privacy LED
On (Green) -
The Privacy function is enabled.
Off -
The Privacy function is disabled.
Rear Panel
1. LAN port
Use a standard LAN cable to connect your Network camera to a
10/100BaseT (or faster) Ethernet router or switch.
The LAN cable should only be connected or disconnected when the
camera is powered OFF. Attaching or detaching the LAN cable while the
camera is powered on does NOT switch the interface between wired and
wireless.
The LAN cable is only used while pairing the camera to Iris™. After
pairing is complete, the LAN cable is no longer required for video data
transmission. Please visit lowes.com/iris to learn more about pairing your
camera with Iris™.
2. Power Input
Connect the supplied 12V power adapter here. Do not use other power
adapters; doing so may damage the camera.
3. External Input/Output
GPIO terminal block including 1 input port and 1 output port.
The GPIO block is NOT used by Iris™.
4. Memory Card Slot
The memory card slot is not used with the Iris service and is disabled for all
installations.
RC8221 Iris
™
Camera
3
OC821 Iris
™
Outdoor Camera
RC8221 Iris
™
Camera Set-Up Guide
Chapter 2
Basic Setup
This chapter provides details on how to setup and mount the camera.
System Requirement
The Iris™ camera requires the Iris™ smart hub for operation. To use the wireless
interface on the wireless model, other wireless devices must be compliant with the
IEEE802.11b, IEEE802.11g or IEEE 802.11n specifications. Your wireless router must
use compatible settings.
Front Panel
1. Lens
No physical adjustment is required or possible for the lens, but you should ensure
that the lens cover remains clean. The image quality is degraded if the lens cover is
dirty or smudged.
2. Mircrophone
The built-in microphone is mounted on the front.
3. Network LED
On (Green) - Network (Wireless or LAN) connection is available.
Off - Wireless or LAN is not connected or camera is not sending/receiving data.
Blinking (Green) - Data is being transmitted or received via the LAN or
Wireless connection.
4. Motion Sensor
Passive infrared sensor (PIR) detects motion in front of the camera.
5. Day/Night Sensor
This is a hardware sensor to detect lighting levels. In low light conditions the camera
will automatically switch to black-and-white mode and the IR LEDs will illuminate.
6. Infrared (IR) LEDs
These lights are nearly invisible to the human eye. Turning on in low light conditions,
the IR LEDs illuminate the image to allow the camera to record a better image.


