background image

16 


The  highest  speed  when  transporting  a  load  is  20km/h,  or  what  the  vehicle  manufacturer 
recommends (the lower speed must be observed). 


Apply the ATV parking brake before working with crane. 


Make sure that the support legs are on hard, level ground and locked in, before operating with 
crane. 


When installing fasteners to load for lifting, take into account the centre of the gravity of load. 
Stop lifting at a height of half a meter and check the balance of the load.  


When lifting, make sure that the load cannot slip on the lifting ropes. 


Do not start lifting unless you are sure of the strength of the connection. 


Do not exceed the maximum capacity of the crane. 


When installing cargo box with crane on a trailer:  

1.


Stop the trailer as close to the side of the cargo box as possible 

2.


Apply the ATV parking brake. 

3.


Set drawbar length to length L1. 

4.


Fix the crane support legs to a hard and level surface. 

5.


Set  the  crane  boom  to  the  highest  position  and  remove  the  pin  that  restricts  lateral 
movement. 

6.


Attach the 4-prong lifting strap to the lifting points on the cargo box. 

7.


Start lifting, if necessary, guide the movement of the cargo box by hand. 

NB! It is forbidden to lift the cargo box with a load in it! 

8.


Fix the cargo box to the rear carrier with pins. 


When using cargo box, make sure that the box clamp is locked before loading the load. 


To tilt the load from the cargo box, apply the ATV parking brake, open the box clamp and lift 
the box. 


When tilting the cargo box with a crane, use the highest crane boom position and the shortest 
boom length.


Prefer to use the lifting adapter in front of the box and use the lifting point inside 

the box only when necessary.


12.


MAINTENANCE 


Always  wash the trailer after  use.  To  remove most  of  the  dirt,  use  running  water.  Usual  car 
shampoo can be used for washing the trailer.


Only change trailer tire on flat and hard surface, by placing jack stand under the vertical axle 
beam corner. 


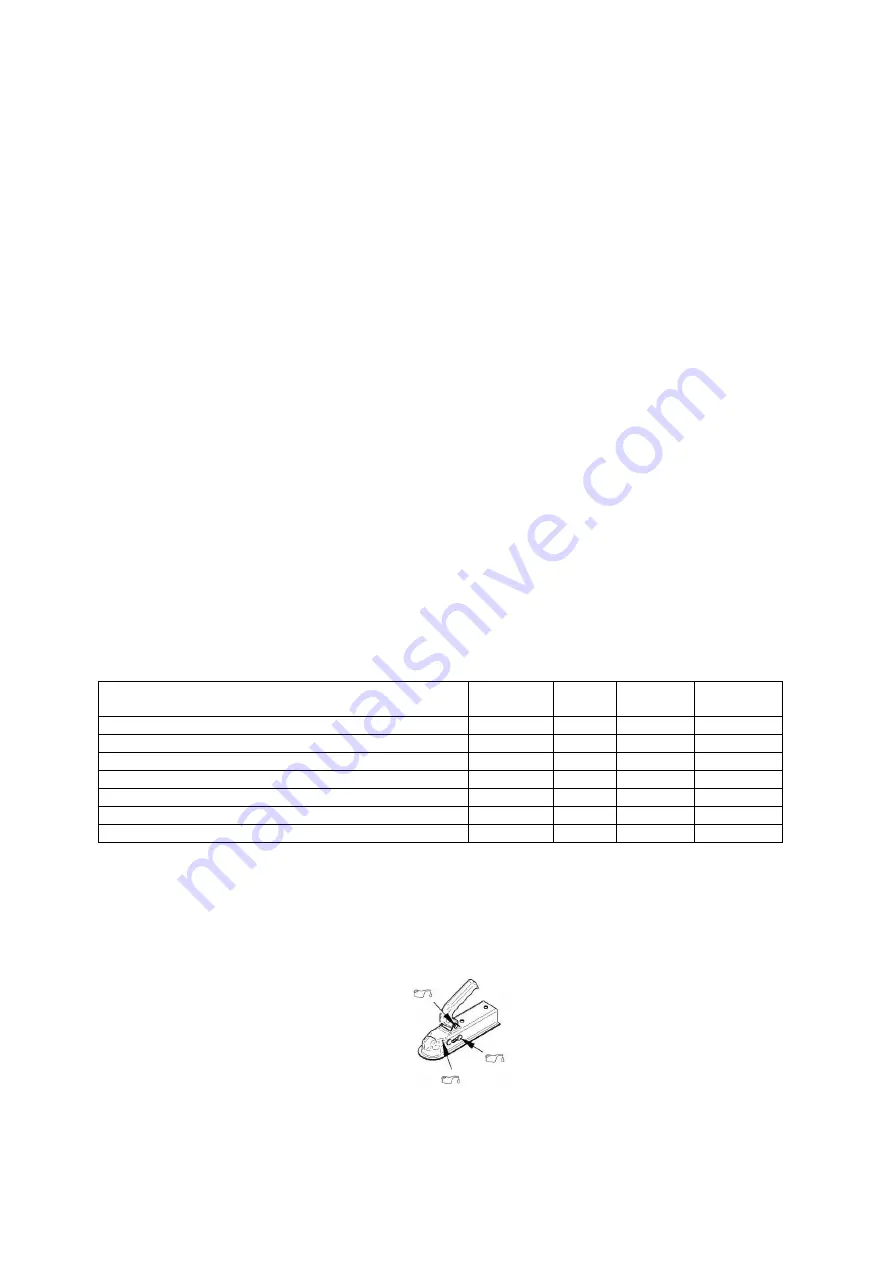
If  the  tow  coupling  moves  difficultly,  add  oil  to  places  showed  on  the  diagram  or  contact 
manufacturer or licenced reseller.


Maintenance activity: 

Before and 

after work 

Weekly 

Monthly 

Seasonally 

Clean the trailer  

● 

● 

● 

● 

Tire pressure, wheel bolts, tow coupling connection check 

● 

● 

● 

● 

Visual inspection of parts fastening 

● 

● 

● 

● 

Checking the condition of all connecting parts 


● 

● 

● 

Inspection of safety labels 


● 

● 

● 

Lubricate the tow coupling and swing arms 


● 

● 

Checking the wear rate of metal parts 


● 

● 

Summary of Contents for 86.1000

Page 1: ...ATV HAAGIS ATV TRAILER IB 1200 Mudel Model 86 1000 TÄHELEPANU LOE JA JÄLGI KÕIKI OHUTUS JA KASUTUSJUHISEID ATTENTION READ AND FOLLOW ALL SAFETY AND OPERATING INSTRUCTIONS ...

Page 2: ......

Page 3: ...USJUHEND 9 6 HOOLDUS 10 13 HAAGISE KOOSTAMISE JUHEND 17 14 VEOKASTI KOOSTAMISE JUHEND 24 15 KRAANA KOOSTAMISE JUHEND 34 ENGLISH 11 7 INTRODUCTION 11 8 SAFETY INSTRUCTIONS 12 9 SAFETY LABELS 13 10 PRODUCT DESCRIPTION 14 11 USER GUIDE 15 12 MAINTENANCE 16 13 TRAILER ASSEMBLING GUIDE 17 14 CARGO BOX ASSEMBLING GUIDE 24 15 CRANE ASSEMBLING GUIDE 34 ...

Page 4: ...his product is in conformity with the requirements of Directive 2006 42 EC applicable to the safety and functionality of machinery regarding the replaceable equipment and it is in compliance with the standard EN12100 Safety of machinery General principles for design Risk assessment and risk reduction In witness whereof CE marking is attached to the product Place and date of issue of the declaratio...

Page 5: ...t Tootja ei vastuta ega hüvita kulusid kahjustuste eest mis on tekkinud toote mistahes valesti kasutamisest MÄRKUS Kõik juhendis toodud fotod ja illustratsioonid ei pruugi kujutada tingimata tegelikke mudeleid või tarvikuid vaid on antud viidetena ning põhinevad avaldamise ajal olemasoleval uusimal tooteinformatsioonil Seda sümbolit kasutatakse kogu juhendis ja hoiatussiltidel võimaliku raske viga...

Page 6: ...ja esitatud juhiseid Veenduge et kõik kõrvalseisjad on haagisega töötamise ajal ohutus kauguses Kasutage sõidukiga töötamisel alati nõuetekohast kaitsevarustust kiiver jms Veenduge et kõik kõrvalseisjad on töötamise ajal ohutus kauguses Puhastage tööpiirkond võimalikest ohtlikest elementidest Jälgige et kõik ohutuskleebised oleksid heas seisukorras vajadusel vahetage kahjustatud kleebised uute vas...

Page 7: ...lubatud kandevõime 1200 kg Keelatud on haagisel vedada inimesi Keelatud on liigelda üle 15 kallakutel Kasti langetamisel jälgige et jäsemed ei jääks kasti ja raami vahele Koorma maha kallutamisel jälgige ümbrust ja veendu ohutuses Pärast koorma maha kallutamist võib kasti ja maapinna vahele tekkida takistus mis põhjustab iseeneslikku kasti vajumist Ebaühtlane koorma paigutus võib põhjustada koorma...

Page 8: ...evate kaupade ja materjalide vedamiseks Veokasti esi ja tagaluuk on eemaldatavad ning lisana on võimalik veokastile lisada kõrgendused 86 2500 mis võimaldavad vedada ka ülegabariidilisi koormaid Veokasti kallutamine on võimalik komplekteerides haagise koos kraanaga 23 3000 või kasti kallutus mehhanismiga 23 4000 Haagise kraana 23 3000 mis on varustatud elektrilise vintsiga on mõeldud veokasti kall...

Page 9: ...jadusel pikendage haagist muutes tiislitoru pikkust raamitoru suhtes Reguleerimiseks keerake lahti raami toru küljes olevad lukustusmutrid locking nut ja pingutus poldid tightening bolt ning eemaldage tapp pin Seejärel valige sobiv tiisli pikkus vastavalt veetavale koormale fikseerige pikkus tapiga pin ja pingutage pingutus poldid tightening bolt ning luksutus mutrid locking nut Tiisli toru on või...

Page 10: ...erihm veokasti küljes olevate tõsteaasade külge 6 Alustage tõstmist vajadusel suunake käega veokasti liikumist NB Keelatud on tõsta kasti milles on koorem 7 Fikseerige veokast tagumise kanduri külge tappide abil Veokasti kasutamisel veendu et kasti klambrid oleks enne koorma laadimist lukustatud Veokastist koorma kallutamiseks avage kasti klambrid ning tõstke kasti Veokasti kallutamisel kraanaga k...

Page 11: ... expense incurred NOTE Photos and drawings in this manual may not necessarily depict the actual models of trailer or their accessories They are merely given as a frame of reference and are based on the latest available information at the time of publication This symbol is used throughout the manual and on warning signs in order to warn users of the potential for serious injury Before using the veh...

Page 12: ...the manufacturer MANDATORY ACTIONS Follow all the instructions of the ATV manufacturer Always use proper protective equipment helmet etc when using the vehicle Make sure that bystanders are moved to a safe distance when operating the trailer Make sure that all of the safety stickers are in good condition Replace damaged stickers as required Reduce the speed of the ATV when working on a hillside or...

Page 13: ...0 kg Never carry any passenger on the trailer It is forbidden to drive slopes over 15 When lowering the box ensure that the limbs do not fall between the box and the frame Trace the surroundings when tilting the load and make sure it is safe After tilting the load there may be an obstacle between the cargo box and ground which may cause cargo box spontaneous lowering Uneven load distribution may c...

Page 14: ...terials The front and rear panels of the box are removable and in addition it is possible to add side extensions 86 2500 to the cargo box which allows to transport oversized loads Cargo box tilting is possible by assembling the trailer with crane 23 3000 or a box tilting mechanism 23 4000 The trailer crane 23 3000 is equipped with an electric winch and is designed to lift logs and other loads and ...

Page 15: ... bolts on the frame tube and remove the pin Then select the appropriate drawbar length according to the load being transported Secure the length with a pin and tighten the tightening bolts and the locking nuts The drawbar tube can be set to five different lengths 1 Length L1 is intended for carrying loads up to 1900 mm in length 2 Length L2 is intended for loads between 1900 mm and 2300 mm 3 Lengt...

Page 16: ... necessary guide the movement of the cargo box by hand NB It is forbidden to lift the cargo box with a load in it 8 Fix the cargo box to the rear carrier with pins When using cargo box make sure that the box clamp is locked before loading the load To tilt the load from the cargo box apply the ATV parking brake open the box clamp and lift the box When tilting the cargo box with a crane use the high...

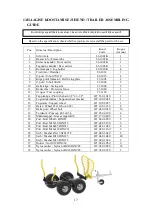
Page 17: ...in with chain 1 2 x 3 1 2 OT 53 01 010 1 14 Tugiratta kinnitus Support wheel bracket OT 10 02 058 1 15 Tugiratas Support wheel OT 10 02 057 1 16 Ratas Wheel 22x11x8 A 032 OT 10 03 120 4 17 Ratta polt Wheel bolt OT 02 09 010 16 18 Torukork Pipe cap 48 3x2 3 6 OT 25 00 100 4 19 Määrdenippel Grease nipple M6 OT 17 00 005 2 20 Polt Bolt M6x16 DIN933 OT 02 02 050 2 21 Polt Bolt M12x30 DIN933 OT 02 02 3...

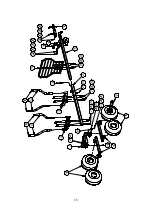
Page 18: ...18 1 3 1 2 22 25 25 28 22 25 25 28 1 1 9 25 28 6 7 25 2 7 25 28 1 1 6 1 6 8 23 26 29 1 0 20 24 1 5 1 4 21 27 1 9 5 28 4 3 1 7 5 1 8 1 8 21 27 ...

Page 19: ...1 Install swing arms Pos 10 to axle beam Pos 1 Make sure that the grease nipple Pos 19 of the swing arm is facing downwards For fastening use M16x130 bolt Pos 23 Ø16 mm washer Pos 26 and M16 nyloc nut Pos 29 Before tightening the swing arm mounting bolt fix it position with bolt fixing plate Pos 8 by attaching it to the axle with M6x16 bolt Pos 20 and Ø6 mm washer Pos 24 1 1 0 8 23 26 29 20 24 Sam...

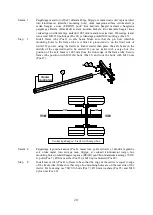
Page 20: ...e middle of the expected load to be carried If you use trailer with a cargo box the position of the axle beam is 1085 mm from the front edge of the frame tube Secure frame tube position with M12x30 bolts Pos 21 and lock the bolts with M12 nuts Pos 27 D raw bar m ountinghole 2 21 27 4x 1 085 3 65 F R O N T R E A R Samm 4 Paigaldage tagumine kandur Pos 4 raami toru peale selliselt et kanduri tagumin...

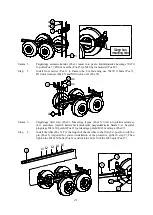
Page 21: ...28 4x 4x 2x Samm 6 Paigaldage tiisli toru Pos 6 Fikseerige tapiga Pos 13 tiisli toru pikkus esimesse L1 asendisse vajalik kaitsevõre korrektseks paigaldamiseks Samm 9 s Seejärel pingutage M12x30 poldid Pos 21 ja lukustage poldid M12 mutritega Pos 27 Step 6 Install drawbar Pos 6 Fix the length of the drawbar to the first L1 position with the pin Pos 13 required for correct installation of the prote...

Page 22: ...10x85 bolts Pos 22 Ø10 mm washers Pos 25 and M10 nyloc nuts Pos 28 1 5 1 4 22 25 25 28 Samm 9 Paigaldage kaitsevõre Pos 11 tiisli toru Pos 6 peale Positsioneerige kaitsevõre selliselt et selle tagumine serv oleks vastu raami toru Pos 2 NB Tiisli toru peab eelnevalt olema fikseeritud asendisse L1 vt samm 6 Kaitsevõre kinnitamiseks kasutage 60x60 U polte Pos 9 Ø10 mm seibe Pos 25 ja M10 nyloc mutrei...

Page 23: ...23 Samm 10 Paigaldage koormapostid Pos 5 ja torukorgid Pos 18 Step 10 Install log bolsters Pos 5 and pipe caps Pos 18 5 5 5 5 1 8 1 8 1 8 1 8 ...

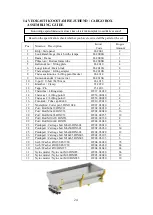
Page 24: ...24 OT 07 01 020 2 18 Polt Bolt M6x12 DIN933 OT 02 02 030 4 19 Polt Bolt M6x14 DIN933 OT 02 02 040 16 20 Polt Bolt M8x65 DIN933 OT 02 02 255 12 21 Polt Bolt M10x70 DIN933 OT 02 02 350 4 22 Polt Bolt M10x80 DIN931 OT 02 01 048 2 23 Puidupolt Carriage bolt M6x16 DIN603 OT 02 05 010 8 24 Puidupolt Carriage bolt M6x50 DIN603 OT 02 05 030 30 25 Puidupolt Carriage bolt M6x60 DIN603 OT 02 05 028 12 26 Pui...

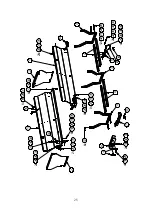
Page 25: ... 5 21 3 0 3 0 3 3 20 29 29 3 2 1 9 28 28 3 1 1 2x 4x 8x 28x 8 3 1 28 25 8x 3 1 28 23 8x 26 3 0 3 3 27 3 0 3 3 6x 1 8 28 1 5 1 9 28 3 1 8x 4x 1 7 6x 1 1 9 1 0 3 0 3 3 2x 6 1 2 1 6 3 4 22 3 0 3 0 3 3 2x 25 28 3 1 1 4 25 28 3 1 2x 2x ...

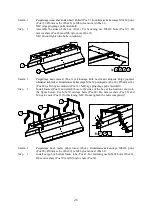
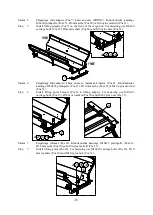
Page 26: ...htadest Kinnitamiseks kasutage M6x50 puidupolte Pos 24 Ø6 mm seibe Pos 28 ja M6 nyloc mutreid Pos 31 NB Äge pingutage polte täielikult Step 2 Install frames Pos 3 and attach these to the sides of the box at the locations shown in the figure below Use M6x50 carriage bolts Pos 24 Ø6 mm washers Pos 28 and M6 nyloc nuts Pos 31 for fastening NB Do not tighten the bolts completely 3 3 3 1 8x 24 28 3 1 S...

Page 27: ...suta M6x16 puidupolte Pos 23 M6x60 puidupolte Pos 25 Ø6 mm seibe Pos 28 ja M6 nyloc mutreid Pos 31 Step 4 Install hatch locks Pos 6 For fastening use M6x16 carriage bolts Pos 23 M6x60 carriage bolts Pos 25 Ø6 mm washers Pos 28 and M6 nyloc nuts Pos 31 6 6 31 28 25 28 31 8x 6 23 8x 6 ...

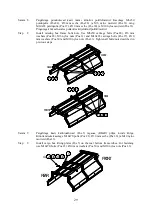
Page 28: ...ge esimese tõsteaasa kinnitus Pos 8 Kinnitamiseks kasutage M10x65 puidupolte Pos 27 Ø10 mm seibe Pos 30 ja M10 nyloc mutreid Pos 33 Step 6 Install lifting point bracket Pos 8 to lifting adapter For fastening use M10x65 carriage bolts Pos 27 Ø10 mm washers Pos 30 and M10 nyloc nuts Pos 33 8 33 30 27 2x 8 Samm 7 Paigaldage tõsteaas Pos 14 Kinnitamiseks kasutage M10x25 puidupolte Pos 26 Ø10 mm seibe ...

Page 29: ...loc nuts Pos 31 and M10x65 carriage bolts Pos 27 Ø10 mm washers Pos 30 and M10 nyloc nuts Pos 33 Tighten all bolts nuts described in previous steps 24 28 3 1 3 3 3 0 27 R E A R F R O N T 33 30 27 24 28 31 F R O N T R E A R Samm 9 Paigaldage kasti kallutuskõrvad Pos 5 tagaosa REAR põhja torude külge Kinnitamiseks kasutage M10x70 polte Pos 21 Ø10 mm seibe Pos 30 ja M10 nyloc mutreid Pos 33 Step 9 In...

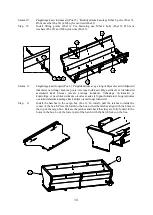
Page 30: ...uuk kasti külge selliselt et riivlukustid asetseksid kasti ülaosas olevate avadega kohakuti Vabastage riivlukustid ja kontrollige et need oleksid kastis olevates avades ja lõpuni lukustatud Luugi alumise osa lukustamiseks kasutage kasti küljes olevad luugi lukusteid Step 11 Install the hatches to the cargo box Pos 2 To install pull the latches towards the center of the hatch Place the hatch to the...

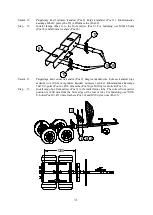
Page 31: ...galdage kasti esimene kandur Pos 9 haagise raamitorule Esimese kanduri õige asukoht on 1200 mm tagumise kanduri esimesest servast Kinnitamiseks kasutage 70x70 U polte Pos 10 Ø10 mm seibe Pos 30 ja M10 nyloc mutreid Pos 33 Step 13 Install cargo box front carrier Pos 9 to the trailer frame tube The correct front carrier position is 1200 mm from the front edge of the rear carrier For fastening use 70...

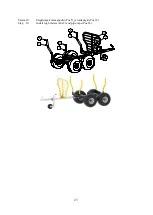
Page 32: ... box 22 30 30 33 Samm 15 Paigaldage tõsterihm Pos 13 tõsteaasade Pos 15 külge ja tõstke kast kasutades kraanat 23 3000 või muud tõstevahendit haagisele Kasti kinnitamiseks haagise tagumise kanduri külge kasutage tappe Pos 12 ja nõelsplinte Pos 17 Step 15 Attach the lifting strap Pos 13 to the lifting points Pos 15 and lift the box onto the trailer using a crane 23 3000 or other lifting device Use ...

Page 33: ...33 1 2 1 2 1 7 ...

Page 34: ... Rulliku tapp Pulley pin 34 500K 1 17 Tugijala kinnitus Support leg bracket OT 10 02 055 2 18 Tugijalg Support leg OT 10 02 050 2 19 Nõelsplint Cotter pin 3 DIN 11024 OT 07 01 020 3 20 Polt Bolt M8x12 DIN933 OT 02 02 168 4 21 Polt Bolt M8x25 DIN933 OT 02 02 190 4 22 Polt Bolt M10x40 DIN933 OT 02 02 330 2 23 Polt Bolt M10x50 DIN933 OT 02 02 340 4 24 Polt Bolt M12x50 DIN933 OT 02 02 430 2 25 Polt Bo...

Page 35: ...35 26 29 29 32 4 3 6 1 9 1 9 1 2 5 24 29 29 32 1 3 25 30 30 32 1 5 20 27 20 27 1 3 1 6 1 9 24 29 1 1 1 0 22 28 28 31 1 1 8 1 8 1 7 1 7 23 28 28 31 8 9 7 28 31 1 4 29 32 2 21 27 ...

Page 36: ...lastikust rõngas Pos 10 Lisage noole hoidja külge piiraja puks Pos 11 ja kinnitage kraana masti külge kasutades M12x50 polti Pos 24 Ø12 mm seibe Pos 29 ja M12 nyloc mutrit Pos 32 Pingutage polt selliselt et noole hoidjat saaks vabalt liigutada Fikseerige noole hoidja keskmisesse asendisse tapiga Pos 6 NB Määrige Grease joonisel näidatud noole hoidja ja plastik rõnga pinnad Step 2 Install the boom ...

Page 37: ... nool liiguks vabalt Step 3 Install crane boom Pos 3 For fastening use M12x90 bolts Pos 25 Ø12 mm washers Pos 30 and M12 nyloc nuts Pos 32 Tighten the bolts so that the angle of the crane boom can be easily changed the crane boom moves freely 25 3 0 3 0 3 2 3 Samm 4 Paigaldage kraana noole pikendus Pos 4 ja fikseerige asend noole tapiga Pos 12 Step 4 Install crane boom extension Pos 4 and fix the ...

Page 38: ...loc mutrit Pos 32 Pingutage polt selliselt et rullik saaks vabalt pöörelda Step 6 Install pulley Pos 13 For fastening use M12x50 bolt Pos 24 Ø12 mm washers Pos 29 and M12 nyloc nut Pos 32 Tighten the bolt so that the pulley can rotate freely 24 29 29 3 2 1 3 Samm 7 Paigaldage rulliku hoidik vintsi alumine kate Pos 14 koos vintsiga lisavarustus ning rullik Pos 13 Hoidiku kinnitamiseks kasutage M8x2...

Page 39: ...dega Pos 8 Tugijala klambrite kinnitamiseks tugijala torude külge kasutage M10x50 polte Pos 23 Ø10 mm seibe Pos 28 ja M10 nyloc mutreid Pos 31 Fikseerige tugijala toru kraana masti külge jala fiksaatoriga Pos 9 Step 9 Install support legs Pos 18 together with support leg bracket Pos 17 and leg tube Pos 8 Use M10x50 bolts Pos 23 Ø10 mm washers Pos 28 and M10 nyloc nuts to fasten the support leg bra...

Page 40: ...40 ...

Page 41: ...41 ...

Page 42: ...42 ...

Page 43: ...43 ...

Page 44: ...IRON BALTIC OÜ Põldmäe tee 1 Vatsla 76915 Estonia 372 6 533 711 info ironbaltic com WWW IRONBALTIC COM ...

Reviews: