background image

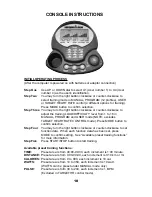
CONSOLE INSTRUCTIONS

11

TRAINING MODE INSTRUCTION

(To start your training)

As soon as you press START/STOP button without any presets (functions and
programs), the computer starts working under Manual mode.

Training without preset Time: 

If you do not preset TIME, each column of the workout profile bar graph
represents 0.1 km or ml.

Training with preset Time:

If you have preset TIME, each column of the workout profile bar graph 
represents the total time divided by 16.

Tension difficulty adjustment:

You may adjust the tension load from 1 to 16 during training under 
Manual mode if you did not preset Watt function.  If you have preset 
WATT, then tension load will be auto-adjusted depending on the current 
speed and watt values you are generating during your workout.

There will be four different symbols used on the console to help your training:

S

You need to speed up the training speed.

T

You need to slow down the training speed.

---

This is to remind you that the current WATT is out of spec and you 
need to speed up or slow down training speed accordingly.

***

The WATT is over spec. If you keep training at this level for over 1 
minute, the computer ALARM with 6 beeps will sound for 30 
seconds, and the computer system STOPS automatically.  At
this moment, LOAD is down to 1 and preset WATT data is zero. 
During the ALARM period, you can stop ALARM by pressing any 
function buttons.

Training with 12 profiles:  

You can select from P1  to  P12 profiles for training.  You can also
adjust training levels any time during training.

Training with USER:

You can preset your personal training profiles under this mode. During 
training, you can also adjust training levels any time.

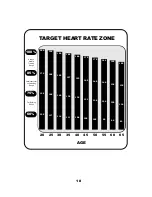
Training in TARGET H.R. control:

The tension difficulty will be auto-adjusted according to the current heart 
rate figure.  If your heart rate figure is under the target pulse, the tension
difficulty will be up-adjusted one level per 30 seconds, up to the 

Summary of Contents for M3EL

Page 1: ...O W N E R S M A N U A L Official product of the Ironman Triathlon M3EL IRONMAN M3 ELLIPTICAL TRAINER 315 00034 07 05 Rev B ...

Page 2: ...s product The Ironman M3 Elliptical Trainer is a tremendously effec tive tool for achieving your personal fitness goals Named after the Ironman Triathlon you will be able to rely on the quality craftsmanship and durability of the Ironman M3 Elliptical Trainer for years to come This owner s manual contains all the information you need to operate and enjoy your Ironman M3 Elliptical Trainer Please r...

Page 3: ...STOP Consult your physician before continuing Do not place fingers or any other objects into moving parts of the exercise equipment Keep children and pets away from the M3 Elliptical Trainer A child s curiosity may result in injury Do not allow children to use the M3 Elliptical Trainer The machine is designed and intended for adults not children Never turn pedal crank arms by hand To avoid entangl...

Page 4: ...Y INSTRUCTIONS 2 STEP 1 Connect foot tubes 5 to main frame 1 using Qty 4 35 Hex Head Screw Make sure that the foot tube 5 with transport wheels 33 is assembled to the front of the main frame 1 Transport Wheels ...

Page 5: ...the extension wire in the console tube to the reed switch wire 77 in the main frame Secure the console tube 2 to the main frame using Qty 2 67 Hex Head Screw Qty 2 67 Hex Head Screw Qty 1 64 Plastic Washer Short Qty 1 65 Plastic Washer Long ...

Page 6: ...TIONS STEP 3 Attach left and right handles 3 4 to console tube 2 using Qty 4 22 Washer Qty 2 16 Precise Bearing Qty 2 18 Locknut Attach rear and front shaft caps 60 61 to left and right han dles 3 4 using Qty 4 28 Screw ...

Page 7: ...EMBLY INSTRUCTIONS STEP 4 Connect foot frames 9 to left and right handles 3 4 using Qty 2 15 Hex Head Screw Qty 2 17 Washer Qty 2 18 Locknut Attach left and right frame sid covers 13 14 using Qty 8 19 Screw ...

Page 8: ...6 STEP 5 Attach the left and right foot pedals 11 12 to the foot frames using Qty 6 24 Hex Head Screw Qty 6 25 Washer ASSEMBLY INSTRUCTIONS ...

Page 9: ...o extension wire in the console tube 66 Feed two hand pulse wires from console down into console tube and out handlebar hole Attach console 10 to console tube 2 using Qty 4 69 Screw shipped in rear of console ASSEMBLY INSTRUCTIONS ...

Page 10: ...8 STEP 7 Connect hand pulse wires from handlebar 82 to hand pulse wires from console Attach handlebar 82 to console tube 2 using Qty 2 44 Hex Head Screw Qty 2 23 Washer ASSEMBLY INSTRUCTIONS ...

Page 11: ...9 CONGRATULATIONS You have completed the assembly of your IRONMAN M3 Elliptical Trainer Please read on for more information on using your new elliptical trainer ASSEMBLY INSTRUCTIONS ...

Page 12: ...nd USER mode NOTE excludes TARGET HEART RATE CONTROL mode Press MODE button to confirm selection Step Four You may turn the right button clockwise or counter clockwise to set function data When each function data has been set press MODE to confirm setting See Available preset training functions for more information Step Five Press START STOP button to start training Available preset training funct...

Page 13: ...d to speed up the training speed T You need to slow down the training speed This is to remind you that the current WATT is out of spec and you need to speed up or slow down training speed accordingly The WATT is over spec If you keep training at this level for over 1 minute the computer ALARM with 6 beeps will sound for 30 seconds and the computer system STOPS automatically At this moment LOAD is ...

Page 14: ...lculated by the CPU according to the inputed AGE data Remark 55 MAXH R If you input age as 30 your target heart rate will be 104 This figure is 55 of your maximum heart rate figure which is 190 220 AGE The same formula can be used to have the result for 75 and 90 Target Pulse figure input by yourself You may preset your target pulse figure by turning the dial button clockwise or counter clockwise ...

Page 15: ...inking display FUNCTIONS TIME Count Up The computer starts counting up from 00 00 to 99 59 during training Count Down The computer will count down from the preset Time to 00 00 SPEED Displays current SPEED from 0 0 to maximum 99 9 km or ml DISTANCE Count Up The computer accumulates total workout distance from 0 00 to 99 90 km or ml Count Down The computer will count down from the preset distance t...

Page 16: ...ry status with grade F1 F2 F3 F6 F1 is the best and F6 is the worst You may keep exercising to improve the heart recovery status day by day from F6 up to F1 Press the RECOVERY button again to return the main display NOTE 1 To change KM or ML please remove batteries first Then push the switch to select scale KM or ML and then install batteries to power on the monitor The monitor will reset all data...

Page 17: ...NSTRUCTIONS 15 5 If the monitor display is improper please remove the batteries wait 2 minutes then replace the batteries 6 The monitor can be powered on with 4 C size batteries or by using the AC adaptor input ...

Page 18: ...se this number to find your approximate effective target zone For example the maximum heart rate for an average 40 year old is 180 bpm The target heart rate zone is 60 75 of 180 or 108 135 bpm See Fitness Safety on page 17 Before beginning your workout check your normal resting heart rate Place your fingers lightly against your neck or against your wrist over the main artery After finding your pul...

Page 19: ...uding medica tion emotional state temperature and other conditions can affect the target heart rate zone that is best for you Your physician or health care professional can help you determine the exercise intensity that is appropriate for your age and condition MHR Maximum Heart Rate THR Target Heart Rate 220 age maximum heart rate MHR MHR x 60 60 of your maximum heart rate MHR x 75 75 of your max...

Page 20: ...scular Conditioning Range Fat Burning Range 20 25 30 35 40 45 50 55 60 65 AGE 200 195 190 185 180 175 170 165 160 155 170 166 162 157 153 149 145 140 136 132 150 146 143 139 135 131 128 124 120 116 120 117 114 111 108 105 102 99 96 93 TARGET HEART RATE ZONE ...

Page 21: ... 00399 ADJUSTMENT CHANNEL ALL MACRO BIKES 2 42 302 00409 M6 HEX NUT BLACK 2 43 302 00369 M10 CAP NUT 2 44 302 00411 M8 X15 HEX HEAD SCREW 2 45 319 00146 BELT TENSION BRACKET 1 46 302 00370 M8 LOCKNUT 1 47 302 00410 M8X17MM HEX HEAD SCREW 1 48 311 00049 ALUMINUM IDLER PULLEY 48 W BELT TENSION 1 49 302 00448 M8 X12 5X4L SPACER 49 1 50 302 00406 M8 NYLON NUT 1 51 302 00403 M8 X30MM HEX HEAD SCREW 1 5...

Page 22: ...EXPLODED VIEW 20 ...

Page 23: ...ice You must prepay any shipping charges export taxes custom duties and taxes or any other charges associated with transportation of the parts or Product In addition you are responsible for insuring any parts or Product shipped or returned You assume the risk of loss during shipment You must present Ironman with proof of purchase documents including the date of purchase Any evidence of alteration ...

Page 24: ...4009 DISTRIBUTION DRIVE SUITE 250 GARLAND TEXAS 75041 ironmanfitness com ...

Reviews: