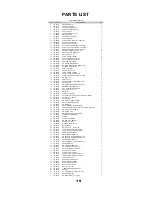


PARTS LIST
19
REF #
PART #
DESCRIPTION
QTY
1
323-00207
MAIN FRAME #1
1
2
323-00169
CONSOLE TUBE#2
1
3
323-00170
LEFT FOAM HANDLE#3
1
4
323-00171
RIGHT FOAM HANDLE #4
1
5
323-00172
FOOT TUBE#5
2
6
311-00046
ALUMINUM PULLEY#6
1
7
311-00047
MAG BRAKE#7
1
8
307-00063
GEARBOX W/WIRE#8
1
9
323-00173
FOOT FRAME#9
2
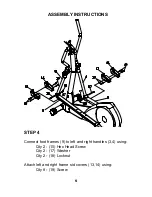
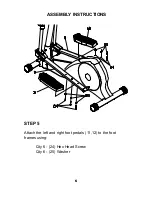
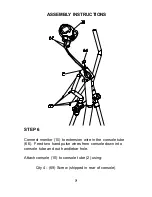
10 307-00008
COMPUTER U/R/EL M3 ( 220R/U/EL)
1
11 306-00323
LEFT FOOT PEDAL#11
1
12 306-00324
RIGHT FOOT PEDAL#12
1
13 306-00325
LEFT FOOT FRAME SIDE COVER#13
2
14 306-00326
RIGHT FOOT FRAME SIDE COVER#14
2
15 302-00438
M10 X70MM HEX HEAD SCREW #15
2
16 331-00047
BEARING PRECISE, 6202Z, #16
14
17 302-00437
M10 X 23 MM WASHER #17
2
18 302-00436
M10 LOCKNUT #18
7
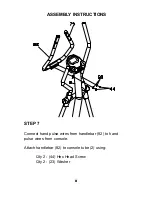
19 302-00416
TP M4 X12MM SCREW
18
20 302-00434
FOOT FRAME SPACER #20
2
21 302-00441
M17 X22MM WASHER #21
2
22 302-00402
M10X19MM WASHER
8
23 302-00449
M8 X19MM WASHER #23
3
24 302-00445
M6 X45 MM HEX HEAD SCREW #24
6
25 302-00444
WASHER, M6X16MM
6
26 306-00327
DISC COVER#26
2
27 319-00035
CRANK PLATE #27
2
28 302-00396
TP M4 X25MM SCREW
8
29 302-00439
M16X21.8 MM WASHER #29
2
30 310-00127
CIRCLE FIXED PLATE#30 #25 220R
2
31 302-00394
M9 HEX NUT
2
32 306-00328
END CAP#32
2
33 306-00605
TRANSPORTATION WHEEL, M3EL
2
34 306-00330
FOOT CAP#34
2
35 302-00450
M8 X80MM HEX HEAD SCREW #35
4
36 331-00009
BEARING 6003Z, BRONZE
2
37 302-00435
M10 CURVED WASHER #37
2
38 302-00440
M17 SHAFT NUT #38
1
39 302-00211
MAGNET
1
40 302-00398
EYEBOLT 6X37MM
2
41 302-00399
ADJUSTMENT CHANNEL ALL MACRO BIKES
2
42 302-00409
M6 HEX NUT (BLACK)
2
43 302-00369
M10 CAP NUT
2
44 302-00411
M8 X15 HEX HEAD SCREW
2
45 319-00146
BELT TENSION BRACKET
1
46 302-00370
M8 LOCKNUT
1
47 302-00410
M8X17MM HEX HEAD SCREW
1
48 311-00049
ALUMINUM IDLER PULLEY#48 W/BELT TENSION
1
49 302-00448
M8 X12.5X4L SPACER #49
1
50 302-00406
M8 NYLON NUT
1
51 302-00403
M8 X30MM HEX HEAD SCREW
1
52 331-00002
608 PRECISE BEARING,
2
53 302-00202
SPRING
1
54 302-00408
EYEBOLT 6X65MM
1
55 302-00409
M6 HEX NUT (BLACK)
2
56 330-00049
PULLEY AXLE#56
1
57 302-00444
WASHER, M6X16MM
4
58 302-00366
M6 LOCKNUT
4
59 304-00015
BELT, POLY V , 220R, 220U
1
60 306-00331
FOAM HANDLE REAR CAP#60
2
61 306-00332
FOAM HANDLE FRONT CAP#61
2
62 313-00091
HAND PULSE WIRE#62
2
63 302-00442
M4X20MM WASHER #63
4
64 302-00447
M8 PLASTIC WASHER (SHORT) #64
1
65 302-00446
M8 PLASTIC WASHER (LONG) #65
1
66 313-00092
EXTENSION WIRE#66
1
67 302-00451
M8X25MM HEX HEAD SCREW #67
3
68 330-00047
GUIDED WHEEL
1
69 302-00443
M5 X10MM SCREW #69
2
70 305-00055
BOTTOM LEFT COVER#70
1
71 305-00056
BOTTOM RIGHT COVER#71
1
72 306-00333
LEFT TOP COVER#72
1
73 306-00334
RIGHT TOP COVER#73
1
74 306-00337
CONNECTION LEFT COVER#74
1
75 306-00335
CONNECTION RIGHT COVER#75
1
76 313-00093
SENSOR#76 #38N
1
77 313-00113
REED SWITCH WIRE #77
1
78 302-00417
TP M5 X50MM SCREW
9
79 313-00095
HAND PULSE GRIP#79
2
80 306-00338
BALL PLUG 1 1/2#80
2
81 306-00339
BALL PLUG 1"#81
2
82 323-00174
T-SHAPED HANDLEBAR#82
1
83 306-00340
GRIP#83 2
#
313-00114
AC ADAPTER 220U/R/E M3U/R/EL
1
#
302-00315
BOLT PACK M3EL
1
#
315-00034
OWNER'S MANUAL, M3EL
1
M3el Parts List Rev B


