background image


IMPORTANT: FOR NORTH AMERICA ONLY 


For damage or defective product, questions, replacement parts or any other 

service support, please contact our customer service department (8:00 AM - 5:00 

PM Pacific Standard Time, Open Daily) by below methods: 

For Best Service Email: 

Service@paradigmhw.com

 * 


Website: 

www.paradigmhw.com


Toll-Free:  

1-844-641-7922** 


Please have the following information ready when requesting for service: 


Your name 


Phone number 


Model number 


Serial number 


Part number 


Proof of Purchase 


For damaged or defective product please contact our customer service 

before returning to the store. 


* Emailing us with the information above will be the best method to 

receive a response during peak business hours. 

 
**Response time may vary.   


Paradigm Health & Wellness, Inc. 

1189 Jellick Ave. 

City of Industry, CA 91748, USA 


SERVICE


Summary of Contents for Power Tower

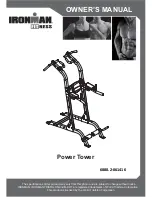
Page 1: ...vary from this photo and are subject to change without notice IRONMAN IRONMAN TRIATHLON and M DOT are registered trademarks of World Triathlon Corporation This product is licensed by the World Triathlon Corporation OWNER S MANUAL Power Tower 6880 2 061416 ...

Page 2: ......

Page 3: ...CEMENT 3 PRODUCT SAFETY 4 ASSEMBLY PREPARATION 5 EXPLODE DRAWING 7 HARDWARE PACK 8 PART LIST 9 STEP 1 10 STEP 2 12 STEP 3 14 STEP 4 16 STEP 5 18 STEP 6 20 ADJUSTMENT 22 WARRANTY 23 PART REQUEST FORM 24 TABLE OF CONTENTS 1 ...

Page 4: ...hw com Toll Free 1 844 641 7922 Please have the following information ready when requesting for service Your name Phone number Model number Serial number Part number Proof of Purchase For damaged or defective product please contact our customer service before returning to the store Emailing us with the information above will be the best method to receive a response during peak business hours Respo...

Page 5: ...AL COMPLETAMENTE NUEVO COMPUESTO DE 100 RELLENO DE ESPUMA DE POLIURETANO NOTIFICACIÓN Este artículo no se ajusta a Mobiliario boletín técnico 117 Cuidado de California deben ejercerse cerca de una llama abierta o con cigaretts ardientes NO DE REG VA25302 CN materiales de este artículo se describen según las leyes Paradigm Health and Wellness Inc 1189 Jellick Ave City of Industry CA 91748 USA SOUS ...

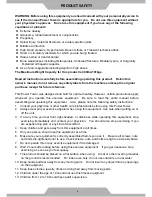
Page 6: ...so please note the following safety instructions 1 Consult your physician or other health care professionals before using this Power Tower 2 Always wear proper exercise apparel when using this equipment Use care when getting on or off the unit 3 If at any time you feel faint light headed or dizziness while operating this equipment stop exercising immediately and contact your physician You should a...

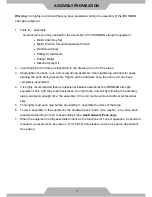
Page 7: ...he entire unit has been completely assembled 4 It is highly recommended that a professional installer assembles the IRONMAN strength equipment But with the proper assistance the right tools and strictly following the assembly steps and given enough time the assembly of the unit can be achieved without professional help 5 Thoroughly read each step before proceeding to assemble the items of that ste...

Page 8: ...6 ...

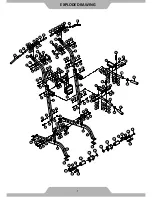
Page 9: ...EXPLODE DRAWING 7 ...

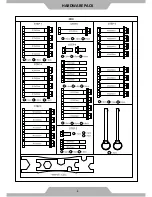
Page 10: ...HARDWARE PACK 8 ...

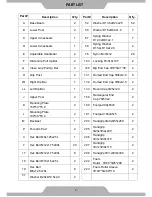
Page 11: ...ip Bar 1 132 Domed End Cap Φ50xt2 0 2 I L Left Dip Bar 1 133 Round Cap Φ25xt2 0 2 J Upper Post 2 158 Rectangular End Cap 75x50x2 2 K Mounting Plate 150 50 T5 0 2 190 Footpad 90x65x5 2 L Mounting Plate 100 40 T6 0 2 191 Footpad 145x65x5 2 M Backrest 1 204 Handgrip Φ49xΦ55x250 2 P Forearm Pad 2 205 Handgrip Φ24xΦ32x200 2 3 Hex Bolt M8x1 25x25L 1 206 Handgrip Φ31xΦ38x310 2 7 Hex Bolt M12x1 75x80L 20 ...

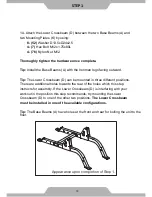
Page 12: ...utward Tip The Lower Crossbeam D can be mounted in three different positions There are additional holes towards the rear of the holes which this step instructs for assembly If the Lower Crossbeam D is interfering with your workout in the position this step recommends try mounting the Lower Crossbeam D to one of the other two positions The Lower Crossbeam must be installed in one of the available c...

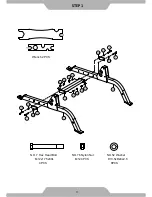
Page 13: ...8 STEP 1 11 NO 7 Hex Head Bolt M12x1 75x80L 4PCS NO 76 Nylon Nut M12 4PCS NO 52 Washer D13 5xD24x2 5 8PCS Wrench 2PCS ...

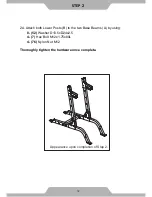
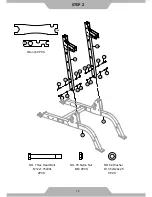
Page 14: ...pon completion of Step 2 2A Attach both Lower Posts B to the two Base Beams A by using 8 52 Washer D13 5xD24x2 5 4 7 Hex Bolt M12x1 75x80L 4 76 Nylon Nut M12 Thoroughly tighten the hardware once complete STEP 2 12 ...

Page 15: ...STEP 2 13 NO 7 Hex Head Bolt M12x1 75x80L 4PCS NO 76 Nylon Nut M12 4PCS NO 52 Washer D13 5xD24x2 5 8PCS Wrench 2PCS ...

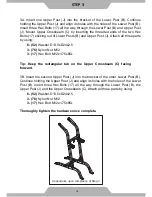
Page 16: ...ach all three parts by using 6 52 Washer D13 5xD24x2 5 3 76 Nylon Nut M12 3 17 Hex Bolt M12x1 75x85L Tip Keep the rectangular tab on the Upper Crossbeam C facing forward 3B Insert the second Upper Post J into the bracket of the other Lower Post B Continue holding the Upper Post J and align its holes with the holes of the Lower Post B Insert three Hex Bolts 17 all the way through the Lower Post B t...

Page 17: ...STEP 3 15 NO 17 Hex Head Bolt M12x1 75x85L 6PCS NO 76 Nylon Nut M12 6PCS NO 52 Washer D13 5xD24x2 5 12PCS Wrench 2PCS ...

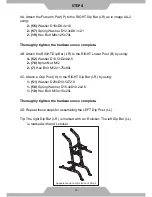
Page 18: ...I R to the RIGHT Lower Post B by using 4 52 Washer D13 5xD24x2 5 2 76 Nylon Nut M12 2 7 Hex Bolt M12x1 75x80L 4C Attach a Grip Post H to the RIGHT Dip Bar I R by using 1 51 Washer D20xD10 5xT2 0 1 58 Spring Washer D15 4xD10 2x2 6 1 18 Hex Bolt M10x1 5x25L Thoroughly tighten the hardware once complete 4D Repeat these steps for assembling the LEFT Dip Post I L Tip The right Dip Bar I R is marked wit...

Page 19: ...ut M12 4PCS NO 52 Washer D13 5xD24x2 5 8PCS NO 57 Spring Washer D12 3xD8 1x2 1 4PCS NO 19 Hex Bolt M8x1 25x70L 4PCS NO 56 Washer D16xD8 4x1 6 4PCS NO 18 Hex Bolt M10x1 5x25L 2PCS NO 58 Spring Washer D15 4xD10 2x2 6 2PCS NO 51 Washer D20xD10 5x2 2PCS Wrench 2PCS ...

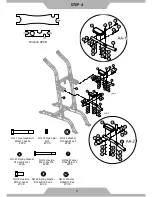
Page 20: ...ning the screw holes and hand tightening the hardware listed below into place Once all hardware has been inserted fasten the hardware tightly 2 19 Hex Bolt M8x1 25x70L 1 3 Hex Bolt M8x1 25x25L 3 57 Spring Washer D12 3xD8 1x2 1 3 56 Washer D16xD8 4x1 6 Thoroughly tighten the hardware once complete STEP 5 18 ...

Page 21: ...STEP 5 NO 56 Washer D16xD8 4x1 6 3PCS NO 19 Hex Bolt M8x1 25x70L 2PCS NO 57 Spring Washer D12 3xD8 1x2 1 3PCS NO 3 Hex Bolt M8x1 25x25L 1PC 19 Wrench 1PC ...

Page 22: ... D13 5xD24x2 5 4 76 Nylon Nut M12 6B Attach the Close Grip Pull Up Bars G and Mounting Plates L to Upper Posts J by using 4 7 Hex Bolt M12x1 75x80L 8 52 Washer D13 5xD24 x2 5 4 76 Nylon Nut M12 Thoroughly tighten the hardware once complete 6C Insert the Adjustable Handlebars E into the lowest set of holes marked and secure them into place by using 2 103 Locking Pin Φ8 10 STEP 6 20 ...

Page 23: ...STEP 6 21 NO 7 Hex Head Bolt M12x1 75x80L 8PCS NO 76 Nylon Nut M12x1 75x12T 8PCS NO 52 Washer D13 5xD24x2 5 16PCS NO 103 Locking Pin Φ8x10⁷ 2 PCS ...

Page 24: ... Handlebars E can be used in any of the 1 inch holes available along the frame to allow for a variety of exercises Warning Always make sure that each Adjustable Handlebar E is securely held in place with a Locking Pin 103 before performing an excise with them Also ensure that the pin is positioned such that the end with the ring is NOT pointing downward as the pin may fall out if oriented differen...

Page 25: ...intenance or by animals 5 Any act of Nature such as fire flooding snow ice hurricane earthquake lightning or other natural disaster environmental condition such as air pollution mold mildew etc or staining from foreign substances such as dirt grease oil etc 6 Normal weathering due to exposure to sunlight weather and atmosphere which can cause colored surfaces to among other things flake rust accum...

Page 26: ...ELEPHONE Day ____________________________________________ Night ____________________________________________ SERIAL _____________________________________________________ MODEL _____________________________________________________ PURCHASE DATE _____________________________________________ PLACE OF PURCHASE _________________________________________ YOUR ORDER WILL BE PROCESSED WITHIN 3 BUSINESS DAY...

Reviews: