background image

Page 11 of 18 


6. 

To pull out the wire rope, disengage the clutch control by loosening two lock nuts and turning the 
clutch knob (19) counterclockwise, to loosen it. Slide the loop of the hook strap over the hook and 
then pull on the hook strap to pull out the wire rope. 

WARNING


Leave at least five full turns of wire rope on the drum. 


7. 

Hook onto the object using a pulling point. 

Do not wrap the wire rope around the object and hook 

onto the wire rope itself. This can damage the object being pulled, and kink or fray the wire rope.


8. 

The attachment point must be centered in the loop of the hook and the hook

’s safety clasp must 

be fully closed. See the illustration below. 


9. 

Do not use a recovery strap while winching. They are designed to stretch and can suddenly whip 
back towards the operator during a winching operation. 

10.  Place a heavy rag or carpet (not included) over the wire rope span, 6 feet from the hook, to help 

absorb the force released if the wire rope breaks. 

11.  Re-engage the clutch by turning the clutch knob (19) clockwise until tight. Do not force it or 

overtighten. 

WARNING


Do not allow anyone to stand near the wire rope or in line with the wire rope behind the winch while 

it is under power. If the wire rope should slip or break, it can suddenly whip back towards the winch, 

causing a hazard for anyone in the area. Stand to the side while winching. 


12.  Operate the controls briefly to ensure they work properly. 
13.  When it is safe to do so, use the power switch on the pendant controller to retract the wire rope, 

and winch the item as desired. Do not power the hook all the way into the fairlead to prevent 
damage. 

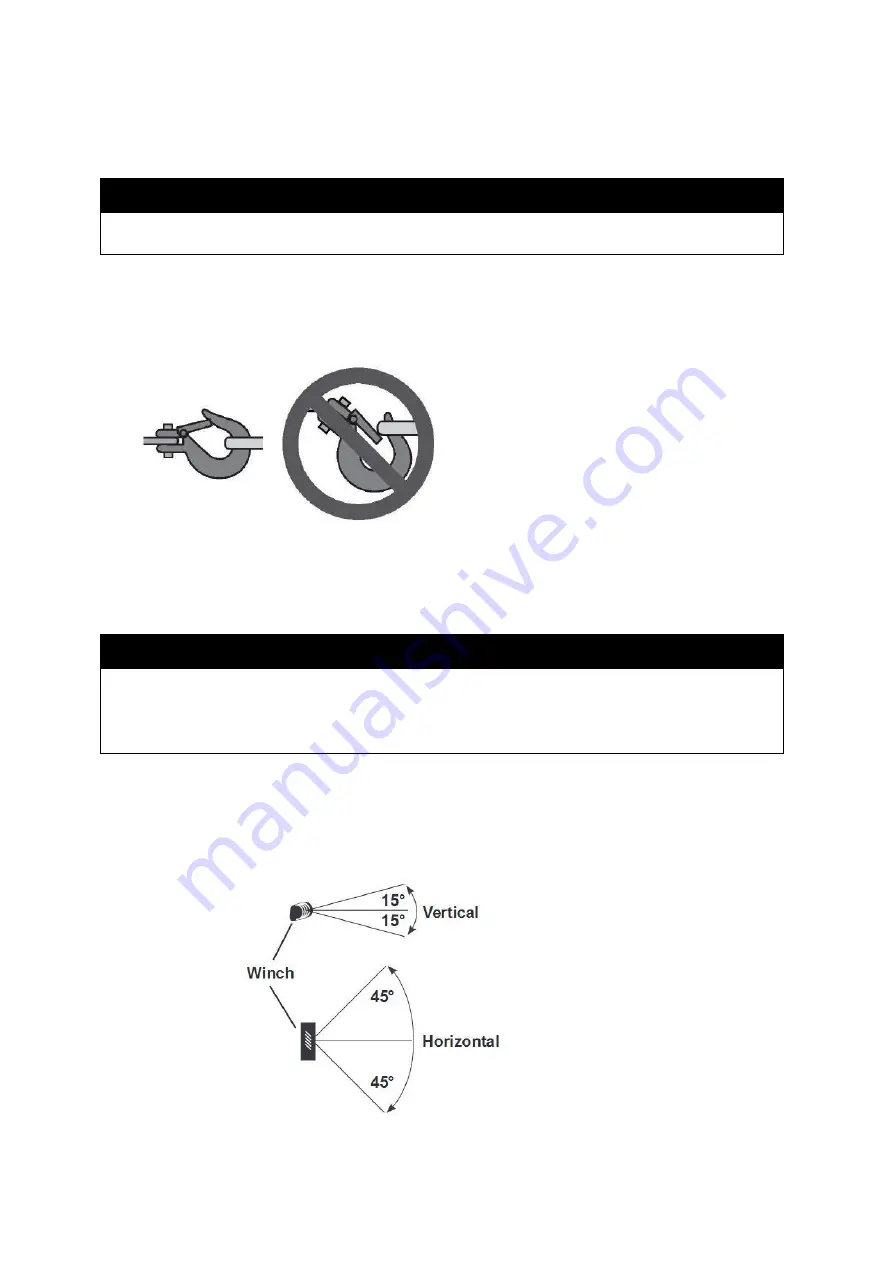
14.  Do not operate the winch at extreme angles. Do not exceed the angles, shown in the illustration 

on the following page, for a roller fairlead.  


Summary of Contents for 54127

Page 1: ...ric Marine Winch Owner s Manual WARNING Read carefully and understand all ASSEMBLY AND OPERATION INSTRUCTIONS before operating Failure to follow the safety rules and other basic safety precautions may...

Page 2: ...at you read the entire manual to become familiar with this product before you begin using it This electric marine winch is designed for certain applications only Northern Tool Equipment is not respons...

Page 3: ...cations 4 Important Safety Information 4 Specific Operation Warnings 6 Assembly Instructions 7 Before Each Use 9 Operating Instructions 10 After Each Use 12 Maintenance 12 Troubleshooting 13 Parts Dia...

Page 4: ...ngs cautions and instructions in this manual cannot cover all possible conditions or situations that could occur Exercise common sense and caution when using this electric winch Always be aware of the...

Page 5: ...be caught in moving parts Air vents on the tool often cover moving parts and should be avoided Wear the proper personal protective equipment when necessary Use ANSI Z87 1 compliant safety goggles not...

Page 6: ...of tension before use Otherwise the wire rope may bind during operation Do not route electrical cables near sharp edges or parts that will move or become hot Ventilate area well before and while worki...

Page 7: ...sideways against the wire rope under tension wire rope might break under this load and recoil back striking the person pushing against it or a bystander If the wire rope begins to get entangled stop t...

Page 8: ...out damage or weakening Steel reinforcement plates may be needed or a certified welder may need to weld on additional bracing depending on the mounting location This winch is not waterproof and is not...

Page 9: ...pe back into the winch under at least 500 lb of tension Attaching the Hand Crank 1 Attach the hand crank 18 only when manually rewinding 2 To attach the hand crank tighten the clutch first by turning...

Page 10: ...perator and assistants must carefully plan usage to prevent accidents Components and Controls Basic Operation 1 Examine the wire rope Do not use the winch if the wire rope is frayed kinked or damaged...

Page 11: ...operator during a winching operation 10 Place a heavy rag or carpet not included over the wire rope span 6 feet from the hook to help absorb the force released if the wire rope breaks 11 Re engage th...

Page 12: ...one minute at or near the rated load Do not maintain power to the winch if the motor stalls Double line rigging will help prevent overloading and should be used whenever practical 18 When finished pul...

Page 13: ...connected properly 2 Loose battery cable connections 3 Vehicle battery needs charging 4 Solenoid malfunctioning 5 Remote is damaged 6 Defective motor 7 Water has entered motor 8 Internal damage or we...

Page 14: ...Page 14 of 18 Parts Diagram...

Page 15: ...2 22 Large Gear Assembly 2 1 23 12 Washer 2 24 Bearing Housing long 2 25 Oil Bearing long 2 26 M5 x10 Screw 1 27 Shaft 1 28 Driver Gear small 2 29 D10 Spring Washer 4 30 M10 Nut 4 31 Adapter Plate 1 3...

Page 16: ...all product components are available for replacement The illustrations provided are a convenient reference to the location and position of parts in the assembly sequence When ordering parts the follow...

Page 17: ...claim contact Us at 1 800 222 5381 identify the product by make and model number and follow the claim instructions that will be provided The product and the purchase receipt must be provided to Us in...

Page 18: ...Page 18 of 18 Distributed by Northern Tool Equipment Company Inc Burnsville Minnesota 55306 www northerntool com Made in China...

Reviews: