background image

Multimedia Playing 

12

Random Playing

Program Playing

Audio selector

Subtitle selector

Setting Disc playback time

Stop the playback

Multi-angle selector

Go to Title

Touch  the  icon 

RDM

  or  Press  RDM  key  in  IR 

handset to play any track randomly.
On Screen Display
Press OSD key in IR handset,  the  screen will display 
Track/Chapter nbr, current playing time etc.

Press PROG key in IR handset to enter programming 
page, press arrow key and number key in IR handset to 
program the tracks to be played.

Repeatedly press AUDIO key in IR handset to change 
the different audio track mode.

Press SUB-T key in IR handset to select language.

Press GOTO key in IR handset to set the specific time 
to  play,  use  arrow  keys  and  number  keys  to  set 
track/chapter on time, and press ENTER key to play.

Press STOP key in IR handset to suspend the playback, 
press it again to stop the playback.

Press  ANGLE  key  in  IR  handset  to  watch  the  DVD 
content from different angle if the disc support.

Press TITLE key in IR handset to show all track's title 
on screen. Then press nbr keys or arrow keys to choose 
your  desired  track  nbr  and  press  ENTER  key  or 
PLAY/PAUSE key to start.

Pause the playing

Playing the next /previous chapter

Fast forward or remind playing

Repeat playing

Touch  the  icon     

to  pause  the  playing,  touch  it 

again to restore playing.

Touch the icon 

   or 

   shortly to skip the next or 

previous chapter. 

Long  touch  the  icon 

    or   

  to  fast  forward  or 

remind the disc.

Touch  the  icon 

RPT

  to  play  one  track  repeatedly, 

Press  RPT  key  in  IR  handset  to  play  the  track 
repeatedly.


Playing DVD/VCD/SVCD/CD Disc

1. Insert the multimedia disc

2. Eject the disc 

T o   e n j o y   t h e   m u s i c   a n d   v i d e o   i n  
DVD/VCD/SVCD/CD disc, only need to insert a disc 
with labeled side up into the disc slot, so the unit starts 
to  play automatically. After leave  this  mode,  you  can 
press MENU button and touch the icon        to switch 
to  Play  the  multimedia  disc  again.  After  leave  this 
mode,  you  can  touch  the icon            to  go  back  main 
menu.

Press EJECT button to eject the disc.


Playing USB storage device and SD Card

To  enjoy  the  music  and  video  in  SD  card  and  USB 
storage device, only  need to insert USB  and SD card 
into  the  slot,  so  the  unit  starts  to  play  automatically. 
After  leave  this  mode,  you  can  press  MENU  button 
and touch the media icon          or          to switch to 
Play USB storage or SD card.

Summary of Contents for XDVD7000T

Page 1: ... CD MP3 MP4 MPEG4 WMA con porta USB slot per schede SD ingresso uscita AV e telecomando In car Multimedia Radio Player DVD CDV CDA CD MP3 MP4 MPEG4 WMA with USB port SD slot AV in out and remote control Manuale d uso User manual ...

Page 2: ...llo di controllo 4 Schema telecomando 5 Schema elettrico 6 Operazioni di base 7 8 Operazioni Radio RDS 9 10 Operazioni Aux 11 Riproduzione multimedia 12 Setup riproduzione multimedia 13 Sostituzione batteria ricevitore IR 14 17 Installazione unità 18 Specifiche 19 ...

Page 3: ... all unità causati da un corto circuito Assicurarsi di collegare i cavi dello speaker al terminale dello speak er Non collegare mai i cavi dello speaker per il canale destro e sinistro l uno all altro o al veicolo Non bloccare fori o pannelli del radiatore per evitare il pericolo di surriscaldamento e conseguente incendio Dopo aver completato l installazione e iniziato a mettere in funzione l unit...

Page 4: ...L VEICOLO PRIMA DI EFFETTUARE OPERAZIONI CHE POSSONO INTERFERIRE CON LA GUIDA NONACCENDERE L UNITA CON TEMPERATUREALL INTERNO DELVEICOLO CHE NON RIEN TRANO NELL INTERVALLO DA 20C A 60C QUESTO PRODOTTO E PROGETTATO PER UNA SINGOLA USCITA VIDEO USARE UNO SPLIT TER PER CONNETTERSI A USCITE VIDEO MULTIPLE Tenere il disco per i bordi conservarlo pulito e non toccare la superficie Non usare CD con resid...

Page 5: ...ione TFT ON OFF 3 Eject 7 Sensore IR 8 AV IN 14 Slot disco 15 Disco TFT 17 Spia slot disco 20 Presa Navi MAP 19 Presa USB 23 Tasto reset 26 Volume 31 Open 42 Tasto menu A UX 15 7 2 42 26 31 15 23 1 19 8 14 17 45 SD IR ME NU VOL VOL OP EN R ST DVD US B S D RDS USB XDVD7000T ...

Page 6: ...OG AMS RPT RDM LOC AF TA PTY 2 Power TFT ON OFF 3 Volume 4 Audio SEL 5 Mute Eject 6 AMS Repeat 10 Play Pause 11 Banda 12 Cerca in alto 13 Modalità 24 OK 26 Cerca in basso 27 28 Sottotitoli 29 Display titolo PBC 30 Setup 31 Open 32 EQ Angolazione 33 Zoom 34 Stop 35 LOC Riproduzione casuale 36 CLK 37 OSD 38 Audio 39 Tasti numerici 7 AF solo per RDS 8 TA solo per RDS 9 PTY solo per RDS 41 Stereo Prog...

Page 7: ... porpora B3 Anteriore destro grigio nero B4 Anteriore destro grigio B5 Anteriore sinistro bianco nero B6 Anteriore sinistro bianco B7 Anteriore sinistro bianco B8 Posteriore sinistro verde Connettore ISO Parte A A1 tel mute marrone A2 freno a mano rosa A3 accessorio rosso A4 controllo ripresa post arancione A5 A6 antenna auto blue A7 messa a terra B nero A8 batteria B fusibile 15A giallo ...

Page 8: ... Funzione mute Premere il tasto del telecomando MUTE brevemente per ridurre l audio e apparirà l icona MUTE sul display LCD Premere nuovamente per ripristinare il livello di volume precedente Calibrare il touch screen Se il touch screen appare deformato è possibile calibrarlo premendo il cursore e accedere all interfaccia di cali brazione Cliccare l icona per accedere all interfaccia di cali brazi...

Page 9: ...a orario o a scelta 2 Beep ON OFF Schermata per selezionare la visualizzazione E possibile regolare ogni elemento pre mendo l icona o sul touch screen Brightness Luminosità 00 50 Color Colore 00 50 Saturation Saturazione 00 50 per accedere al setup di default del sistema Schermata per selezionare l audio E possibile regolare ogni parametro pre mendo l icona o sul touch screen BASS basso 7 7 TREBLE...

Page 10: ...PS del ricevitore IR brevemente per attivare automaticamente la fun zione di memorizzazione 6 Toccare la banda di frequenza sul display per selezionare le stazioni preimpostate 7 Premere a lungo l icona APS per esplorare le stazioni preimpostate per 10 sec 8 Toccare l icona ST o premere il tasto ST del ricevitore IR per impostare la modalità di ricezione stereo o mono 9 Durante la modalità radio p...

Page 11: ...l tasto 7 del telecomando toccare sul display TFT l icona AF Se è visualizzato AF sul display LCD è attiva la modalità RDS altrimenti è attiva la frequenza FM 3 Premere a lungo il tasto 8 del telecomando toccare sul display TFT l icona TA per accedere alle informazioni sulla frequenza delle informazioni sul traffico Durante la riproduzione delle informazioni è possibile passare alla modalità RDS a...

Page 12: ...11 Operazioni Aux Operazioni AV IN 1 Premere l icona per accedere al display del menu principale 2 Toccare l icona AV IN per passare alla modalità AV desiderata ...

Page 13: ... Al termine premere il tasto MENU e toccare l icona per passare a Riproduci nuovamente il disco Al termine toccare l icona per tornare al menu principale Selezione audio Premere ripetutamente il tasto AUDIO del ricevitore IR per cambiare la modalità audio della traccia Selezione sottotitoli Premere il tasto SUB T del ricevitore IR per selezion are la lingua 2 Espellere il disco Premere il tasto EJ...

Page 14: ...legati a una TV widescreen i bordi destro e sinistro saranno tagliati 2 4 3 LB Riproduzione LETTER BOX se collegati a una TV widescreen le bande nere appariranno sulla parte su periore e inferiore dello schermo 3 16 9 Selezionare se è collegato un sistema TV widescreen Password menu di setup Questo lettore può riprodurre dischi registrati in formato PAL o NTSC Selezionare il formato NTSC quando si...

Page 15: ...D SAFE Selezionare se il programma è adatto ai bambini Rating 2 G Selezionare se il programma è adatto a tutte le età Rating 3 PG Selezionare se il programma è vietato ai minori di 13 anni Setup lingua audio Rating 4 PG13 Selezionare se il programma è vietato ai minori di 13 anni Rating 5 PG R Selezionare se PG R era stampato sul DVD Rating 6 R Selezionare se il programma è vietato ai minori di 17...

Page 16: ...PDIF OFF alla mo dalità SPDIF RAW o SPDIF PCM SPDIF OFF La porta analogica o ottica di uscita non ha segnale SPDIF RAW Quando il lettore è collegato all amplificatore di ali mentazione con la porta analogica o ottica selezionare questo elemento se il disco è registrato in Dolby Digital DTS o MPEG Il segnale di uscita analogico o ottico dell unità sarà lo stesso del segnale digitale formato RAW del...

Page 17: ...za SETUP VIDEO Questa pagina di setup include tutti gli elementi per il VIDEO Menu di setup luminosità Menu di setup contrasto Menu di setup tonalità Menu di setup saturazione Setup riproduzione multimedia menu di setup video ...

Page 18: ...a batteria CR2025 Assicurarsi che la polarità della batteria sia corretta 1 Estrarre la custodia della batteria premendo il tappo 1 2 Inserire la batteria a forma di bottone con il segno verso l alto nell apposito alloggiamento 3 Inserire la custodia nel telecomando Sostituzione batteria del ricevitore IR ...

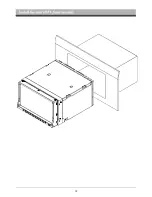
Page 19: ...18 Installare l unità Montaggio frontale DIN ...

Page 20: ... D x W x H Peso Circa 2 75 KG Disco riprodotto DVD MPEG4 DIVX VCD1 0 2 0 MP3 WMA CD CD R RW CD foto Sistema video Auto PAL NTSC Angolo montaggio 0 30 gardi Sistema video 4 3 Letter Box 4 3 Pan scan 16 9 Wide Screen Livello uscita video 1 0VPP 75Ω Risoluzione orizzontale 500 Max livello acustico 2 Vrms 3dB Risposta frequenza 20Hz 20KHz Rapporto segnale rumore 85dB Separazione 80dB Intervallo di sin...

Page 21: ...spetto delle disposizioni di cui al D M 26 03 92 ed in particolare e conforme alle prescrizioni dell Art 1 dello stesso Decreto Ministeriale Questo apparecchio è conforme ai requisiti essenziali ed alle altre disposizioni pertinenti stabilite dalla Direttiva 1999 5 CE R TTE A causa della continua evoluzione dei prodotti le caratteristiche ed il disegno di questo modello possono variare senza preav...

Page 22: ...O DI APPARECCHIATURE ELETTRICHE ED ELETTRONICHE Ai sensi della Direttiva RAEE 2002 96 CE e successiva modifica 2003 108 CE questa apparecchiatura viene contrassegnata con il simbolo del contenitore di rifiuti barrato Per un futuro smaltimento di questo prodotto si prega di tenere presente quanto segue E vietato smaltire questa apparecchiatura come un comune rifiuto urbano è necessario rivolgersi a...

Page 23: ...zia stessa Questo apparecchio non verrà mai considerato difettoso per materiali o fabbricazione qualora dovesse essere adattato cambiato o regolato per conformarsi a norme di sicurezza e o tecniche nazionali o locali in vigore in un Paese diverso da quello per il quale è stato originariamente progettato e fabbricato Questo apparecchio è stato progettato e costruito per un impiego esclusivamente do...

Page 24: ...modificati La presente garanzia non comprende alcun diritto di risarcimento per danni diretti o indiretti di qualsiasi natura verso persone o cose causati da un eventuale inefficienza dell apparecchio Eventuali estensioni promesse o prestazioni assicurate dal rivenditore saranno a carico di quest ultimo IL PRESENTE CERTIFICATO DEBITAMENTE COMPILATO IN OGNI SUA PARTE DEVE SEMPRE ACCOMPAGNARE L APPA...

Page 25: ...ayout Remote Control Layout Wiring Diagram Basic Operation Radio RDS Operation Aux Operation Multimedia playing Multimedia playing setup Replace the battery of IR handset Install the unit Specifications 2 3 4 5 6 7 8 9 10 11 12 13 14 17 18 19 CONTENTS ...

Page 26: ...rcuit Be sure to connect the speaker leads to the speaker terminal Never connect the left and right channel speaker cables each other or to the vehicle body Do not block vents or radiator panels Blocking the will cause heat to build up inside and may result in fire After the completion of the installation and begin to operate the unit including replacing the battery please press the reset button o...

Page 27: ...THE VEHICLE BEFORE CARRYING OUT ANY OPERATION THAT COULD INTERFERE WITH YOUR DRIVING DO NOT TURN ON THE UNIT IF THE TEMPERATURE INSIDE THE VEHICLE IS OUT OF 20C TO 60C THIS PRODUCT IS DESIGNED FOR ONE SINGLE VIDEO OUTPUT PLEASE USE A SPLITTER IF YOU WOULD LIKE TO CONNECT FOR MULTIPLE VIDEO OUTPUT Handle the disc by its edge to keep the disc clean and do not touch the surface Do not use your CDs wi...

Page 28: ...1 Microphone only for B T 2 Power Button TFT ON OFF 3 Eject 7 IR Sensor 8 AV IN 14 Disc slot 15 TFT Display 17 Disc slot lamp 20 Navi MAP 19 USB socket 23 Reset Button 26 Volume 31 Open 42 Menu Button Socket SD IR MENU VOL VOL OPEN RST DVD USB SD RDS USB XDVD7000T ...

Page 29: ... 38 32 4 29 47 41 26 2 Power TFT ON OFF 3 Volume 4 Audio SEL 5 Mute Eject 6 AMS Repeat 10 Play Pause 11 Band 12 Seek up 13 Mode 24 OK 26 Seek Down 27 28 Subtitle 29 Title Display PBC 30 Setup 31 Open 32 EQ Angle 33 Zoom 34 Stop 35 LOC Random 36 CLK 37 OSD 38 Audio 39 Number Keys 7 AF only for RDS 8 TA 41 Stereo Program 47 Playing Time Setting only for RDS 9 PTY only for RDS ST PROG AMS RPT RDM LOC...

Page 30: ...3 Accessory Red A4 Rear camera control Orange A5 A6 Auto antenna Blue A7 Ground B Black A8 Battery B Fuse 15A Yellow Part B B1 R B2 B3 Right Gray Black B4 B5 Left White Black B6 B7 Left Green Black B8 Rear ight Purple Black Rear ight Purple R Front Front Right Gray Front Front Left White Rear Rear Left Green ...

Page 31: ...NOTE When some errors occur in the LCD display you can also press RESET button to resume to normal And it will erase the clock setting and some memorized functions Menu Function Press MENU button to enter as below main menu display screen you can touch the icon of the screen to enter different working mode Touch screen Calibrate If the position of touch occurs warp you can calibrate by pressing th...

Page 32: ...touch screen BASS 7 7 TREBLE 7 7 LOUD ON OFF Click the icon to access the EQ setup POP ROCK JAZZ CLASS CUSTOM Soft Stand Custom Click the icon to access the System Default setup Click the Left Right to access the Balance Setup Click the Front Rear to access the Fader Setup After finishing setting click the icon to exit the menu setup interface IR Sensor Receiver for wireless IR remote control Sett...

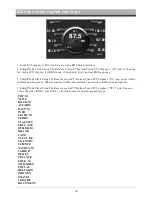
Page 33: ...ss icon APS to scan each preset memory station for 10S 8 Touch the icon ST or Press ST key in IR handset to set stereo or mono receiving mode 9 During radio mode repeat press SEL button to select the desired mode in the following order 1 Touch the radio icon in the main menu display screen to select radio mode the LCD will displays as following 2 Touch the icon BAND repeatedly to select bands in t...

Page 34: ...if showing AF in the LCD display it is RDS mode if no show AF it is normal FM frequency enter traffic information frequency When broadcast traffic information can switch to RDS mode automotive You can select the title of RDS press VOL button to select as below program type POP M NEWS ROCK M AFFAIRS EASY M INFO LIGHT M SPORT CLASSICS EDUCATE OTHER M DRAMA JAZZ CLUTURE COUNTRY SCIENCE NATION M VARIE...

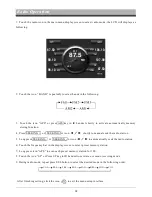
Page 35: ...AUX Operation AV IN Operation 1 Press the icon to enter main menu display screen 2 You can touch icon AV IN to switch to your desired av in mode 11 ...

Page 36: ...ys to choose your desired track nbr and press ENTER key or PLAY PAUSE key to start Pause the playing Playing the next previous chapter Fast forward or remind playing Repeat playing Touch the icon to pause the playing touch it again to restore playing Touch the icon or shortly to skip the next or previous chapter Long touch the icon or to fast forward or remind the disc Touch the icon RPT to play o...

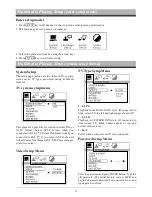
Page 37: ...ded in either PAL or NTSC format Select NTSC format when you connected to NTSC TV Select PAL format when you connected to PAL TV If you select AUTO the unit will auto select the format PAL NTSC according to your disc content TV system setup menu System Setup The setup page include all the items of TV system screen saver TV type password rating default features 3 Select the preferred item by using ...

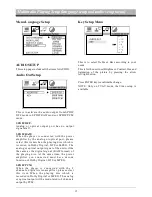
Page 38: ...ect following when children under 13 are forbidden to view Select following when children under 13 are forbidden to view Select this when the PG R was printed on the DVD disc Sele ct this when c hildren under 17 are forbidden to view Sele ct this when c hildren under 17 are forbidden to view Select this when only allows admission to all adults Rating 1 KID SAFE Rating 2 G Rating 3 PG Rating 4 PG13...

Page 39: ...G The analog or optical output signal of the unit will be the same as the digital signal RAW format of the playing disc At the same time the power amplifier you connected must have decode function of Dolby Digital DTS or MPEG When the player is connected with the 2 channels digital stereo amplifier please select this item When the playing disc which is recorded in Dolby Digital or MPEG The analog ...

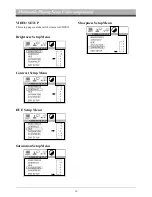
Page 40: ...VIDEO SETUP This setup page includes all the items for VIDEO Brightness Setup Menu Contrast Setup Menu HUE Setup Menu Saturation Setup Menu Sharpness Setup Menu 16 ...

Page 41: ...n functions while operating Replace a new CR2025 battery Make sure the battery polarity before replacement 1 Pull out the battery holder while pressing the stopper 1 2 Pull the button type battery mark upward into the battery holder 3 Insert the battery holder into the remote controller 17 ...

Page 42: ...18 ...

Page 43: ...8 x 100mm D x W x H Weight Approx 2 75KG Disc played DVD MPEG4 DIVX VCD1 0 2 0 MP3 WMA CD CD R RW Picture CD Video System Auto PAL NTSC Mounting Angle 0 30 degree Video System 4 3 Letter Box 4 3 Pan scan 16 9 Wide Screen Video Output Level 1 0VPP 75Ω Horizontal Resolution 500 Max Output Level 2 Vrms 3dB Frequency Response 20Hz 20KHz Signal to Noise ratio 85dB Separation 80dB Tuning Range 87 5 108 ...

Page 44: ...Melchioni Spa Via Friuli 18 a 20135 Milano IT Tel 3902 5794213 Fax 39 02 5794351 ...

Reviews: