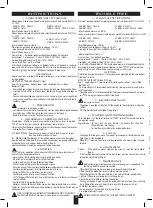
1 -CARACTÉRISTIQUES TECHNIQUES
Niveau de puissance acoustique mesuré selon Annexe B de la norme
- 95 dB(A) : D503 - D554SH
- 96 dB(A) : D514S
- 97 dB(A) : D514SH
- 98 dB(A) : D503K - D554SK - D554S
- 95 dB(A) : D503 - D554SH
- 96 dB(A) : D514S
- 97 dB(A) : D514SH
- 98 dB(A) : D503S - D554SK - D554S
Niveau
Incertitude de mesure : 0,5 dB (A)
Incertitude de mesure : 0,5 dB (A)
Incertitude de mesure : 2%
Measurement uncertainty : 2%
Incertitude de mesure : 1 dB (A)
Incertitude de mesure : 1 dB (A)
de pression acoustique à l’oreille selon Annexe B de la norme
- 84 dB(A) : D503 - D554SH
-
85
dB(A)
: D514S - D554S
- 86 dB(A) : D514SH
- 87 dB(A) : D503K - D554SK
- 84 dB(A) : D503 - D554SH
- 85 dB(A) : D514S - D554S
- 86 dB(A) : D514SH
- 87 dB(A) : D503K - D554SK
Vibrations au guidon à la hauteur de la poignée : 2,5 m/s²
Transmission :
- Par boîtier réducteur double embrayage Par courroie
Avancement :
1 vitesse avant - 2.3 km/h (D500 - D503 - D514 - D554).
Guidon :
Réglable en hauteur (D503 - D514 - D554).
Frein moteur :
Pour plus de sécurité.
Utilisation de la débroussailleuse :
La débroussailleuse est destinée à couper la
broussaille dans les terrains irréguliers.
Elle est livrée avec un andaineur et un carter
frontal d’origine qui permettent d’andainer l’herbe ou la broussaille.
2-MONTAGE
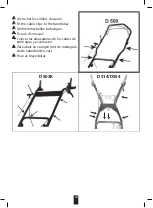
Déplier le guidon et le régler à hauteur désirée, puis serrer les deux boutons à la
base du guidon.
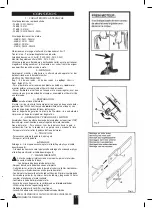
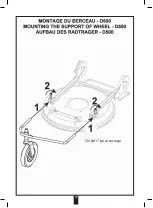
MONTAGE DU TRAIN AVANT :
(voir P13 Fig. a)
Rep. 1 : kit mono-roue - kit deux roues, selon choix.
Rep.2 : chassis. Rep.3 :
Boulon M10x30
- Pour un débroussaillage sur terrain en devers, bosselé, avec beaucoup de friches,
il est conseillé d’utiliser le kit deux roues (bordure d’étang, débroussaillage en
forêt).
- Pour un débroussaillage ou une tonte sur un terrain plus ou moins régulier, ou
une grande maniabilité est demandée, il est conseillé d’utiliser le kit mono-roue
(pelouse, verger).
3 - PRÉPARATION
Se reporter à la notice du moteur.
- Le moteur est livré sans huile, il convient de mettre une huile détergente de bonne
qualité de type 10W30. Remplir jusqu’au niveau maxi de la jauge.
- Remplir le réservoir avec de l’essence sans plomb.
4 - DÉMARRAGE ET ARRÊT DU MOTEUR
Accélérateur :
Mettre le levier de commande d’accélérateur dans la position
“START” (vers le bas), puis varier le régime moteur comme voulu.
Frein moteur :
Pour démarrer, pousser le levier vers le guidon puis donner un coup sec
sur la corde. Pour stopper, relâcher le levier.
5-TRACTION :
- Pour avancer, pousser le levier d’embrayage vers le gui
-
don. Pour arrêter, relâcher le levier.
6 - RÉGLAGES Embrayage :
Si la machine avance, visser la vis de réglage
pour détendre le câble Rep. 4. Si la machine n’avance pas, poignée d’embrayage
actionnée, dévisser la vis pour tendre le câble (Rep. 4).
Hauteur de coupe :
Hauteur de coupe centralisée au guidon.
7 - ENTRETIEN
Toutes les opérations d’entretien sont
lorsque le moteur est
arrêté, le de bougie déconnecté.
- Aprés avoir utilisé la machine, nettoyer la partie du dessous.
- N’hésitez pas à remplacer la lame si elle est abîmée.
- La lame doit toujours être parfaitement équilibrée.
- Utiliser seulement des piéces de rechange d’origine.
- En cas de pannes, faites contrôler votre débroussailleuse par un atelier spécialisé.
- Contrôler périodiquement le serrage des boulons et des vis.
- Huiler les
articulations (huile moteur).
- Contrôler le niveau d’huile avant chaque utilisation.
- La 1
ère
vidange
aprés 5 heures d’utilisation, ensuite toutes les 25 heures
(moteur chaud).
- Contrôler l’état de propreté du moteur.
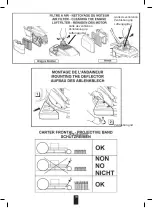
- Nettoyez votre grille de ventilation moteur dès l’apparition d’herbe sur celle-ci.
Toutes les 2 heures de débroussaillage, démonter le grille de ventilation pour un
nettoyage total.
TOUTES LES OPÉRATIONS DE MAINTENANCE ET DE DÉPANNAGE DOIVENT ÊTRE EFFECTUÉES
DANS UN ATELIER SPÉCIALISÉ. (Nous tenons la liste des agences à votre disposition).
1 - TECHNICAL SPECIFICATIONS
Mesured sound power level according to Annex B of the standard a1:2009
Sound pressure livel at the ear according to Annex B of the standard a1:2009
Vibration of the handlebar at the grip : 2,5 m/s²
Transmission :
- Vee belt and gear box.
Forward speed :
1 speed : 2.3 km/h (D500 - D503 - D514 - D554).
Handlebar :
adjustable in height (D503 - D514 - D554).
Use of the Brushwood Mower :
The brushwood mower is intended for
cutting the
brushwood in some irregular grounds.
It delivers with a
and a projective
band of origin which allow making swathes with grass and scrub.
2-FITTING
Unfold the steering bar and set it to the requirred height tighten the two buttons
situated at its base.
MOUTING THE FRONT AXLE :
(see P13 Fig.a)
Rep 1 : single wheel kit - two wheel kit. According choice.
Rep 2 : chassis.
Rep
3
: Bolt M10 x 30.
- The two-wheel kit is recommanded for clearing slaping or bumpy land, with a
lot of vegetation.
- The single wheel kit is recommanded for clearing or mowing land wich is more or
less
where great manœuvrability is required.
3 - BEFORE STARTING UP
See engine manual.
- The engine is supplied without oil. Fill the engine to the
correct level with grade
10W30.
- Fill the petrol tank with lead free petrol.
4 - STARTING AND STOPPING ENGINE
Throttle lever : Set the throttle lever to “START” and set the remote control to
the required speed.
Engine brake : - To start, pull the lever towards the handle bar, then pull
the cord hard or use the key.
- To stop the motor, release the engine brake lever.
5 -CLUTCH
- To engage forward gear, move the support placed against handlebar up and
hold it against the handlebar.
- When this is released, the motor is disengaged and the mower stops moving
forward.
6 -ADJUSTMENT
Clutch : - If the machine moves, tighteen the screw to relax the clutch cable
(Rep. 4).
- If the machine does not move with the clutch lever in action, loosen the screw to
release the clutch cable (Rep. 4).
7 - MAINTENANCE
Before attempting maintenance, make sure the engine is stopped and the
spark plug lead has been disconnected.
- Often check the lawn mower, avoiding grass deposits under the deck.
- Often check the blade. Be sure it is always well balanced.
- Check the lightness of the nuts and bolts on your cultivator
pariodically.
- Lighty oil the various moving parts with engine oil.
- Check the oil level before starting the engine.
- The oil change is made when the engine has completed 5 hours running
time. There after, every 25 hours. Drain oil whilst the engine is hot.
- Check that the motor is clean.
- Lawn mower must be checked by a service station.
- Use original spare parts only.
ALL REPAIRS MUST BE DONE AT THE CUSTOMER - SERVICE - WORKSHOP
Verhoogdgeluidsvermogensniveauv
- 95
- 96
- 97
- 98
- 99
Schalldruckpegel
- 84
- 85
- 86
- 87
- 88
Holmschwingungen
Ubersetzung
Vorwärstganggeschwindigkeit
Sterz
Benutzung
mäßigen
frontalen
das
Die
beiden
MONTAGE
N
o
1
N
o
3
- Zum
bei
- Zum
Geländen,
des
- Der
nehmen,
abnehmen.
Motor
- Den
laüft.
Gasstellteil
Motorbremse
- Zum
Zum
Führungsholm
Kupplung
das
Schnitthöhe
Vertiefungen
- Nach
- Zögern
- Verwenden
- So
Spezialwerkstatt
- Regelmäßig
- Die
- Vor
- Der
stunden.
- Die
INSTRUCTIONS
TROUBLE FREE
10
a1 : 2009
a1 : 2009
selon Annexe B de la norme a1 : 2009
According to Annex B of the standard a1:2009
Summary of Contents for DB501KH
Page 2: ......
Page 9: ...30 2017 29 2017 2 39 2017 78 109 119 9 118 110 110 118 123 123 120 122 28 28 ...
Page 13: ...18 Clé de 17 pour serrage ...
Page 19: ......


