3. Remove the top panel from the replacement chassis.
For more information, see
on page 38.
4. Remove the IB/NVRAM card from the replacement chassis.
For more information see,
on page 27.
5. Remove one of the NVRAM battery assemblies from the replacement chassis.
For more information see,
Removing an NVRAM battery assembly from a 4U node
on page 11.
6. Separate the NVRAM battery from the battery assembly.
a. Release the hook-and-loop fastener securing the battery to the assembly.
b. Disconnect the battery cable from the assembly.
For the rest of the procedure, the separated battery is referred to as the transfer battery.
7. Remove the top panel from the failed node.
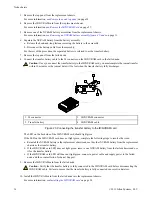
8. Connect the transfer battery cable to the J4 connector on the IB/NVRAM card in the failed node.
Caution: Once you connect the transfer battery to the IB/NVRAM card, you must complete the journal transfer
within 30 minutes or the journal data will be lost when the transfer battery fully discharges.
!
2
1
3
4
3 IB/NVRAM connector
1 J4 connector
4 IB/NVRAM cable
2 Transfer battery
Figure 23. Connecting the transfer battery to the IB/NVRAM card
The LED on the back side of the IB/NVRAM card should light green.
If the LED on the IB/NVRAM card does not light green, complete the following steps to resolve the issue:
a. Reinstall the NVRAM battery in the replacement chassis and use the other NVRAM battery from the replacement
chassis as the transfer battery.
b. If the IB/NVRAM card LED does not light green, remove one NVRAM battery from the failed chassis and use
it for the transfer battery.
c. If the IB/NVRAM card LED still does not light green, connect a power cable and supply power to the failed
node, and then contact Isilon Technical Support.
9. Remove the IB/NVRAM card from the failed node.
Caution: Verify that the transfer battery is fully connected to the IB/NVRAM card before disconnecting the
IB/NVRAM cable. Failure to ensure that the transfer battery is fully connected can result in data loss.
!
10. Install the IB/NVRAM card from the failed node into the replacement chassis.
For more information, see
on page 28.
36
©
2011 Isilon Systems, LLC.
Node chassis


