background image

6

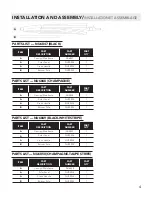
Before beginning assembly of product, make sure all parts are present. Compare parts with package 
contents list. If any part is missing or damaged, do not attempt to assemble the product.

Estimated Assembly Time: 5 minutes.

No tools required for assembly.

Avant de commencer l'assemblage du produit, assurez-vous que toutes les pièces sont incluses en vérifiant 
le contenu du carton par rapport à la liste des pièces. Toutes les pièces et le matériel sont nécessaires. Si 
une pièce est manquante ou endommagée, n'essayez pas d'assembler le produit. 

Durée estimée de l'assemblage: 5 minutes.

Aucun outil n’est nécessaire pour l’assemblage.

SETUP

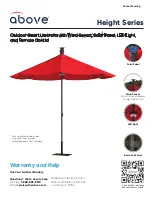
Carefully remove umbrella from box. Insert bottom pole into canopy/mainframe pole. Line up button with hole and 
snap into place. Insert assembled umbrella into weighted base (sold separately).

OPENING & TILTING UMBRELLA:

Turn the umbrella upright and crank handle clockwise to open umbrella to its fully open position. To tilt, continue to 
turn the crank to desired position. DO NOT over crank. Once umbrella is tilted, stop when you feel resistence.

CLOSING UMBRELLA:

Turn crank handle in counter clockwise direction to bring umbrella back to a horizontal position. Continue to turn crank 
handle in counter clockwise direction to close umbrella.

OPERATING SOLAR LED LIGHTS:

Put the umbrella under the sun for 8 hours to fully charge the solar battery. Turn on the lights by using the switch near 
not using the umbrella.

INSTALLATION:

Déballez le parasol avec soin. Placez le parasol debout et insérez-le dans le tube inférieur. Alignez le bouton avec

OUVERTURE ET INCLINAISON DU PARASOL:

Tournez la manivelle dans le sens horaire pour ouvrir complètement le parasol. Pour l’incliner, continuez de tourner la 
manivelle jusqu’à la position souhaitée. NE PAS tourner la manivelle trop rapidement. Dès que le parasol est incliné, 
arrêter de tourner la manivelle si vous sentez une résistance.

INSTALLATION AND ASSEMBLY/

INSTALLATION ET ASSEMBLAGE

ASSEMBLY/

ASSEMBLAGE

Summary of Contents for NU6847

Page 1: ...UPE STRIPE NU6847 NOIR NU6848 CHAMPAGNE NU6849 RAYURE NOIR BLANC NU6850 RAYURES CHAMPAGNE TAUPE MIRAGE II FIESTA 9 FT OCTAGON UMBRELLA WITH LED TUBE LIGHTS PARASOL OCTAGON AVEC TUBES LED MIRAGE II FIE...

Page 2: ...this entire manual before attempting to assemble or install the product Assemble on a soft non abrasive surface Two adults may be required for safe assembly Do not leave the umbrella open during high...

Page 3: ...nded period of time Nettoyez avec un savon doux et de l eau ti de Rincez et s chez l air Lorsqu il n est pas utilis fermer le parasol et le recouvrir d une housse de protection vendue s par ment Laiss...

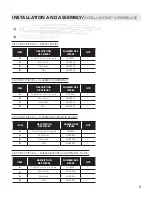
Page 4: ...NU6847 1 A Solar Panel NUP0026 1 A Crank Handle NUP0024 1 B Bottom Pole NUP0025 1 ITEM PART DESCRIPTION PART NUMBER PART QTY A Canopy Mainframe NU6849 1 A Solar Panel NUP0026 1 A Crank Handle NUP0024...

Page 5: ...es et celle de la quincaillerie S il y a des pi ces manquantes ou endommag es le produit proximatif 5 minutes e pour l assemblage PARATION A B Bulbs ampoule x2 NUP0027 NANCE ENTRETIEN ukewarm water ri...

Page 6: ...ndle clockwise to open umbrella to its fully open position To tilt continue to turn the crank to desired position DO NOT over crank Once umbrella is tilted stop when you feel resistence CLOSING UMBREL...

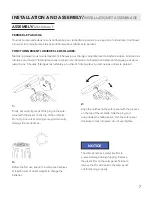
Page 7: ...n wires as doing so may permanently damage the connections 2 Align the notches on the solar panel with the grooves on the top of the umbrella hide the plug and wires insides the hollow space Turn the...

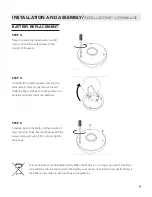
Page 8: ...the batteries or cause batteries to leak Do not mix old and new batteries Do not mix Alkaline Nickel Cadmium or Lithium rechargeable batteries Recycled batteries in accordance with local laws and regu...

Page 9: ...screws removed in step 3 Do not over tighten the screws This product uses a rechargeable battery When the battery can no longer be used it should be removed form the unit and recycled The battery mus...

Page 10: ...ts expenses or damages incurred by the consumer for any other use The user assumes all risk of injury resulting from the use of this product This warranty is expressly in lieu of all other warranties...

Page 11: ...res co ts d penses ou dommages indirects ou accessoires encourus par le consommateur pour toute autre utilisation L utilisateur assume tous les risques de blessures r sultant de l utilisation de ce pr...

Reviews: