background image

5

INSTALLATION AND ASSEMBLY/

INSTALLATION ET ASSEMBLAGE

Before beginning assembly of product, make sure all parts are included by checking the contents of the 
carton against the Parts List. All parts and hardware are required. If any part is missing or damaged, do not
attempt to assemble the product.

Estimated Assembly Time: 3 minutes.

No tools required for assembly.

Avant de commencer l'assemblage du produit, assurez-vous que toutes les pièces sont incluses en vérifiant 
le contenu du carton par rapport à la liste des pièces. Toutes les pièces et le matériel sont nécessaires. Si 
une pièce est manquante ou endommagée, n'essayez pas d'assembler le produit. 

Durée estimée de l'assemblage: 3 minutes.

Aucun outil n’est nécessaire pour l’assemblage.

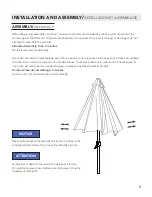
Please pull and loosen the umbrella ribs by hand, so they're not 
entangled, before attempting to open the umbrella by crank.

Veuillez tirer et desserrer les nervures du parapluie à la main, 
afin qu'elles ne soient pas emmêlées, avant d'essayer d'ouvrir le 
parapluie par manivelle.

NOTICE

ATTENTION

ASSEMBLY/

ASSEMBLAGE

Summary of Contents for NU6862

Page 1: ...5 PIEDS X 10 PIEDS Assembly Instructions Instructions de montage V1 032021 Questions problems missing parts Before returning to your retailer call our Consumer Hotline at 1 800 759 0977 Monday Friday...

Page 2: ...s r Ne laissez pas le parapluie ouvert en cas de vent fort Fermez compl tement le parapluie en cas de vent Lorsqu il n est pas utilis gardez le parapluie ferm SAFETY INFORMATION INFORMATIONS DE S CURI...

Page 3: ...nded period of time Nettoyez avec un savon doux et de l eau ti de Rincez et s chez l air Lorsqu il n est pas utilis fermer le parasol et le recouvrir d une housse de protection vendue s par ment Laiss...

Page 4: ...Canopy Mainframe NU6865 1 A Solar Panel NUP0026 1 A Crank Handle NUP0074 1 B Bottom Pole NUP0062 1 ITEM PART DESCRIPTION PART NUMBER PART QTY A Canopy Mainframe NU6863 1 A Solar Panel NUP0026 1 A Cran...

Page 5: ...outes les pi ces sont incluses en v rifiant le contenu du carton par rapport la liste des pi ces Toutes les pi ces et le mat riel sont n cessaires Si une pi ce est manquante ou endommag e n essayez pa...

Page 6: ...ght and crank the handle clockwise to open umbrella to its fully open position DO NOT over crank A B ASSEMBLY ASSEMBLAGE INSTALLATION D ballez le parasol avec soin Placez le parasol debout et ins rez...

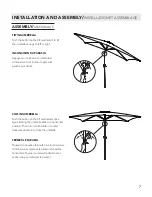
Page 7: ...la back to a horizontal position Then turn crank handle in counter clockwise direction to close the umbrella ASSEMBLY ASSEMBLAGE INCLINAISON DU PARASOL Appuyez sur le bouton du m canisme d inclinaison...

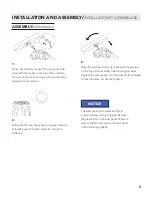
Page 8: ...to lock into place do not over tighten 3 Before the first use ensure the solar panel receives at least 8 hours of direct sunlight to charge the batteries Step 5 Attach the Solar Panel part L on the to...

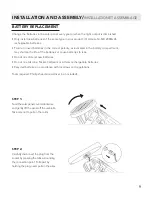
Page 9: ...the batteries or cause batteries to leak Do not mix old and new batteries Do not mix Alkaline Nickel Cadmium or Lithium rechargeable batteries Recycled batteries in accordance with local laws and regu...

Page 10: ...e screws removed in step 3 Do not over tighten the screws STEP 4 Carefully lift the bottom panel ensuring the wires remain intact Gently remove the old batteries Paying attention to the positive and n...

Page 11: ...ts expenses or damages incurred by the consumer for any other use The user assumes all risk of injury resulting from the use of this product This warranty is expressly in lieu of all other warranties...

Page 12: ...res co ts d penses ou dommages indirects ou accessoires encourus par le consommateur pour toute autre utilisation L utilisateur assume tous les risques de blessures r sultant de l utilisation de ce pr...

Reviews: