background image


13A 

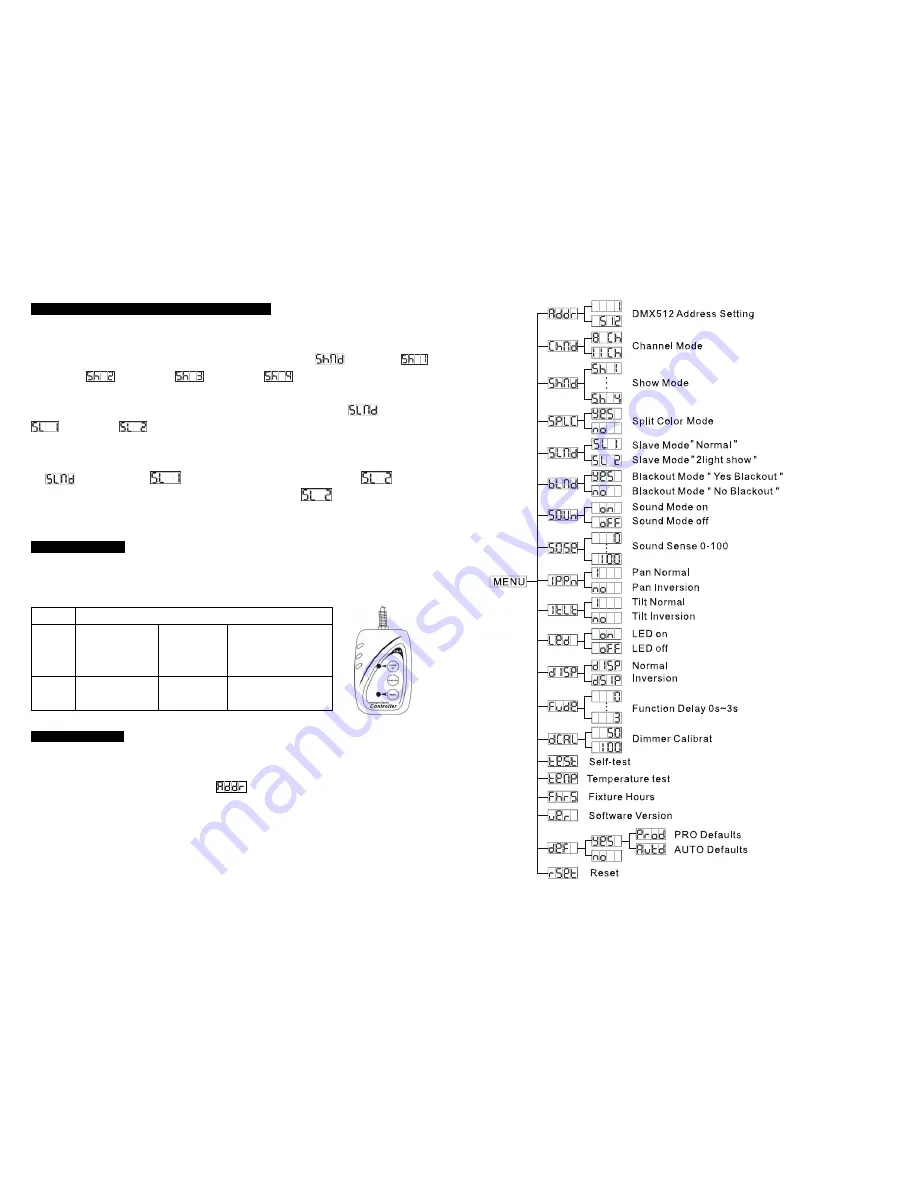
4.1 Master/Slave Built In Preprogrammed Function   

By linking the units in master/slave, the first unit will control the other units to give an 

automatic, sound activated or synchronized light show. This function is good when you want 

an instant show. You have to set the first unit into master mode 

 and select 


(show 1) or 

 (show 2) or 

 (show 3) or 

  (show 4) mode. Its DMX input 

socket will have nothing plugged into it, and Its master LED will be constantly on and sound 

LED will flash to the music. The other units will have to set in slave mode 

 and select 

 (normal) or 

  (2 light show) mode, Their DMX cables plugged into the DMX 

input sockets (daisy chain) and the slave led lights will constantly on. 

2-light show 

In 

 (slave  mode), 

 means the unit works normally and 

 means 

2-light show. In order to create a great light show, you can set 

  on the second unit to 

get contrast movement to each other, even if you have two units only. 


4.2 Easy Controller   

The easy remote control is used only in master/slave mode. By connecting to the 1/4” 

microphone jack of the first unit, you will find that the remote control on the first unit will 

control all the other units functions press the MENU button again. 

Stand By 

Blackout the unit 

Function 

1. Sync. Strobe 

2. Async strobe 

3. Sound Strobe 

Show 

1-4 

1. Press to select color 

2. Hold to select gobo 

Mode 

Sound (LED OFF) 

Show (LED 

Slow Blinking) 

LED ON 


4.3 DMX Controller   

By using a universal DMX controller to control the units, you have to set DMX address from 

1 to 512 channel so that the units can receive DMX signal. 

Press the 

MENU

 button up to when the 

 is showing on the display. Pressing the


ENTER

 button and the display will blink. Use the 

DOWN

 and 

UP

 buttons to change the 

DMX512 address. Once the address has been selected, press and keep 

ENTER

 button 

pressed up to when the display stops blinking or storing automatically 8 seconds later. To go 

back to the functions without any change press the

 MENU

 button again. If you use please 

refer to the following diagram to address your DMX512 channel for the first 4 units


6A 


Summary of Contents for iMove 50S

Page 1: ...ic Compatibility EMC Directive 89 336 EEC EN55014 2 1997 A1 2001 EN61000 4 2 1995 EN61000 4 3 2002 EN61000 4 4 1995 EN61000 4 5 1995 EN61000 4 6 1996 EN61000 4 11 1994 Harmonized Standard EN60598 1 20...

Page 2: ...irrors must be carried out periodically to optimize light output Cleaning frequency depends on the environment in which the fixture operates damp smoky or particularly dirty surrounding can cause grea...

Page 3: ...be sure that they also receive this user manual y Unpack and check carefully there is no transportation damage before using the unit y Before operating ensure that the voltage and frequency of the po...

Page 4: ...angle 15 y Automatic Pan Tilt position correction y Smooth 0 100 dimming and variable strobe speeds y LED display for easy navigation and addressing y Perfect for disco club bar parties and Mobile DJ...

Page 5: ...OBO 4A Voltage 120V 230V 50 60Hz Power consumption 112W at 230V Light source 1 x 50W LED Dimensions 299 x 247 x 420 mm gobo wheel 109 mm gobo 19 mm Weight 10 kgs Photometric diagram 3 How To Set The U...

Page 6: ...t to power supply DMX input output For DMX512 link use 3 5 pin XLR cable to link the unit together 3 2 Main Function To select any of the given functions press the MENU button up to when the required...

Page 7: ...Controller The easy remote control is used only in master slave mode By connecting to the 1 4 microphone jack of the first unit you will find that the remote control on the first unit will control all...

Page 8: ...color mode or normal mode Once the mode has been selected press the ENTER button to setup to go back to the functions without any change press the MENU button again Hold and press the MENU button for...

Page 9: ...mode has been selected press the ENTER button to setup to go back to the functions without any change press the MENU button again Hold and press the MENU button for about one second or wait for one mi...

Page 10: ...selected press the ENTER button to setup to go back to the functions without any change press the MENU button again Hold and press the MENU button about one second or wait for one minute to exit the m...

Reviews: