©Isothermal Technology
Page 10 of 61
914 millisKanner manual Iss. 1.00
!
2
2
2
2
Using your millisKanner
Using your millisKanner
Using your millisKanner
Using your millisKanner
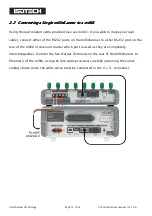
Your millisKanner is very easy to use, simply connect it to your milliK Precision
Thermometer (analogue and RS232 connections) and apply power to both instruments.
On power-up, the milliK ‘discovers’ any millisKanners connected to it and assigns
channel numbers to each input. These additional channels then appear in the list of
channels and can be configured and used in the same was as the existing channels on
the milliK.
The automatic discovery process takes place during initialisation of the milliK software
and requires the RS232 connection(s) to be present (see sections 2.2 or 2.3). If you
connect or power the millisKanner after the milliK software has initialised (at the initial
screen with the
Start
button, or later), press the
Restart/Update Software
button on the
Instrument
screen of the milliK to re-invoke the discovery process.
A millisKanner will only work with a milliK that is running with firmware version 1.11 or
above and software version 1.5.4 or above. The firmware and software versions are
shown on the milliK in the opening screen (with the
Start
button). If your milliK is running
with older firmware or software, please contact Isothermal Technology or one of our
appointed distributors to arrange an upgrade. The hardware on all milliKs is compatible
with millisKanner multiplexers.
2.1
2.1
2.1
2.1
Powering Up Your millisKanner
Powering Up Your millisKanner
Powering Up Your millisKanner
Powering Up Your millisKanner
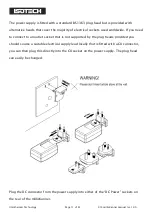
The power supply operates from any standard AC electrical supply (90-264V RMS at 47-
63Hz), so unless your supply is unusual you can simply connect the power supply to a
suitable electrical outlet.


