Page 20
a)
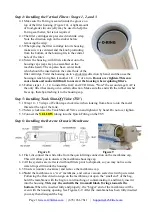
If the membrane housing is leaking, make sure the O-ring is seated correctly as shown in
sections “Installing the RO Membrane” and “How to Change the RO Membrane”. It should
be seated on the end of the membrane housing before the threads begin. The membrane cap
is then screwed on over it. When positioned incorrectly, it will create a gap or damage the
O-ring. When in the correct place, there will not be any pressure or tension on the O-ring.
5)
Low water flow (trickle) at RO faucet
a)
Tank has not been given the chance to fill. Allow approximately two hours for the tank to
fill.
b)
Tank valve is closed. Make sure the blue tank valve is in line with the yellow tube.
6)
High TDS in RO water
a)
The system will provide a 90%+ TDS rejection rate when working properly. Meaning if
your tap water TDS is 500 ppm, the water from the system should be 50 ppm or lower.
b)
Incorrect installation. Verify all connections on the system.
c)
If the TDS of the tap water and water from the system are about the same, make sure the RO
membrane is in fact installed. The semi permeable membrane is blue, comes in sealed
packaging, and goes in the stage 4 membrane housing.
d)
If you are getting some reduction in TDS but not 90%+, some water could be bypassing the
membrane. Contact iSpring customer support to identify the exact cause.
7)
Cloudy water after installation
a)
In the weeks after installing the system or changing the filters, you will see many tiny air
bubbles in the RO water. This can cause the water to appear “cloudy”. The bubbles will
disappear as the system clears itself of trapped air, and are harmless for the time being.
8)
The system drains water 24/7 (continuous drain)
a)
Keep in mind that it will take anywhere from 1-3 hours for the system to fill the tank from
empty, and the drain line will be trickling during this time. If the drain line continues to run
for 4+ hours, one of the following reasons could be the problem.
b)
The pump is running 24/7. See “Pump runs 24/7”.
c)
The inlet water solenoid valve is bad and is unable to shut off the incoming water supply.
9)
Leak from tank valve connection
a)
Make sure you have applied Teflon tape to the tank threads before screwing on the tank
valve. There should be at least 8-10 wraps of Teflon tape to ensure a proper seal. If you have
done this and it continues to leak, contact iSpring customer support for a replacement.
10)
Water from the system tastes the same as tap water
a)
Incorrect installation. Verify all connections on the system.
b)
The RO membrane is not installed in the housing. Ensure the membrane has been installed.
11)
Pump does not start
a)
No power. Make sure the pump is plugged in. If it is plugged in and still not kicking on,
make sure it is not plugged into the same outlet as the garbage disposal. Typically this outlet
only has power when the garbage disposal is switched on.
b)
Incoming water pressure is below 30 PSI. The low pressure switch kicks on the booster
pump at 30 PSI, and if this pressure is not reached then the pump will not turn on.
c)
Low pressure switch is not functioning correctly and is therefore unable to turn the pump
on.
12)
Pump runs 24/7
a)
If the pump is running 24/7 and the output flow remains normal, the high pressure switch is
faulty and not triggering the pump to turn off.
b)
If the pump is running 24/7 and you are getting little to no output flow, either the check
valve is losing pressure or the pump itself is faulty.
c)
Tank pressure is too low, never reaching the pressure requirement to shut the pump. Empty
the tank and set it between 7-10 PSI and reconnect.
Summary of Contents for RCC1P
Page 26: ......

