73
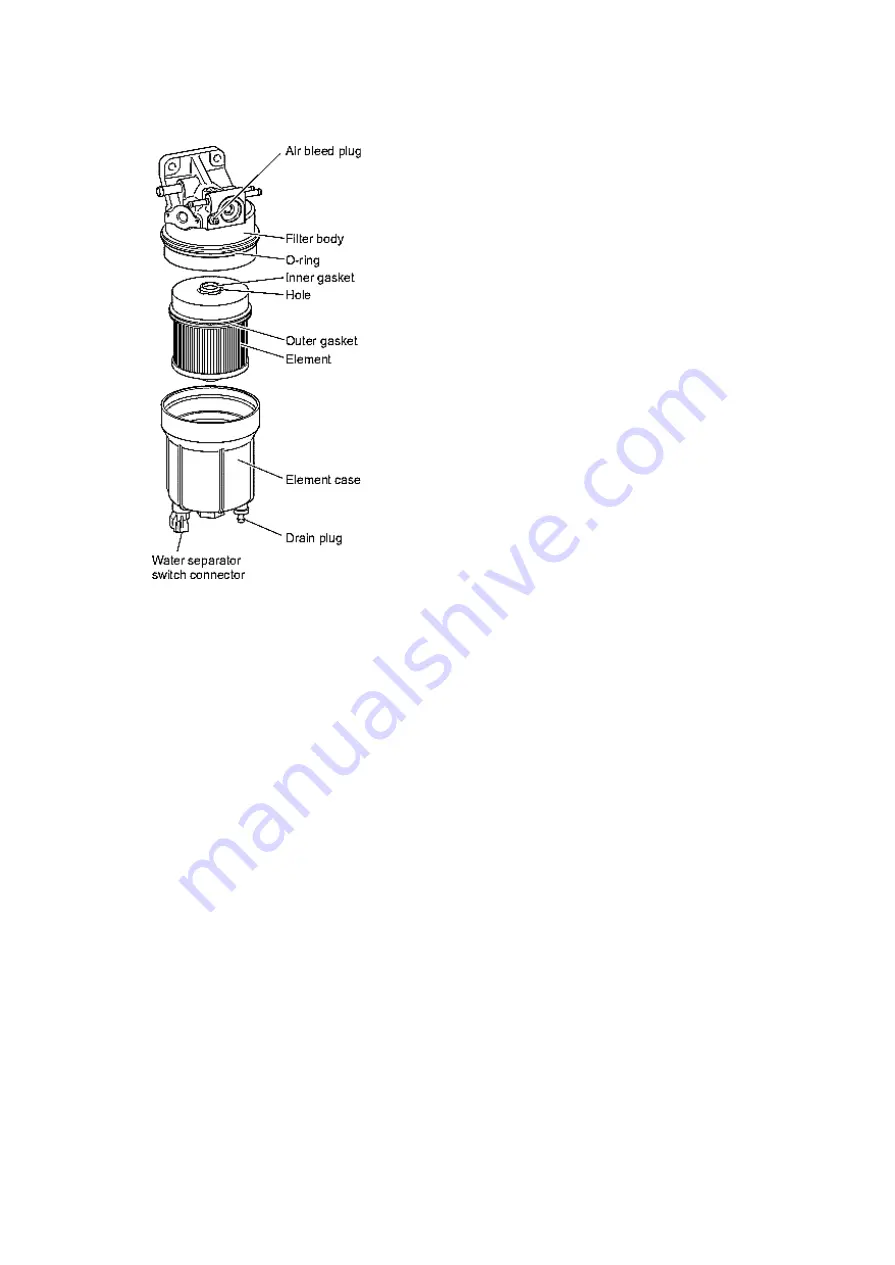
4. Pull out the filter element downward
and remove the O-ring. Use a clean
cloth to wipe off any foreign matter that
has accumulated on the inside surface
of the filter body.
5. Attach the new O-ring to the filter body,
making sure that it is not damaged by
the screw threads.
6. After lightly coating the inner and outer
gaskets of the new filter element with
diesel fuel, insert the element until it
touches the filter body.
7. After lightly coating the inner surface of
the element case or the O-ring with
diesel fuel, turn the element case
clockwise until it touches the filter body.
If the element case end fails to touch
the filter body, the filter element has not
been inserted fully. Reinsert the
element while turning it.
8. Install the element case.
9. Tighten the drain plug and connect the
water separator switch connector.
10. Bleed air from the fuel system.
Chassis-side Fuel Filter (Model with Pre-fuel Filter Only)
1. Loosen the drain plug at the bottom of the bowl to drain the fuel inside the filter.
(Self-bleeding type)
2. Turn the filter element cartridge counterclockwise to loosen and remove it from
the filter head.
3. Turn the bowl counterclockwise to loosen and remove it from the cartridge.
4. Fit a new gasket into the groove of the bowl, lightly coat it with clean diesel fuel and
tighten the bowl until the gasket is firmly seated in position.
5. Fill a new cartridge with diesel fuel to make air bleeding easier.
6. Fit a new gasket into the groove on the top of the cartridge, lightly coat it with clean
diesel fuel and screw the cartridge into the filter head until the gasket is firmly seated
in position. Be careful not to spill any diesel fuel from inside during this process.
7. Use a filter wrench and tighten the cartridge and bowl by 1/2 to 2/3 turns. (Reference
tightening torque for both cartridge and bowl: 10 N·m (1.0 kgf·m/87 lb·in))
8. Tighten the drain plug and bleed air from the fuel system.
Summary of Contents for NOVOULTRA E6 2019
Page 1: ...USER S MANUAL Revision No 01...
Page 5: ...1 INTRODUCTION 1...
Page 11: ...7 2 GENERAL INFORMATION...
Page 14: ...10 3 CONTROLS AND INDICATORS...
Page 33: ...29 ASR failure Error...
Page 34: ...30 4 VEHICLE EQUIPMENT...
Page 64: ...60 5 SERVICE AND MAINTENANCE...
Page 97: ...93 6 TECHNICAL INFORMATION...
Page 101: ...7 LIST OF FOREIGN DISTRIBUTORS 96...


