background image

4

following the operating instructions. Adjust only 
those controls that are covered by the operating 
instructions as an improving adjustment of other 
controls may result in damage and will often require 
extensive work by a qualifi ed technician to restore 
the product to its normal operation.


e) When the product exhibits a distinct change in 
performance -this indicates a need for service.

21.

REPLACEMENT PARTS 

- When replacement 

parts are required, be sure the service technician 
has used replacement parts specifi ed by the 
manufacturer or having the same characteristics as 
the original part. Unauthorized substitutions may 
result in fi re, electric shock or other hazards.

22.

SAFETY CHECK 

- Upon completion of any service 

or repair to this product, ask the service technician 
to perform safety checks to determine that the 
product is in proper operating condition.

23.

HEAT

 - The product should be situated away from 

heat sources such as radiators, heat registers, 
stoves or other products (including amplifi ers) that 
produce heat.

24.

Caution

: Changes or modifi cations not expressly 

approved by the party responsible for compliance 
could void the user’s authority to operate the 
equipment. Changes or modifi cations made without 
written approval may void the user’s authority to 
operate this equipment.

Safety Information

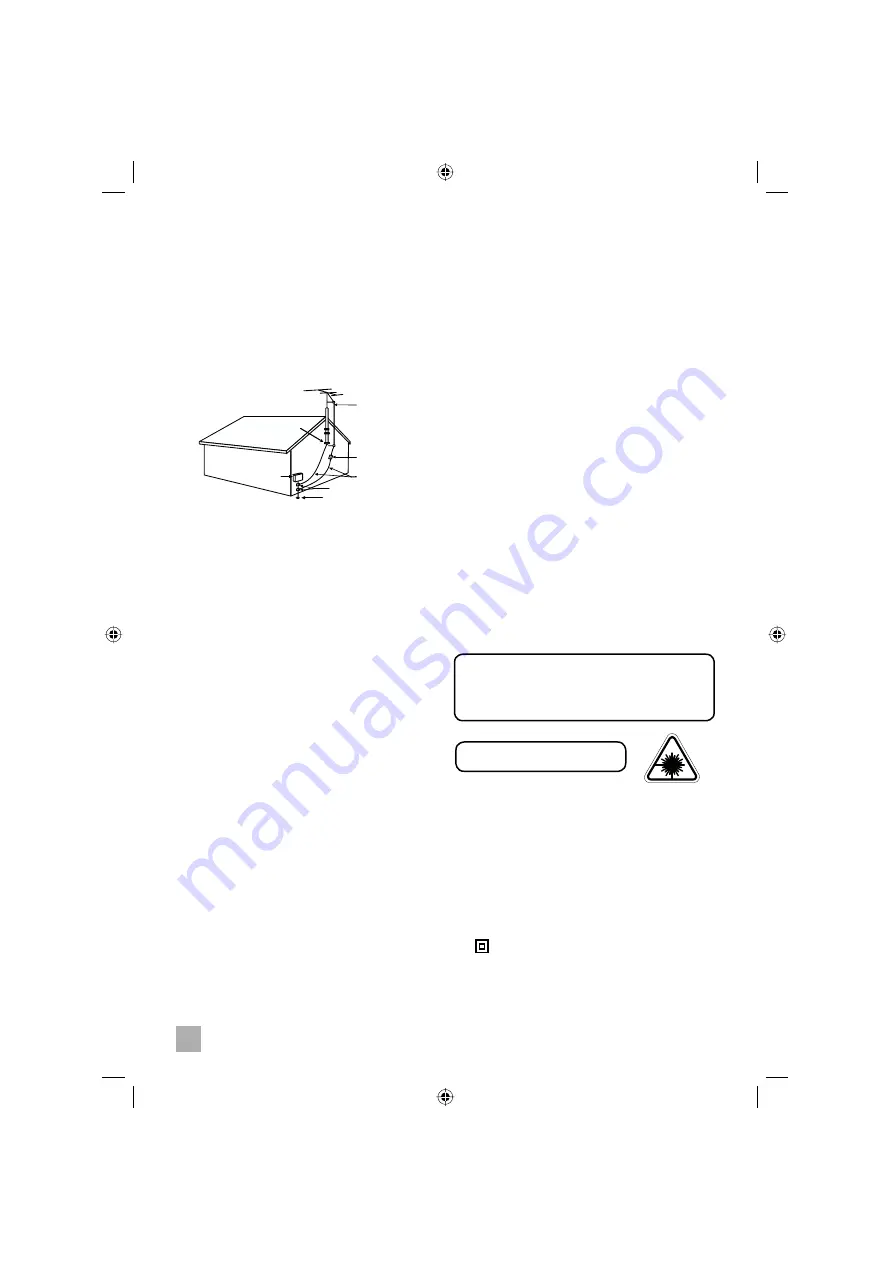
grounding of the mast and supporting structure, 
grounding of the lead-in wire to an antenna 
discharge unit, size of grounding conductors, 
location of antenna-discharge unit, connection to 
grounding electrodes, and requirements for the 
grounding electrode. See Figure 1.

15.

LIGHTNING

 - For added protection for this 

product during a lightning storm, or when it is left 
unattended and unused for long periods of time, 
unplug it from the wall outlet and disconnect the 
antenna or cable system. This will present damage 
to the product due to lightning and power-line 
surges.

16.

POWER LINES 

-An outside antenna system 

should not be located in the vicinity of overhead 
power lines or other electric light or power circuits, 
or where it can fall into such power lines or other 
electric light or power circuits, or where it can fall 
into such power lines or circuits. When installing an 
outside antenna system, extreme care should be 
taken to keep from touching such power lines or 
circuits as contact with them might be fatal.

17.

OVERLOADING

- Do not overload wall outlets, 

extension cords, or integral convenience 
receptacles as this can result in a risk of fi re or 
electric shock.

18.

OBJECT AND LIQUID ENTRY 

- Never push 

objects of any kind into this product through 
openings as they may touch dangerous voltage 
points or short-out parts that could result in a fi re or 
electric shock. Never spill liquid of any kind on the 
product.

19.

SERVICING

 - Do not attempt to service this product 

yourself as opening or removing covers may 
expose you to dangerous voltage or other hazards. 
Refer all servicing to qualifi ed service personnel.

20.

DAMAGES REQUIRING SERVICE 

- Unplug this 

product from the wall outlet and refer servicing to 
qualifi ed service personnel under the following 
conditions.


a) When the power-supply cord or plug is damaged.


b) If liquid has been spilled, or objects have fallen 
into the product.


c) If the product has been exposed to rain or water.


d) If the product does not operate normally by 

CAUTION!
HAZARDOUS LASER RADIATION WHEN OPEN 
AND INTERLOCK FAILED OR DEFEATED. AVOID 
EXPOSURE TO BEAM

CLASS 1 LASER PRODUCT

1.  WARNING: The battery (battery or batteries 

or battery pack) shall not be exposed to 
excessive heat such as sunshine, fi re or the 
like.

2.  WARNING: Excessive sound pressure from 

earphones and headphones can cause 
hearing loss.

3.  WARNING: The direct plug plug-in adaptor 

is used as disconnect device, the disconnect 
device shall remain readily operable.

4.

 This is CLASS II apparatus with double 

insulation, and no protective earth provided.

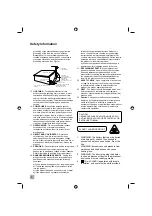
ANTENNA 
LEAD IN WIRE

ANTENNA 
DISCHARGE UNIT
(NEC SECTION 810-20)
GROUNDING
CONDUCTORS
(NEC SECTION 810-20)

GROUND CLAMPS

POWER SERVICE GROUNDING
ELECTRODE SYSTEM
(NEC ART 250, PART H)

GROUND CLAMP

NEC. NATIONAL ELECTRICAL CODE
S2898A

ELECTRIC SERVICE
EQUIPMENT

Summary of Contents for KW-1008

Page 1: ...1 User Manual KW 1008 Audio System with Wireless Speakers ...

Page 2: ...remote control only 15 Compatible Storage Devices 16 iPod Operation 19 Docking your iPod 19 CD Operation 21 Normal Playback 21 Repeat Playback 22 Random Playback 22 Programmed Playback 23 Programmed Repeat Playback 23 Playing MP3 WMA CDs 24 MP3 WMA CD Repeat Playback 24 Memory Card Operation 26 USB Operation 27 Radio Operation 28 Other Functions 29 Setting the Clock 29 Setting Alarm 1 or Alarm 2 2...

Page 3: ...ctions should be adhered to 4 FOLLOW INSTRUCTIONS All operating and use instructions should be followed 5 CLEANING Unplug this product from the wall outlet before cleaning Do not use liquid cleaners or aerosol cleaners Clean only with dry cloth 6 ATTACHMENTS Do not use attachments not recommended by the product manufacturer as they may cause hazards 7 WATER AND MOISTURE Do not use this product nea...

Page 4: ...nity of overhead power lines or other electric light or power circuits or where it can fall into such power lines or other electric light or power circuits or where it can fall into such power lines or circuits When installing an outside antenna system extreme care should be taken to keep from touching such power lines or circuits as contact with them might be fatal 17 OVERLOADING Do not overload ...

Page 5: ...rsuant to Part 15 of the FCC Rules These limits are designed to provide reasonable protection against harmful interference in a residential installation This equipment generates uses and can radiate radio frequency energy and if not installed and used in accordance with the instructions may cause harmful interference to radio communications However there is no guarantee that interference will not ...

Page 6: ...er when it left the factory If you experience any problem with the set up or operation of this system please refer to the back of this manual for instructions on obtaining customer service The serial number of your system is located on the back panel Please take a moment now to locate the serial number and to write it in the space provided below for future reference You may be asked to provide thi...

Page 7: ...f the unit Do not remove any labels or stickers that may be affixed to the back panel of the wireless main unit or the speakers Protect your Furniture This model is equipped with non skid rubber feet to prevent the product from moving when you operate the controls These feet are made from non migrating rubber material specially formulated to avoid leaving any marks or stains on your furniture Howev...

Page 8: ... 12 and there is a brief interruption in the audio coming from the speakers This is the normal operation of the product working to assure the best possible performance of your wireless audio system If the interference persists try moving the other devices to another location or move the wireless main unit or wireless speakers farther from the interfering devices NOTE Do not place the wireless main...

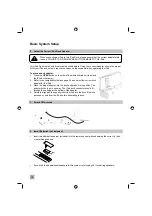
Page 9: ...ect the wireless main unit and both speakers to AC power The larger adapters are for the left and right speakers the smaller for the main wireless unit 3 Turn the wireless main unit and speaker ON The system defaults to FM Tuner mode You should immediately hear static from the speakers If you do not immediately hear audio from the speakers please refer to Page 31 Speaker pairing and adding additio...

Page 10: ...to the dock and press it into position The adapter will only go in one way The iPod dock connector should fit through the opening at the bottom of the adapter 4 Carefully align and then gently insert the iPod into the dock Remove any case or skin from the iPod before attempting to dock 5 Extend FM Antenna 6 Install Batteries not included Insert two AAA batteries not included into the remote control...

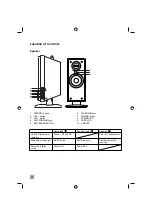
Page 11: ...display 4 STANDBY button 5 FM ST light 6 iPod door 7 Control key door 8 USB slot 9 SD MMC card slot 10 Headphone jack 11 LINE OUT jack 12 AUX IN jack 13 FM antenna 14 DC IN jack 15 FUNCTION button 16 STOP 17 SKIP BACKWARD 18 SKIP FORWARD 19 PLAY PAUSE 20 PAIRING button 21 CLOCK ADJ button 22 ALARM button 23 SNOOZE button 24 REPEAT button 25 VOL button 26 VOL button Wireless Main Unit ...

Page 12: ...P FORWARD 5 SKIP BACKWARD 6 PLAY PAUSE 7 PAIRING button 8 POWER LED 9 MUTE LED 10 LINK LED Illuminated Non illuminated Flashing Link LED Dual color red green Green RF link OK Red RF link problem Mute LED Red color MUTE active MUTE inactive Remote command received Power LED Blue color Power ON Power OFF ...

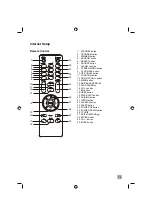
Page 13: ...ton 7 ALARM 1 button 8 STEREO MONO button 9 CLOCK ADJ button 10 UP SCROLL button 11 FUNCTION button 12 DOWN SCROLL button 13 MENU button 14 SKIP BACKWARD 15 PLAY PAUSE 16 VOL button 17 EQ button 18 DBBS button 19 DISC EJECT button 20 PAIRING button 21 INTRO button 22 ALARM 2 button 23 SLEEP button 24 FOLDER UP button 25 FOLDER DOWN button 26 STOP 27 SKIP FORWARD 28 ENTER button 29 VOL button 30 MU...

Page 14: ...front of the remote handset is pointed at the remote sensor on the front panel of the main unit The effective operating range of the remote control is approximately 15 feet Please note that bright sunlight or room lighting may interfere with the remote control operation If the remote is not operating properly try reducing the brightness of the room or moving closer to the main unit If this does no...

Page 15: ...ur selection The system remembers the EQ setting when the power is switched off and returns to the same setting when the power is switched on again DBBS Dynamic Bass Boost remote control only Press the DBBS button on the remote control to increase the bass response X bass on appears briefly on the display Press again to cancel the Bass Boost function MUTE Button on remote control only Press the MUT...

Page 16: ...tick Memory Stick Duo with adapter only xD Picture Card CD discs with non standard shapes e g heart square star cannot be played in this unit Attempting to do so may damage the unit IMPORTANT This player can play normal pre recorded CD discs plus CD Recordable and CD Rewritable discs The ability of this unit to play certain recordable discs may depend on the quality or physical condition of the di...

Page 17: ...ol to check eject any disc already loaded 2 Gently load a disc into the slot with the printed label facing out 3 To remove a disc press the OPEN CLOSE button and remove the disc gently CAUTIONS Do not put anything except a CD into the compartment Foreign objects can damage the mechanism Never place more than one disc into the disc compartment at any time file system The system can read media contai...

Page 18: ...ed one way Remove the device by gently pulling it out of the socket CAUTION Be sure to use the proper card adapter if required Failure to use the correct adapter may cause damage to the memory card or the unit Only one type of memory card can be inserted at one time Inserting and removing Flash Cards Insert the card into the slot by gently pressing into position until it locks in place Cards can o...

Page 19: ...Pod before attempting to dock 4 Press the function button on the wireless main unit or on remote control to switch to iPod mode 5 Use the remote control to operate the iPod as follows To enter main menu Press the MENU button To scroll Press the FOLDER UP DN button To choose an item Press the ENTER button Play or pause a song Press the PLAY PAUSE button Change the volume Press the VOL or VOL button...

Page 20: ... 4GB 8GB iPod classic 80GB U2 iPod with video 30GB 5G iPod with video 30GB 5G iPod with video 60GB 80GB iPod nano 2GB 4GB iPod with color display 60GB iPod photo 40GB 60GB iPod with color display 20GB iPod photo color U2 iPod 20GB 30GB 4G iPod 40GB 4G iPod U2 iPod 20GB iPod mini 4GB 6GB NOTE The iPod battery will charge whenever the iPod is docked and the unit is powered on ...

Page 21: ...r if you are using CD R or CD RW discs This is normal and not an indication of any problem with your unit To pause temporarily during CD playback Press the PLAY PAUSE button The sound stops and the elapsed time shows on the display but the disc continues spinning Press the PLAY PAUSE button once more to cancel pause mode and resume playback at the same point To skip tracks and to search through mu...

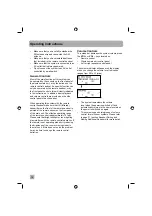
Page 22: ...T button until the ALL indicators disappear from the display Repeat mode can also be cancelled by opening the CD tray switching to the TUNER or USB mode or pressing the STANDBY button to return the system to the Standby Off mode Random Playback The Random playback feature allows you play all the tracks on the disc in random order You can select random playback while the disc is playing or when the...

Page 23: ... PROG button again to enter Track 07 in program memory 1 The program memory number advances to P02 5 Repeat steps 3 and 4 to select more desired tracks until you have entered up to 20 tracks in the CD program memory 6 Press the PLAY PAUSE button to begin programmed playback Programmed Repeat Playback You can use the Programmed and Repeat Playback functions together to continuously repeat a program...

Page 24: ...tions for MP3 WMA CDs as they do for normal CDs To skip quickly from a track in one directory to a track in another directory 1 Load an MP3 WMA CD into the player Wait until the reading process is completed Example Let s assume that you want to skip to Directory 03 Track 005 2 Press the FOLDER UP DN button repeatedly to select album 03 The track will show 001 3 Press the button five times and the d...

Page 25: ... Ran indicator appears on the display The player will play all the tracks on the disc in random order To display the ID3 track information When you create a CD on your computer containing MP3 WMA audio files the software you use to create the disc will normally allow you to input the name of the artist the name of the album and the titles of the individual songs The ID3 will show automatically duri...

Page 26: ...nd directories albums on the card For example 08 albums 49 tracks 3 Press the PLAY PAUSE button to begin playback 4 Press the or button to skip tracks 5 Press FOLDER UP or DN buttons to skip albums 6 Press STOP button to stop playback at any time NOTE The memory card slot on this system enables playback of songs only in MP3 and WMA formats without DRM It cannot play songs purchased from iTunes or ...

Page 27: ...ks and directories albums on the card For example 02 albums 64 tracks 3 Press the PLAY PAUSE button to begin playback 4 Press the or button to skip tracks 5 Press FOLDER UP or DN buttons to skip albums 6 Press STOP button to stop playback at any time NOTE The USB port on this system enables playback of songs only in MP3 and WMA formats without DRM It cannot play songs purchased from iTunes or othe...

Page 28: ...ator To select mono sound Press the STEREO MONO button on the remote control to select FM Mono mode To improve FM reception The FM lead wire antenna on the back panel should be extended to its full length You may also have to vary the direction of this antenna until you find the position that provides the best reception To preset stations in the tuner memory You can store up to 20 of your favorite ...

Page 29: ...s to flash 5 Press or button to select Sun Mon Tue Wed Thu Fri Sat 6 Press the ENTER button to confirm Setting Alarm 1 or Alarm 2 The dual alarms are set in the following sequence Set Alarm Set time Set mode Set day To enable or disable the alarm 1 Press the ALARM 1 or ALARM 2 button to enter the alarm setting sequence 2 Press the ENTER button when you see Set Alarm 3 Press the or button to select a...

Page 30: ...nd and then press the ENTER button The alarm is now set Sleep Timer remote control only This system includes a programmable Sleep Timer that shuts the power off automatically after between 15 and 90 minutes To set the sleep timer Press the SLEEP key repeatedly The system cycle through different sleep settings in the following order Sleep off Sleep timer 15mins à Sleep timer 30mins Sleep timer 45mi...

Page 31: ... once again To pair speakers Make sure all the wireless speakers are in the operating locations and connected to AC power Power ON the wireless main unit and the wireless speakers 1 Press the PAIRING button on wireless main unit front panel or on the remote control for 6 seconds until the display shows Press Pairing Key on Speaker 2 Press the PAIRING button on the Left speaker or Right speaker con...

Page 32: ...rs in the group Slave Group Speakers Use this option when you want individual control of speaker pairs usually on a room by room basis For example speakers placed in a bedroom could use this setting so that volume and power changes on the main unit do not unintentionally wake someone All Slave Group speakers receive the same audio from the wireless main unit Slave Group speakers are controlled ind...

Page 33: ...he FUNCTION button Stereo Headphone Jack This system includes a stereo PHONES jack on the side panel of the wireless main unit You may connect a set of stereo headphones not included to this jack for private listening without disturbing others The main speakers are automatically shut off when headphones are connected to the PHONES jack Make sure that the plug from your headphones is fully inserted...

Page 34: ...h 100mm spacing to match the VESA 100 standard The mounting holes will accept only M4 metric bolts not included All bolts must be of correct length and be able to tighten properly when the wall mount is attached Be careful not to use bolts that are too long or too short If your wall mount does not include bolts of the correct diameter or length you can easily buy these parts at a hardware store To...

Page 35: ...ower cord and then plug it back in Unable to operate the system from the remote control The path between the remote control and the remote sensor on the system is blocked Clear the path The batteries are exhausted Replace the batteries No sound is heard Volume is set too low Increase volume level Headphones are connected Radio Operation Head to hear broadcasts because of noise The FM antenna is no...

Page 36: ... player section Playback system DAC Frequency response 5 Card USB Section Flash memory card support USB Support 6 Speaker system Speakers Impedance 120V AC 50 Hz 80W operation 445 W x 285 H x 222 D mm 6 55 Kg 87 5 MHz to 108 MHz 540 KHz to 1600 KHz FM 30 AM 10 Compact Disc Digital Audio 8 times over sampling 1 bit D A converter 100 20 000 Hz SD MMC up to 2GB Flash Storage Device up to 2GB 2 x 4 4 ...

Page 37: ...d freight prepaid and properly packaged with the original dated bill of sale as proof of purchase to iSymphony Service Center Please call 1 800 710 7740 to obtain the shipping instructions iSymphony Customer Service 1 800 710 7740 Please register your product online at www isymphony com register iSymphony will pay for the return shipping charges for products that are under warranty and received in...

Reviews: