background image

FRANÇAIS

ENGLISH


Your new air compressor can be used for operating paint, weed killer, and  

insecticide sprayers, air tools, grease & caulking guns, sandblasters, inflation, etc.   

A tool with a higher air demand than this compressor can produce may either not  

function, or not function well.  It may also cause the compressor to run without  

stopping for long periods of time, trying to maintain pressure in the tank.  This can 

cause either the motor or compressor pump to overheat and damage them.  Be  

sure the requirements of your tools can be met by the compressor.

To compress air, the piston in the pump moves up and down in the cylinder.  On the 

down stroke, air is drawn in through the inlet valve.  Since the discharge valve  

remains closed, as the piston goes up, the air in the cylinder is compressed.  The  

inlet valve closes and compressed air is forced out into the air receiver.  A check 

valve prevents it from going back into the pump.  Working air is not immediately 

available. The pump continues to add air until the air receiver pressure builds to 
above that required at the regulator.

INSTALLATION AND LOCATION

Locate the compressor in a clean, dry and well-ventilated area, on a firm level 

surface. It should be located 12 to 18 inches from a wall or any other obstruction 

that would interfere with the air flow.  It is equiped with heat dissipation fins that 

allow for proper cooling.  Keep them and other parts free of dust or dirt that could 

interfere with cooling.  A clean compressor runs cooler and provides longer service.  

Do not place anything on top of the compressor.

WARNING:


Do not use lead-tin solder to join pipes and fittings.  It can melt at the 

temperatures of the compressor’s air discharge and cause the piping to burst.

EXTENSION CORDS

If you plan to use an extension cord when operating your air compressor, please 

note:

 

Maximum length: not to exceed 50 ft.

 

Minimum wire size: 14 gauge.

 

If the extension cord is too long or the wire size is too small, the air compressor 

will not start.

COMPRESSOR LUBRICATION

1.  CHECK THE OIL quantity and quality before operating the compressor.  Do not 

add or change oil while the compressor is in operation.  Use only oil with the 

correct specifications

2.  With the air compressor on level surface, the oil level should be at the red dot on 

the oil level sight glass.

3.  If oil level is low, remove oil fill plug/breather cap, add enough oil to bring level to 

the red dot.  Do not over-fill.

4.  Replace oil fill plug before starting compressor.

DRAINING THE OIL

1.  Remove the oil drain plug (oil level sight glass).  Allow oil to drain completely.

2.  Replace the oil drain plug (we recommend the use of a sealing compound or 

teflon tape to avoid leakage).  Do not over-tighten.

3.  Refill with the recommended oil to the red dot in the oil level sight glass.

BEFORE OPERATING

:

1.  Check that all nuts and bolts are all snug.

2.  Check the quantity and quality of oil (see compressor lubrication, above).

OPERATING INSTRUCTIONS

Summary of Contents for 13426

Page 1: ...or future reference CONSERVEZ CE GUIDE Vous aurez besoin de ce guide pour les instructions de s curit les proc dures d utilisation et la garantie Conservez le dans un endroit s r et sec pour r f rence...

Page 2: ...When working wherever live electrical wires may be encountered try to ascertain whether there is a danger of shock Even so DO NOT TOUCH ANY METAL PARTS OF THE TOOL while using it Hold the tool only by...

Page 3: ...arts breakage of parts mountings and other conditions that may affect its operation Inspect screws and tighten any ones that are loose Any part that is damaged should be properly repaired or replaced...

Page 4: ...is connected AIR TANKS Over pressurizing the air receivers piping or tanks could cause it to explode or burst To protect from over pressurizing the compressor is equipped with a factory preset safety...

Page 5: ...r cooling Keep them and other parts free of dust or dirt that could interfere with cooling A clean compressor runs cooler and provides longer service Do not place anything on top of the compressor WAR...

Page 6: ...ow been properly disconnected from the air compressor unit You can now move the tank freely Installing the Air Tank 1 Turn the power switch off 2 Place the portable air tank in the appropriate positio...

Page 7: ...ndency to loosen up After two weeks tighten all nuts and bolts including head bolts Will not start Fuse blown or circuit breaker tripped Loose electrical connections Extension cord not correct Overhea...

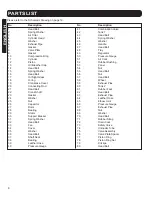
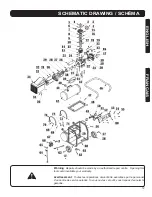
Page 8: ...Bolt 18 O ring 58 Wheel 19 Crankcase Cover 59 Exhaust Pipe 20 Connecting Rod 60 Tank 2 21 Head Bolt 61 Rubber Foot 22 Crank Shaft 62 Head Bolt 23 Gasket 63 Exhaust Pipe 24 Washer 64 Leather Hose 25 Nu...

Page 9: ...t ITC distributor to determine those products that are covered by our over the counter warranty Any ITC tool that fails during normal use and within the specified warranty period and qualifies for ove...

Page 10: ...ION DOUBLE Cet outil est doublement isol Il est quip d une fiche polaris e Une lamelle de la fiche est plus large que l autre et elle ne s adaptera une prise de courant polaris e que d une seule fa on...

Page 11: ...ut entier si le travail que vous effectuez produit de la limaille m tallique de la poussi re ou des clats de bois Des lunettes de s curit sont appropri es dans les autres situations Portez un masque p...

Page 12: ...uilibre tout moment Ne vous penchez pas sur des machines qui sont en marche 9 V RIFIEZ POUR D CELER TOUTE PI CE ENDOMMAG E Effectuez souvent des inspections afin de vous assurer du fonctionnement corr...

Page 13: ...l anneau afin de vous assurer qu elle fonctionne librement Si la soupape ne fonctionne pas librement remplacez la avant de continuer d utiliser l appareil Ne soudez et ne percez jamais le r servoir d...

Page 14: ...Il est muni de palmes pour dissiper la chaleur permettant un refroidissement appropri Garder celles ci et les autres pi ces sans poussi re ou salet qui pourrait nuire au refroidissement Un compresseu...

Page 15: ...servoir d air portatif 3 Fermez la soupape 1 4 D connectez la soupape 2 5 Desserrez les sangles en caoutchouc pour lib rer le r servoir d air Le r servoir est maintenant d connect de mani re appropri...

Page 16: ...de l eau savonneuse sur tous les joints S il y a une fuite serrez les joints V rifiez ce que les crous et les boulons sont toujours bien serr s 250 HEURES OU SIX 6 MOIS le premier qui survient Changez...

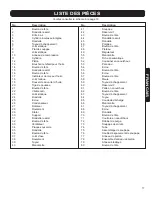
Page 17: ...u 17 Indicateur de niveau d huile 57 Boulon de t te 18 Joint torique 58 Meule 19 Couvercle du carter d huile 59 Tuyau d chappement 20 Tige de pouss e 60 R servoir 2 21 Boulon de t te 61 Patte en caout...

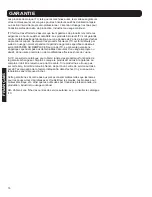
Page 18: ...r de ITC La pr sente garantie ne s applique cependant pas aux d fectuosit s d coulant d un usage impropre ou abusif d une usure anormale ou de modifications effectu es hors de l usine S V P consulter...

Page 19: ...orized repair centre Opening this tool could invalidate your warranty Avertissement Toutes les r parations doivent tre ex cut es par le personnel d un centre de service autoris Si vous ouvrez cet outi...

Reviews: