background image

PM605KT/PM605KT-B  Technical documentation

18

5.  

Check product

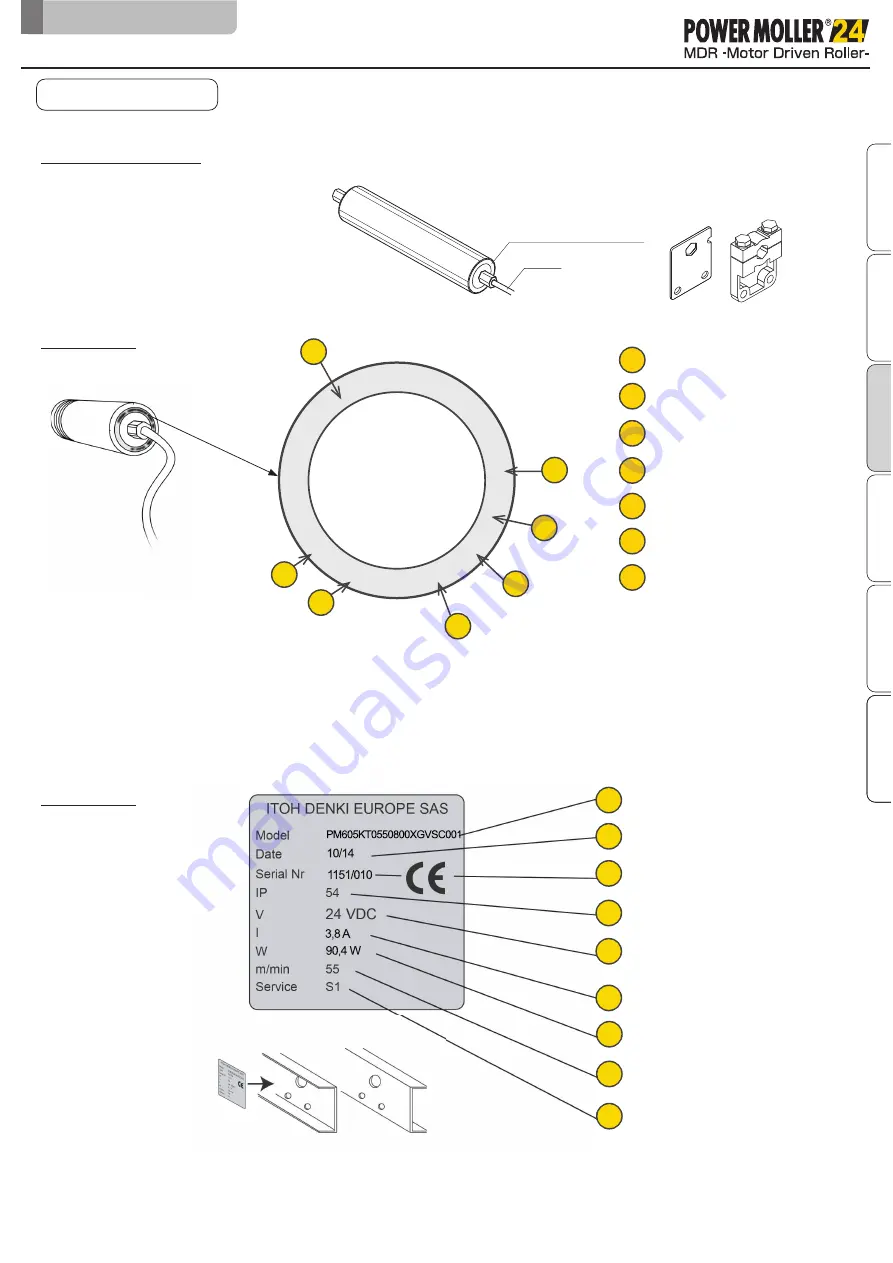
Checking the model

Open the package, and verify the product part number matches what you ordered.

MDR

Check product

Mounting bracket

(See Page 19)

Location of
part number indication

Cable

Safety precautions

Preparation Before Installation

Check product

Installation

Maintenance

Appendix 

Original notice - A1.1

Round label

IT

O

H

D

E

N

K

I P

M

60

5K

T

0

55

0800

X

V

0S

C0

01

1

0/

1

4

11

5

1

/

0

1

0

IP

5

42

4

VD

C

5

5m

/m

n

S

1

1

2

3

4

5

6

7

1

2

3

4

5

6

7

Product reference number

Month and year of shipment

Serial number

Protection index

Power supply

Speed

Operation

Square label

1

2

3

4

5

6

7

8

Product reference number

Month and year of shipment

Serial number

Protection index

Power supply

Nominal intensity

Absorbed power

Speed

Operation

9

Summary of Contents for PM605KT

Page 1: ...ducts hereinafter referred to as This Product This Product does not include the dedicated driver card Read this manual before use Brushless DC MDR for heavy duty pallet handling Technical documentation Read this manual carefully and familiarize yourself to the product as well as the information on safety and precautions before using and operating the product Keep this manual readily accessible for...

Page 2: ... FUCHS AS Interface B W AS i 3 0 Ø32 Ø50 Ø60 5 PM320 HS CB018 PM500 FE CBM 105 HB510 IB E PM500 FE B CB016B HB510B PM605 FE PM605 FE B CB016B HB510B CBM 105 HB510 IB E Network controller IB E IB P PM500 VE CBV 108 HBV 609 IB P PM605 VE CBV 108 HBV 609 IB P PM500 XP B W AS i 3 0 Wenglor PM605 XP B W AS i 3 0 Wenglor B B Compatible module sensor CBR 306 CB018 CB016 CB016B CBK 109B CBK 109 CBM 105 CB...

Page 3: ...ensate for any damage including abnormalities of equipment connection devices and or software any damage resulting from malfunctions and or any other secondary damage There are some examples of parts that need to be prepared by customers as explained within this manual However this does not provide any guarantee against the existence of any rights such as our industrial property rights or those of...

Page 4: ... all the product s functions safety information and precautions Read this manual Product check Perform maintenance and inspection based on corresponding parts Maintenance Switch settings Control Commissioning before operation Commissioning Run operation Install the MDR Installation Mount driver cards Connect power and signal cables to driver cards Wiring No Yes Procedures from installation to oper...

Page 5: ...re Installation Check product Installation 6 2 Preparation to install MDR 6 3 MDR installation with hexagonal shaft on free side Maintenance Specifications 3 4 6 8 10 10 11 12 17 20 22 29 32 34 35 Safety precautions Preparation Before Installation Check product Installation Maintenance Appendix INDEX INDEX Original notice A1 1 Product range 2 Incorporation declaration 38 6 1 Mechanical option Tran...

Page 6: ...umentation 6 For parts names in sentences refer to 5 Check product P 17 3 Safety precautions 3 Safety precautions Safety precautions Preparation Before Installation Check product Installation Maintenance Appendix Original notice A1 1 ...

Page 7: ...iption and operates the product improperly is categorized with the following symbols and explained below We categorize the type of those precautions using the following symbols throughout the manual WARNING This indicates a high possibility that severe injury or even death may result CAUTION This indicates a high possibility that injury or only equipment damage This symbol indicates operations tha...

Page 8: ...ween cables Failure to follow this could result in fire and or electric shock due to cable damage Make sure to attach ground wires to the conveyor body and DC power supply unit Failure to follow this could result in electric shock if any malfunction or leakage occurs Never modify the product and or driver cards Failure to follow this could result in serious accidents Do not touch the product when ...

Page 9: ...r and or signal cables during operation Also do not run stop this product by the power supply Use the signal Failure to follow this could result in malfunction Do not forcibly rotate the MDR at times other than maintenance and inspection Failure to follow this could result in damage to driver cards and or their lifetime to be significantly shortened Do not shut off the power during operation unless ...

Page 10: ...sening and or malfunction 3 2 Precautions on installation Precautions on installation 3 Safety precautions Safety precautions Preparation Before Installation Check product Installation Maintenance Appendix If necessary warning caution labels become hidden after installing fences affix again on places where they can be seen Allow a 2 to 5 mm gap between MDR and conveyor frame to facilate the instal...

Page 11: ...t until the causes have been eliminated completely Have specialists or people who have sufficiently acquired skills perform maintenance and inspection under instructions by management supervisors Using this product with unattended abnormalities could result in not only damage to the devices but also unexpected accidents 3 4 Precautions on maintenance Precautions on maintenance CAUTION 3 Safety pre...

Page 12: ... B Technical documentation 12 4 Preparation Before Installation 4 Preparation Before Installation Safety precautions Preparation Before Installation Check product Installation Maintenance Appendix Original notice A1 1 ...

Page 13: ...10A x number of MDR Select an isolated switched mode power supply conforming to safety standard rated IEC60950 1 and or UL60950 1 Do not use non isolated type power supply for safety reasons and for radiation noise restrictions Use of transformer type power supply is prohibited Verify that the suppliedvoltage is stable at DC24V 10 at terminal for the Driver card Select a power supply with a protec...

Page 14: ...24V 10A 24V 20A 24V 40A Power 240W 480W 960W Start up boost 120 150 150 Very weak inrush current Accepts excess current of 120 to 150 at startup according to model 24VDC distribution connector Connector Reference PD 2P 21 35 24 32A max 2 pole with marking 24V OV 4 connector by pole Cable 0 5 4 00mm AWG Fixing with M3 bolt or screw CBK 109 HBK 608 IB E04 IB P02 A driver card is required to control ...

Page 15: ...P Extension cable for Mechanical brake option 60 L 5 Male side Male side Female side Female side 37 60 L 5 37 37 5 40 φ5 5 φ5 5 PM605KT PM605KT B Technical documentation 15 4 Preparation Before Installation Preparation Before Installation Safety precautions Preparation Before Installation Check product Installation Maintenance Appendix Original notice A1 1 Part number 13 Pin extension cable length...

Page 16: ...nd OFF when turning ON and OFF the breaker 2 Input to this Product 24V DC is securely turned ON and OFF when turning the emergency stop switch OFF and ON 1 Circuit breaker check points 2 Device Operation Test Safety precautions Preparation Before Installation Check product Installation Maintenance Appendix Original notice A1 1 Pitch between the rollers mm For pulley Ø56mm 60 63 6 4 Ref 4PJ302 56 N...

Page 17: ...PM605KT PM605KT B Technical documentation 17 5 Check product 5 Check product Safety precautions Preparation Before Installation Check product Installation Maintenance Appendix Original notice A1 1 ...

Page 18: ...Check product Installation Maintenance Appendix Original notice A1 1 Round label I T O H D E N K I P M 6 05KT0550800XV0SC 0 0 1 1 0 1 4 1 1 5 1 0 1 0 I P 5 4 2 4 V D C 5 5 m m n S 1 1 2 3 4 5 6 7 1 2 3 4 5 6 7 Product reference number Month and year of shipment Serial number Protection index Power supply Speed Operation Square label 1 2 3 4 5 6 7 8 Product reference number Month and year of shipme...

Page 19: ...1 pce 1 pce 1 pce 2 pcs 2 pcs 2 pcs 2 pcs 2 pcs 50 35 13 4 C 1 2 M8 6 Spring loaded shaft non cable side Ref MBK 0K1 7 Hex bolt M8 x 25 Strengthening category 10 9 Spring washer M8 Toothed washer nut M8 35 51 16 42 7 8 3 65 73 9 Spring washer Hex bolt M8 x 25 2 8 3 Hex socket head cap bolt M8 25 Spring washer M8 D 35 Dedicated nut Safety precautions Preparation Before Installation Check product In...

Page 20: ...PM605KT PM605KT B Technical documentation 20 6 Installation 6 Installation Safety precautions Preparation Before Installation Check product Installation Maintenance Appendix Original notice A1 1 ...

Page 21: ...spring or Ø 15mm x 8mm 13mm flat M10 threaded not avalaible for brake version Heat treated and phosphated steel shaft Heat treated flange Polymerized polyurethane coating thickness 4 75 mm 90 ShA grey Natural hot vulcanized rubber coating thickness 4 75 mm 60 65 ShA Tube in precision cold drawn steel STKM12 quality outer diam 60 5mm Zinc plated steel or stainless steel 304L 6 1 Set screw Ribbed wi...

Page 22: ...tatic load Kg Axial Force Max N 350 400 500 600 700 800 900 1000 1100 1200 1300 1400 5 1 5 3 5 7 6 1 6 5 6 9 7 3 7 7 8 1 8 5 8 9 9 3 4 1 5 0 5 4 5 8 6 2 6 6 7 0 7 4 7 8 8 2 8 6 9 0 490 160 Original notice A1 1 MDR dimensions 6 2 Preparation to install MDR Standard version Tube L Speed code 15 28 55 Dimension B Mini B Maxi 461 B 1551 441 B 1551 Tube length L mini L max 410 L 1500 390 L 1500 Weight ...

Page 23: ...x 360 L 1500 340 L 1500 Weight Kg 15 28 55 Static load Kg Axial Force Max N 350 400 500 600 700 800 900 1000 1100 1200 1300 1400 5 0 5 2 5 6 6 0 6 4 6 8 7 2 7 6 8 0 8 4 8 8 9 2 4 8 5 0 5 4 5 8 6 2 6 6 7 0 7 4 7 8 8 2 8 6 9 0 490 160 Standard version 1500 9 6 9 4 Tube L Speed code 15 28 55 Dimension B Mini B Maxi 463 B 1553 443 B 1553 Tube length L mini L max 410 L 1500 390 L 1500 Weight Kg 15 28 5...

Page 24: ...Static load Kg Axial Force Max N 400 500 600 700 800 900 1000 1100 1200 1300 1400 1500 5 5 5 9 6 3 6 7 7 1 7 5 7 9 8 3 8 7 9 1 9 5 9 9 5 3 5 7 6 1 6 5 6 9 7 3 7 7 8 1 8 5 8 9 9 3 9 7 490 160 Original notice A1 1 6 Installation Brake version Tube L Speed code 15 28 55 Dimension B Mini B Maxi 375 B 1515 355 B 1515 Tube length L mini L max 360 L 1500 340 L 1500 Weight Kg 15 28 55 Static load Kg Axial...

Page 25: ... 1500 340 L 1500 Weight Kg 15 28 55 Static load Kg Axial Force Max N 350 400 500 600 700 800 900 1000 1100 1200 1300 1400 4 8 5 0 5 4 5 8 6 2 6 6 7 0 7 4 7 8 8 2 8 6 9 0 4 6 4 8 5 2 5 6 6 0 6 4 6 8 7 2 7 6 8 0 8 4 8 8 490 160 Standard version 1500 9 4 9 4 Tube L Speed code 15 28 55 Dimension B Mini B Maxi 427 B 1517 407 B 1517 Tube length L mini L max 410 L 1500 390 L 1500 Weight Kg 15 28 55 Stati...

Page 26: ... load Kg Axial Force Max N 350 400 500 600 700 800 4 8 5 0 5 4 5 8 6 2 6 6 4 6 4 8 5 2 5 6 6 0 6 4 490 160 Crowned tube Hexagonal plain shaft motor side and hexagonal spring loaded shaft on free end Original notice A1 1 6 Installation Tube L Speed code 15 28 55 Dimension B Mini B Maxi 425 B 815 405 B 815 Tube length L mini L max 410 L 800 390 L 800 Weight Kg 15 28 55 Static load Kg Axial Force Max...

Page 27: ...ts conveyed and reduces noise Do not use in contact with hydrocarbon oil or grease Exceptional resistance in the presence of hydrocarbon oil and grease Hardness ShA 60 65 Thickness mm High resistance to abrasion tearing and oil 90 Polyurethane 4 75 L mm 1200 Ø mm 60 5 D mm 70 Crowned machining Cylindrical tube Tube in zinc coated or stainless steel d Tube with natural rubber polyurethane coating t...

Page 28: ...1 See fig below for the position and dimensions of frame holes 1 Leave enough room to tighten hex bolts with hex wrench 1 1 9mm minimum gap is required 2 1 2 2 35 15 2 43 16 2 8 3 If this distance is 23 to 33mm cut the bent part of top of frame for 51mm or over to make a space for M8x25 bolt attaching of the mounting bracket 51mm or over Note Note Safety precautions Preparation Before Installation...

Page 29: ...tion with hexagonal shaft on free side Insert cable side shaft through the frame shaft hole 1 2 Press the spring loaded shaft non cable side with flat head screw driver and carefully insert it to the frame shaft hole Tools required 13mm wrench spanner Care must be paid not to pinch the cable Do not press the shaft beyond the thrust collar As shown in the below figure make sure that the spring load...

Page 30: ...ween the frame inside dimension and MDR Wrench Wrench 1 A B Hex bolt M8 x 25 Hex bolt M8 x 25 Spring washer M8 Hex socket head cap bolt M8 x 25 Cable spanner Cable side Toothed washer nut M8 Spring loaded shaft Dedicated nut Hex wrench As shown in the below figure make sure that the spring loaded shaft pops out from the frame hole Spring loaded shaft Mounting bracket No MBK 0K1 No MBK 0K1 No MBK 0...

Page 31: ...h M10 shaft on free side Ø 10 4 mm Idle end cap side Frame hole Screw M10x20 2 8 15 Insert the cable side shaft into the chassis hole Prevent risk of shearing or sticking the cable CAUTION Make sure the conveyor frame is grounded Position the end cap shaft in front of the chassis hole and fix with M10 screws Ø 10 4 mm M10 Frame hole ø10 4mm MBK 0K1 Tightening torque 27Nm 1 2 Cable diameter 5 5mm T...

Page 32: ...32 PM605KT PM605KT B Technical documentation 7 Maintenance 7 Maintenance Safety precautions Preparation Before Installation Check product Installation Maintenance Appendix Original notice A1 1 ...

Page 33: ...Details No 1 P 30 P 16 Fixing screw of mounting bracket is loose Fasten the screw s with appropriate torque 3 Any slip or wear in transmission belts Replace the belts with new ones 2 MDR behaves abnormally abnormal noise or motion when it starts running Replace the MDR unit if necessary Safety precautions Preparation Before Installation Check product Installation Maintenance Appendix Original noti...

Page 34: ...PM605KT PM605KT B Technical documentation 34 Appendix Appendix Safety precautions Preparation Before Installation Check product Installation Maintenance Appendix Original notice A1 1 ...

Page 35: ...th CBK 109 HBK 608 IB E04 IB P02 Standard MDR Applicable driver card 0 to 40 degree C no freeze Ambient temperature 90 RH no condensation Ambient humidity Indoor Installation No corrosive gas Atmosphere 0 5G Vibration IP54 cold room Contact us for other classes Cold room version 30 C 10 C contact us Index of protection 2 IEC60640 1 UL840 Pollution degree Environment Brake torque Only applicable fo...

Page 36: ... 600 800 1000 1200 10 30 50 80 100 Poids de la charge kg Facteur de PM605KT 55m min PM605KT 28m min PM605KT 15m min Load weight kg Duty cycle Load weight kg Duty cycle Load weight kg Duty cycle These curves are given as a guide Information are from KT motor without brake Transfer capacity depends on the nature and quality of the transported load the belt tension the quality of the bearings the nat...

Page 37: ...min Classic belt PM605KT 28m min Classic belt Load weight kg Speed m min Load weight kg Speed m min Load weight kg Speed m min Belt conveyor dimension lxL 1m x 4m Belt conveyor dimension lxL 1m x 3m Belt conveyor dimension lxL 1m x 3m Friction coefficient used to realise these curve was 0 25μ Information are from KT motor without brake These curves are given as a guide Transfer capacity depends on...

Page 38: ...KT B is an incomplete machine as defined in the EC Machinery Directive and therefore does not fully meet the requirements of this Directive Service entry is prohibited until the whole machine system in which it is incorporated is declared to be in compliance with the EC Machinery Directive The health and safety requirements of Annex I have been applied The special technical documents in accordance...

Page 39: ...Technology for tomorrow www itoh denki com ITOH DENKI 490 Av des Jourdies P A E les Jourdies 74800 St Pierre en Faucigny France Phone 33 0 4 50 03 09 99 Fax 33 0 4 50 03 07 60 ...

Reviews: