background image

6

Main Unit & Accessories

a

Handheld Massager

b

6 types of exchangeable massage heads

c

Charging adaptor

d

Suitcase

Handheld massager

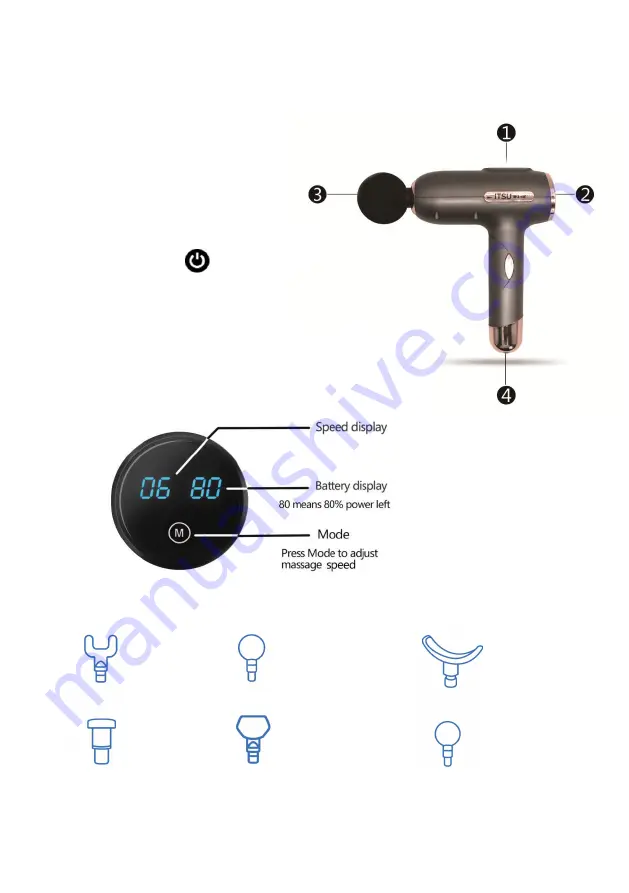
1. ON/OFF switch
2. Control panel

Press

for 3 seconds to standby the massager.

3. Detachable, replaceable shock head.

When removing vibrating head, pull it out with ease.

4. DC charging port.

Control panel

Exchangeable heads

Spade head
for abdominal
abdominal muscles

U-head
for the spine

Small flat head
for all parts of
the body

Crescent head
for Cervical joint

Large spherical head
for large muscle
groups

Small spherical head
for small muscle groups

Summary of Contents for IS0129

Page 1: ...User Manual IS0129...

Page 2: ...1 User Manual All information is correct at the time of print...

Page 3: ...t y C l a i m s 0 5 M a i n U n i t A c c e s s o r i e s 0 6 E x c h a n g e a b l e h e a d s 0 6 I n s t r u c t i o n s 0 7 P r o d u c t M a i n t e n a n c e 0 8 T r o u b l e s h o o t i n g 0...

Page 4: ...ng head as there is a possibility of being pinched Place the appliance in a safe location Do not expose the appliance to a heater or direct sunlight This product is only intended for personal use only...

Page 5: ...or mental capabilities or lack of experience and knowledge unless they have beengiven supervision or instruction concerning use of the appliance by a person responsible fortheir safety Children should...

Page 6: ...5 Damage due to misuse improper treatment and unauthorized modification and repair are not covered by this warranty 6 Warranty does not cover accessories and attachments which do not belong to the mas...

Page 7: ...tandby the massager 3 Detachable replaceable shock head When removing vibrating head pull it out with ease 4 DC charging port Control panel Exchangeable heads Spade head for abdominal abdominal muscle...

Page 8: ...t the preset speed to massage the corresponding body part Charging Before the first use charge it for 4 hours the device will not work when charging and the 16 8V charger will be charged when charging...

Page 9: ...iquid during cleaning Unplug the unit and allow it to cool before cleaning Clean only with a soft slightly damp sponge Do not allow water or any other liquid to go inside the unit Avoid using abrasive...

Page 10: ...Speed too high or too low 1 Press Mode to adjust massage intensity 2 There are 6 levels Product malfunction 1 Let product to cool down for 30 minutes and turn ON again If still fail please contact nea...

Page 11: ...10...

Page 12: ...11 12 14 15 15 16 17 18 18 19...

Page 13: ...12 i 60 ii iii 25 iv ITSU ITSU 16 8V...

Page 14: ...13 v...

Page 15: ...14 1 2 ITSU 3 4 5 6 7 8 ITSU 9 ITSU...

Page 16: ...15 a b 6 c d 1 2 3 3 4 U...

Page 17: ...16 M 1 2 6 LED 4 16 8V LED LED 1 3 4...

Page 18: ...17...

Page 19: ...18 10 15 1 2 1 M 2 6 1 30 2 E3 3 E1 IS0129 16 8V 16 8w X X 17 6 5 22cm 1 4kgs...

Page 20: ...19...

Reviews: