background image


GB 

 
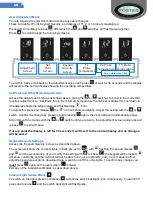
User Adjustment Mode 

You are required to enter this mode to make any setup changes.  
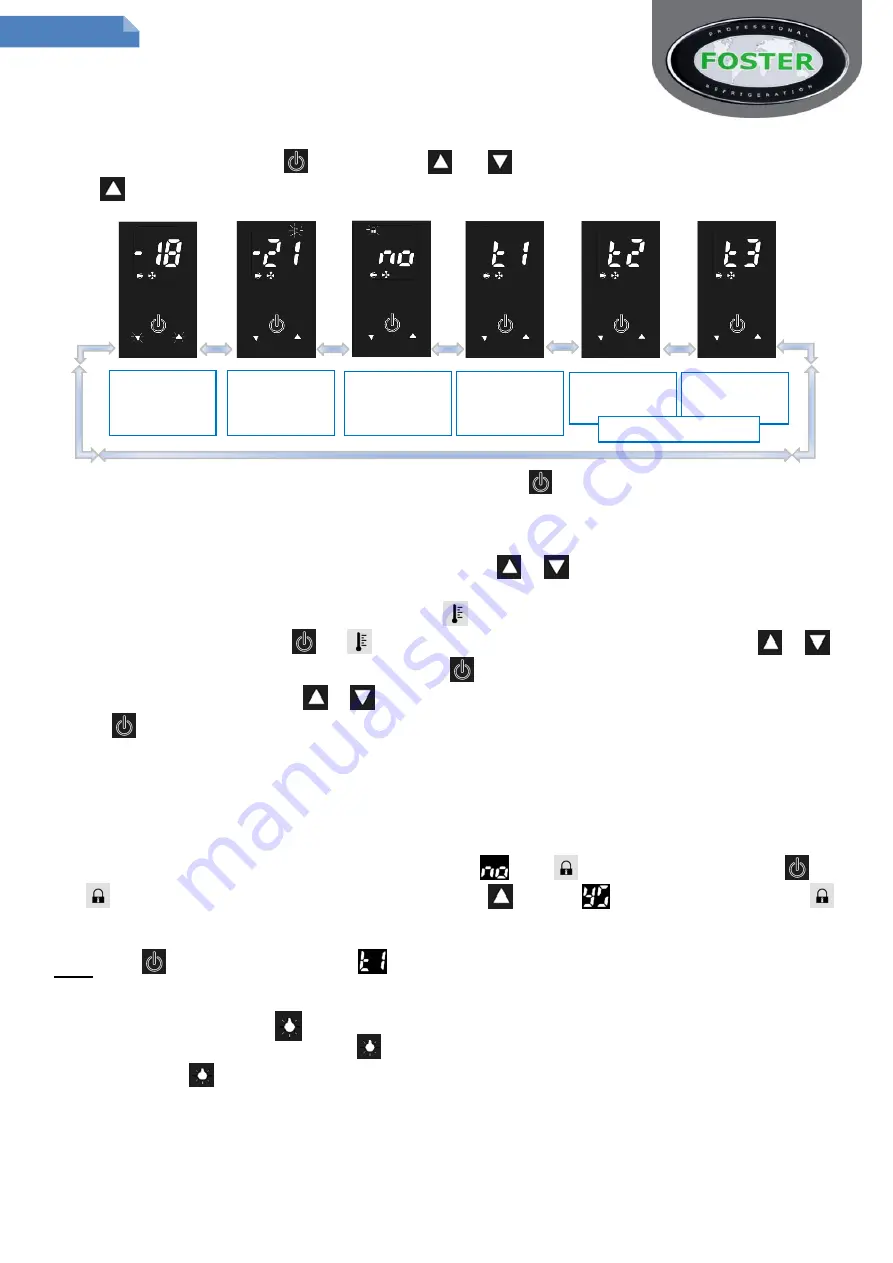
These include Set Point, Keypad Security, and display of T1, 2 or 3 probe temperatures. 

Press and immediately release 

, after which the 

 and 

 switches will flash/pulse together.  

Press 

 to scroll through the following screens: 


To exit this mode scroll back to the adjustment screen and press 

 or wait for 30 seconds and the display 

will revert to the normal display showing the operating temperature. 


Set Point and Other Mode Adjustments  

Access the adjustment mode as described above. Using the 

 or 

 switches to scroll to the mode that 

requires adjustment i.e. 

‘Set Point’ this is the minimum temperature the cabinet is allowed to cool down to 

(the display shows the temperature and flash/pulsing 

 icon).  

To adjust this press and release 

 the 

 icon will show constantly. Adjust the setting with the 

 or 


switch. Confirm the change by pressing and releasing 

 again, the next mode will automatically show. 

Scroll through the modes with the 

 or 

 switch until you return to the adjustment screen and press and 

release 

 to exit and save.  

 
If at any point the display is left for 30 seconds it will revert to the normal display and no changes 
will be saved. 

 
Keypad Security Settings 

Access the ‘Keypad Security’ screen as described above.  

The screen will show the current status, initially pre-set to 

’, with 

 flashing. Press and release 


and 

 will show constantly. (If you modify this setting with 


to show ‘

’ the keypad will be locked, 


will show constantly and the cabinet will not be able to be put into standby, carry out a manual defrost, 
adjust temperature set point, download data or switch on/off the units lights. To confirm any change you 

must

 press 

 again so the next screen 

’ shows).  

Exit any of the 

‘Adjustment Modes’ as described above. 


Internal Light (where fitted)    

To switch on the lights press and release 

 so that the switch backlight is on continuously. To switch off 

press and release 

 and the switch backlight will flash/pulse. 


T1 

Probe 

Temperature 

Keypad 

Security 

Screen 

Set 

Point 

Screen 


Adjustment 

Screen 

T2 Probe 

Temperature 

T3 Probe 

Temperature 

Only visible when fitted 

Summary of Contents for Foster EcoPro G2

Page 1: ...16 4700 Email support foster uk com www fosterrefrigerator co uk A Division of ITW Ltd Foster Refrigerator Oldmedow Road King s Lynn Norfolk PE30 4JU United Kingdom ISO 9001 ISO 14001 Original Operation Instructions EcoPro G2 Cabinets FD1 11 Controller Display 00 556483 March 2012 Issue 1 English Français Nederlands Magyar Pусский Česky Deutsch Español 0772 ...

Page 2: ...able mains power outlet and turn the supply on Please do not plug or unplug the unit with wet hands The cabinet will energise briefly showing followed by the power switch slowly pulsing with a blank display The unit is now in standby Standby Pressing this switch for 3 seconds will turn the unit on the switch backlight is static and the display shows the operating temperature or into standby the sw...

Page 3: ...ly show Scroll through the modes with the or switch until you return to the adjustment screen and press and release to exit and save If at any point the display is left for 30 seconds it will revert to the normal display and no changes will be saved Keypad Security Settings Access the Keypad Security screen as described above The screen will show the current status initially pre set to with flashi...

Page 4: ...g or unplug the unit with wet hands Only when cleaning has been completed and the unit is dry should the cabinet be turned back on at the mains Regular Maintenance As and when required remove all product and shelving beware of cold and or sharp components from the unit Clean exterior and interior surfaces with mild liquid detergent following the directions on the pack at all times Rinse surfaces w...

Page 5: ...ill sound and show until has been pressed and released to cancel the alarm We would recommend the contents of the unit are inspected Before calling your supplier please make sure that a The plug has not come out of the socket and the mains power supply is on i e is the controller illuminated b Check to see if the unit is in standby c The fuse for the cabinet is intact d The cabinet is positioned c...

Page 6: ...il à une prise secteur et le mettre sous tension Ne jamais brancher ou débrancher l appareil avec les mains humides L armoire va indiquer brièvement qu elle est mise sous tension en affichant suivi par l interrupteur d alimentation clignotant lentement et avec un écran vide L appareil est maintenant en mode veille Affichage des icônes et des commutateurs Verrouillage du clavier Avertissement Alarm...

Page 7: ...vient à l affichage normal affichage de la température de fonctionnement Point de consigne et autres modes de réglages Accéder au mode de réglage comme indiqué ci dessus En utilisant les commutateurs ou pour faire défiler jusqu au mode qui nécessite un réglage c est à dire le point de consigne ceci est la température minimale que l armoire est autorisée à atteindre en refroidissant l afficheur ind...

Page 8: ...u style filaire aux normes gastronormes GN qui glissent sur les glissières latérales Les armoires à poissons sont livrées avec un aménagement fixe et bacs à poisson les armoires à vin avec casiers à bouteilles Les deux aménagements sont montés à la place des clayettes standards Aliments Couvrir toutes les denrées alimentaires et séparer les aliments crus et cuits pour éviter la contamination crois...

Page 9: ...it de ne pas entretenir correctement le condenseur peut invalider la garantie du groupe moteur et provoquer une panne du moteur compresseur NE JAMAIS utiliser une brosse métallique pour nettoyer le condenseur Remettre en place les panneaux après le nettoyage Les joints de porte doit être inspectés sur régulièrement et il faut les remplacer s ils sont endommagés Pour le nettoyage essuyer avec un ch...

Page 10: ...d air chaud ou froid n affectent pas les performances e Le condenseur n est ni bloqué ni sale f Les produits sont répartis correctement à l intérieur g Le dégivrage n est en cours ou requis Si la raison de la défaillance ne peut être identifiée débrancher l alimentation électrique de l appareil et contacter votre installateur Lors de la demande d une intervention pour réparation mentionner le modè...

Page 11: ...al een ruimte van 310 mm boven en 50 mm rondom de kast is voor ventilatie en een goede werking Verbindt de eenheid met een geschikte contactdoos en schakel de stroomvoorziening in De stekker van de eenheid niet met natte handen in of uit het stopcontact halen De kast zal inschakelen en gedurende korte tijd het symbool tonen vervolgens zal de aan uitschakelaar langzaam knipperen en zal het display ...

Page 12: ...pulserende symbool Om deze aan te kunnen passen drukt u kort op het symbool wordt nu continu weergegeven Pas de instelling aan met de toets of Bevestig de wijziging door weer kort op te drukken de volgende modus wordt automatisch getoond Stap met de toets of door de modi totdat u in het venster Aanpassen terugkeert en druk vervolgens kort op om de wijziging op te slaan en het venster Aanpassen te ...

Page 13: ...ndmatig te ontdooien terwijl de kast in bedrijf modus is blijft u gedurende 5 seconden onafgebroken op drukken Na 3 seconden wordt het display leeg en komt dan na 2 seconden weer op Op dat moment wordt een defrost uitgevoerd afhankelijk van onderliggende bedrijfsparameters dit wordt automatisch beëindigd Schoonmaken en onderhoud Belangrijk Alvorens de eenheid schoon te maken moet deze op stand by ...

Page 14: ...n toepassing op model en mogelijk gemaakt door parameters Waarschuwing stroomuitval PF wordt weergegeven het alarm klinkt en wordt getoond indien er een stroomuitval is geweest die weerslag op de inwendige luchttemperatuur van de kast heeft gehad alleen wanneer de kast niet in de modus stand by stond Wanneer de stroomtoevoer weer wordt hersteld dan zal de kast verder werken en de temperatuur naar ...

Page 15: ...ksamen Betrieb müssen oberhalb des Schranks 310mm und rund um den Schrank 50 mm Abstand vorhanden sein Schließen Sie das Gerät an eine geeignete Steckdose an und schalten Sie die Stromzufuhr ein Stecken bzw ziehen Sie den Netzstecker nicht mit nassen Händen in die bzw aus der Steckdose Nach dem Einschalten zeigt das Gerät kurz an und anschließend blinkt die Stromtaste langsam bei leerer Anzeige Da...

Page 16: ...stemperatur anzeigt Sollwert und andere Modus Einstellungen Stellen Sie wie oben beschrieben den Einstellungsmodus ein Verwenden Sie dazu die oder Taste um zu jenem Modus zu scrollen der eingestellt werden soll d h Sollwert ist die Mindesttemperatur auf die das Gerät abgekühlt werden muss die Anzeige zeigt die Temperatur und ein leuchtendes blinkendes Symbol Zum Einstellen drücken Sie kurz Das Sym...

Page 17: ...gemäß Gastronorm 2 1 die sich in die Einschubleisten schieben lassen Fischkühlschränke sind mit fixen Regalen und Fischbehältern ausgerüstet Weinkühlschränke mit den erforderlichen Flaschenregalen halterungen Diese Vorrichtungen werden anstelle de standardmäßigen Roste eingebaut Nahrungsmittel Decken Sie alle Nahrungsmittel ab und trennen Sie rohe und gekochte Nahrungsmittel um eine gegenseitige K...

Page 18: ...deckung nicht und lassen Sie sie nicht unbeaufsichtigt Verwenden sie eine weiche Bürste oder einen Staubsauger um Schmutz Staub zu entfernen Bei hartnäckigen Fettverschmutzungen auf dem Kondensator rufen Sie bitte Ihren Lieferanten an und vereinbaren Sie die Durchführung einer vollständigen Wartung kostenpflichtig Wenn Sie den Kondensator nicht ordnungsgemäß warten kann dies zu einem Verfall der G...

Page 19: ...n a Befindet sich der Stecker in der Steckdose und ist die Stromversorgung eingeschaltet d h leuchtet die Kontrollleuchte b Befindet sich das Gerät im Standby Modus c Ist die Sicherung für den Schrank in Ordnung d Ist der Schrank ordnungsgemäß aufgestellt wird seine Leistung nicht durch Kalt oder Warmluftströme beeinträchtigt e Ist der Kondensator blockiert oder verschmutzt f Sind die Lebensmittel...

Page 20: ...ue hay una distancia mínima de 310 mm por encima y 50 mm alrededor de la cabina para proporcionarle una ventilación y un funcionamiento eficaz Conecte la unidad a una toma de corriente de red adecuada y encienda el suministro Por favor no conecte o desconecte la unidad con las manos mojadas La cabina empezará a funcionar en breve mostrando seguido por el interruptor de encendido parpadeando lentam...

Page 21: ...presione o espere 30 segundos y la pantalla volverá a la pantalla normal que muestra la temperatura de funcionamiento Punto de ajuste y otros ajustes de modo Acceda al modo de ajuste como se describió anteriormente Utilizando los interruptores o para desplazarse hasta el modo que requiera un ajuste Por ejemplo Punto de ajuste esta es la temperatura mínima a la que la cabina enfría la pantalla mues...

Page 22: ...las bandejas deslizantes Las cabinas para pescado vienen con contenedores fijos y estanterías para pescado las cabinas para vino vienen con el ensamblaje de sujeción estantería adecuado Ambos están ajustados en lugar de tener estanterías estándar Comida Cubra todos los alimentos y separe los alimentos crudos y cocinados para evitar la contaminación cruzada Carga y flujo de aire Distribuya uniforme...

Page 23: ... la limpieza se lleva a cabo No se apoye en la cubierta de la unidad sin dejar vigilancia Use un cepillo suave o una aspiradora para eliminar la suciedad polvo Si hay depósitos de grasa rebeldes que quedan en o a través del condensador llame a su proveedor para llevar a cabo un servicio completo esto es normalmente de pago Si no se mantiene el condensador puede invalidar la garantía de la unidad d...

Page 24: ...no se ha salido de la toma de corriente y la red eléctrica está encendida por ejemplo el controlador de sistema está iluminado b Verifique si la unidad está en modo de espera c El fusible de la caja está intacto d La cabina está en la posición correcta las fuentes de aire frío o caliente no están afectando al rendimiento e El condensador no está ni bloqueado ni sucio f Los productos se colocan en ...

Page 25: ...dné zásuvky a zapněte ho Zařízení nezapojujte ani neodpojujte ze zásuvky s mokrýma rukama prosím Skříň se začne nabíjet rychle na prázdném displeji se zobrazí Zařízení je nyní v pohotovostním stavu Pohotovostní stav Stlačením spínače po dobu 3 sekund se zařízení zapne podsvícení spínače je statické a na displeji se zobrazí provozní teplota nebo přejde do pohotovostního stavu podsvícení spínače se ...

Page 26: ...cí tlačítek a dokud se nevrátíte na obrazovku nastavení a pro ukončení a uložení stiskněte a uvolněte Je li na displeji ponechán jakýkoli bod po dobu 30 sekund displej se vrátí do běžného stavu a neuloží se žádné změny Nastavení zabezpečení tlačítek Obrazovku Zabezpečení tlačítek nastavte jak je uvedeno výše Na obrazovce se zobrazí aktuální stav v počátečním stavu přednastavený na s blikající ikon...

Page 27: ...až po dokončení čištění a vyschnutí chladící skříně Pravidelná údržba Je li třeba vyjměte všechny produkty a police dejte si pozor na studené nebo ostré komponenty ze zařízení Vnitřní a vnější povrchy vyčistěte jemným čistícím povrchem vždy dodržujte pokyny na balení Povrchy otřete vlhkým hadříkem namočeným do čisté vody Nikdy nepoužívejte drátěnku prášek nebo vysoce zásadité čistící prostředky tj...

Page 28: ...ál alarmu a zobrazí se dokud nestisknete a neuvolníte čímž dojde ke zrušení alarmu Doporučujeme provést kontrolu obsahu zařízení Předtím než kontaktujete svého dodavatele zkontrolujte a Zda Zástrčka nevypadla ze zásuvky a napájení je tudíž zapnuto tj zda je ovládací spínač osvícený b Zda je zařízení v pohotovostním režimu c Zda je pojistka zařízení neporušená d Zda je zařízení umístěno správně zda...

Page 29: ...круг него не меньше 50 мм свободного пространство для обеспечения вентиляции и эффективной работы Устройство подключите к подходящей розетке электросети и включите ток Пожалуйста не включайте и не отключайте устройство мокрыми руками Холодильник включится и на короткое время покажет после чего включатель питания будет медленно пульсировать показывая пустой дисплей Устройство в настоящее время нахо...

Page 30: ...ормальному дисплею показывая рабочую температуру Настройка точки и другие корректировки режима Переключитесь на режим настроек как описано раньше С помощью переключателей или переключитесь на режим который необходимо корректировать то есть настройка точки это минимальная температура до которой холодильник может остыть дисплей показывает температуру и горит пульсирует икона Чтобы корректировать наж...

Page 31: ...тандартного гастрономического стиля они двигаются в раздвыжные подносы Холодильники для хранения рыбы поставляются с фиксированными стеллажами и контейнерами для рыбы в холодильниках для хранения вин имеются стеллажи для бутылок комплект держателей В обоих вариантах эти приспособления заменяют стандартные полки Продукты питания Накройте все продукты питания и отдельные сырые и вареные продукты что...

Page 32: ...ации может быть аннулирована и это может привести к преждевременному выходу из строя двигателя компрессора НЕ пользуйтесь щеткой для чистки конденсатора Поставьте обратно все панели которые были удалены после чистки Регулярно необходимо проверять дверные прокладки и в случае повреждения их необходимо поменять Чтобы очистить их протрите влажной тряпкой намоченной в теплой мыльной воде затем протрит...

Page 33: ...или теплого воздуха не влияют на его производительность e конденсатор не заблокирован и не грязный f продукты в аппарате расположены правильно g не выполняется размораживание и оно не требуется Если вы не можете определить причину неисправности отключите электропитание устройства и обратитесь к поставщику При обращении в сервисную службу назовите модель и серийный номер который можно найти на сере...

Page 34: ...k fölött minimum 310 mm valamint körülötte minimum 50 mm szabad tér legyen a levegő áramlásának és a készülék hatékony működésének biztosítására Csatlakoztassa a készüléket egy megfelelő aljzathoz és kapcsolja rá az áramot Kérjük hogy a készülék csatlakozóját nedves kézzel ne dugja be és ne húzza ki A készülék rövidesen feltöltődik árammal amelyet a bekapcsoló gomb lassú ütemű villogása jelez mikö...

Page 35: ...követően a képernyő visszavált a működési hőmérsékletet mutató normál képernyőre A pontbeállítás és egyéb üzemmód váltások Lépjen be a beállítási üzemmódba a fentiekben leírtak szerint A vagy a gombok megnyomásával eljuthat a beállítandó üzemmódhoz vagyis a setpoint beállításához amely azt a legalacsonyabb hőmérsékletet jelenti amely hőmérsékletre a készülék hűthet a kijelző kijelzi a hőmérséklete...

Page 36: ... tartanak szabványos GN méretűek A haltartó egységek rögzített tartókeret és haltartó edényzet formájában találhatók meg a készülékben a bortartók a szükséges elosztású tartónyílásokkal vannak ellátva Ezek mindegyike a szabványos polcozat helyett rögzített módon kerültek kialakításra Élelmiszer A keresztfertőződés megelőzésére minden élelmiszert fedjen be a nyers és a főtt élelmiszereket tárolja e...

Page 37: ...gy porszívóval távolítsa el Amennyiben makacs zsírlerakódás marad a kondenzátoron vagy azon belül vegye fel a kapcsolatot a beszállítóval és vele végeztesse el a teljes körű tisztítási szolgáltatást ez rendszerint díjköteles Az előkondenzátor karbantartásának elmaradása a kondenzáló egység garanciájának érvénytelenségét vonhatja maga után és a motor vagy a kompresszor idő előtti elromlásához vezet...

Page 38: ...te hogy a dugasz nem jött e ki az aljzatból az áramellátás be van kapcsolva tehát világít az ellenőrző fény b ellenőrizte hogy a készülék nincs e készenléti állapotban c a készülék biztosítéka hibátlan d a készülék elhelyezése megfelelő e vagyis hideg vagy meleg levegő nem befolyásolja e a készülék teljesítményét e Az előkondenzátor nincs sem eltömődve és nem is szennyezett f a hűtendő tételek a k...

Page 39: ...GB Page Left Blank Intentionally ...

Page 40: ... Spelnia wymogi następujących Dyrektyw Europejskich S ä normriktig och utformad enligt fölande Europeiska direktiv GB and have been designed realised and controlled according to the following regulations D das Gerät ist folgenden Normen gemäß entworfen angfertigt und geprüft worden DK er blevet projekteret realiseret og kontrolleret i følge neden for beskrevne normer E y estuvo proyectado realizad...

Reviews: