background image


HDC/HDR_UM_9752092810_NL_D_GB_F_V2_1  


17


GB 

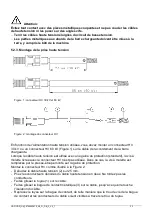
-  Tighten the contact spring (5) with the closed end on the screw thread of the metal contact 

bush. 

-  Check that the HV connector is securely attached to the cable. 


6. Putting into use 


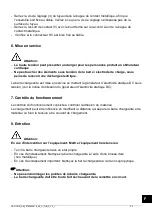
Warning: 

-


High voltages can be dangerous for pacemaker wearers. 

-


Touching live parts of the charging bar/electrode will cause an unpleasant electrical 
shock. 

 
The charging bar is put into use by switching on the DC high voltage power unit (please refer to 
the manual of the DC high voltage power unit). 


7. Functional check 

 
The proper functioning is established by checking the material bonding. 
Charging is affected by changes in the distance from charging bar to material as well as by 
charging voltage and current changes. 


8. Maintenance 


Warning: 


When carrying out work on the equipment: de-energise the equipment.


  Keep the charging bar clean. 

  If fouled: Clean the charging bar with a hard non-metal brush. 

  If heavily fouled: Clean the charging bar with isopropyl alcohol. 


Attention: 


Do not damage the charging bar points. 


Make sure the charging bar is entirely dry before you turn it on again.


Summary of Contents for Simco-Ion HDC

Page 1: ...n 1 7 13 19 NL Gebruikershandleiding HDC HDR Oplaadstaven Aufladestäbe Charging bars Barres chargeantes Simco Ion Netherlands Postbus 71 NL 7240 AB Lochem Telefoon 31 0 573 288333 Telefax 31 0 573 257319 E mail general simco ion nl Internet http www simco ion nl Traderegister Apeldoorn No 08046136 ...

Page 2: ...d 2 3 Toepassing en werking 2 4 Technische specificaties 3 5 Installatie 3 5 1 Controle 3 5 2 Montage 3 5 2 1 Overzicht 3 5 2 2 Montage oplaadstaaf 3 5 2 3 Montage HV connector 4 6 Ingebruikneming 5 7 Controle op de werking 5 8 Onderhoud 5 9 Storingen 6 10 Reparatie 6 11 Afdanken 6 ...

Page 3: ...aan Hierdoor krijgt u een onaangename elektrische schok Hoogspanning kan gevaarlijk zijn voor personen met een pacemaker Metalen delen in de omgeving van de oplaadstaven inclusief machineframe moeten zijn geaard Indien zonder schriftelijke goedkeuring vooraf wijzigingen aanpassingen etc zijn aangebracht verliest het apparaat zijn garantie 3 Toepassing en werking De oplaadstaven HDC en HDR worden g...

Page 4: ...nd van de oplaadstaaf tot metalen delen dient minimaal 75 mm te zijn Bij toepassingen met meer dan 30 kV op de oplaadstaaf dienen speciale voorzieningen te worden getroffen i v m de kans op vonkoverslag naar machinedelen en t a v de isolatiewaar den van de aansluitkabel Bij vragen over de juiste wijze van opladen of montage neem contact op met Simco Ion of met de agent in uw regio 5 2 2 Montage op...

Page 5: ...r geleverde kartelschroef niet gebruikt De kartelschroef wordt hierbij vervangen door de wartel die aan de beschermslang is gemonteerd Monteer de HV connector volgens afbeelding 2 Strip de hoogspanningskabel 2 25 mm Buig de gestripte aders van de hoogspanningskabel dubbel De aders niet twisten Schuif het pijpje 1 over de kabel Schuif de metalen contactbus 3 over de kabel tot tegen de kabelisolatie...

Page 6: ... Controle op de werking vindt plaats door controle van de hechting van het materiaal Verandering van de afstand van de oplaadstaaf tot het materiaal en ook het veranderen van de oplaadspanning en stroom beïnvloeden de oplading 8 Onderhoud Waarschuwing Bij werkzaamheden aan de apparatuur apparatuur spanningsloos maken Houd de oplaadstaaf schoon Bij vervuiling oplaadstaaf reinigen met een harde niet...

Page 7: ...koverslag van oplaadstaaf naar materiaal Hoogspanning te hoog ingesteld Stel de hoogspanning lager in Afstand van oplaadstaaf tot materiaal te klein Monteer de oplaadstaaf verder van het materiaal 10 Reparatie Waarschuwing Reparatie dient te gebeuren door een elektrotechnisch vakbekwaam persoon Bij werkzaamheden aan de apparatuur apparatuur spanningsloos maken Voor reparaties uitgezonderd van de k...

Page 8: ...3 Einsatz und Funktionsweise 8 4 Technische Angaben 9 5 Installation 9 5 1 Kontrolle 9 5 2 Montage 9 5 2 1 Überblick 9 5 2 2 Montage 9 5 2 3 Montage des Hochspannungssteckers 10 6 Inbetriebnahme 11 7 Funktionsprüfung 11 8 Wartung 11 9 Störungen 12 10 Reparatur 12 11 Entsorgung 12 ...

Page 9: ...nungsführenden Spitzen Sie bekommen sonst einen unangenehmen Stromschlag Hochspannung kann für Personen mit einem Herzschrittmacher gefährlich sein In der Nähe der Aufladestäbe befindliche Metallteile einschließlich des Maschinenrahmens sind zu erden Wenn ohne vorhergehende schriftliche Genehmigung Änderungen Anpassungen usw vorgenommen wurden können keine Garantieansprüche geltend gemacht werden ...

Page 10: ...tiert werden muss Verwenden Sie keine Klemmen oder sonstige Befestigungsmaterialien aus Metall Der Aufladestab muss mindestens 75 mm von Metallteilen entfernt sein Bei Anwendungen mit mehr als 30 kV auf dem Aufladestab müssen wegen der Gefahr des Funkenüberschlags auf Maschinenteile sowie im Zusammenhang mit den Isolationswerten des Anschlusskabels besondere Vorkehrungen getroffen werden Nehmen Si...

Page 11: ...hspannungs Netzteil wird ein 30 kV HS Stecker oder ein 60 kV HS Stecker Abbildung 1 am Anschlusskabel des Aufladestabs angebracht Bei Verwendung eines Hochspannungskabels mit Schutzschlauch Standardausführung wird die mit dem HS Stecker mitgelieferte Schraubkappe nicht benutzt Die Schraubkappe wird durch die Überwurfmutter ersetzt die am Schutzschlauch befestigt ist Montieren Sie den HS Stecker ge...

Page 12: ...chen Schlag Der Aufladestab wird durch Einschaltung des DC Hochspannungs Netzteils in Betrieb gesetzt siehe die Bedienungsanleitung für das DC Hochspannungs Netzteil 7 Funktionsprüfung Die Funktionsprüfung erfolgt durch eine Kontrolle des Materials auf ordnungsgemäße Haftung Die Aufladung wird durch eine Änderung der Entfernung zwischen Aufladestab und Material sowie durch eine Aufladespannungs un...

Page 13: ...Funkenüberschlag zwischen Aufladestab und Material Hochspannung zu hoch eingestellt Hochspannung niedriger einstellen Entfernung zwischen Aufladestab und Material zu gering Aufladestab in einer größeren Entfernung vom Material montieren 10 Reparatur Warnung Reparaturarbeiten sind von elektrotechnisch fachkundigem Personal durchzuführen Schalten Sie die Netzspannung bei der Durchführung von Arbeite...

Page 14: ...3 Use and operation 14 4 Technical specifications 15 5 Installation 15 5 1 Checks 15 5 2 Installation 15 5 2 1 Summary 15 5 2 2 Installation 15 5 2 3 Assembly of high voltage plug 16 6 Putting into use 17 7 Functional check 17 8 Maintenance 17 9 Faults 18 10 Repair 18 11 Disposal 18 ...

Page 15: ...live points You will get an unpleasant electrical shock High voltages are hazardous for people who have a pacemaker Metal parts near the charging bars including the machine frame must be earthed If changes adjustments etc have been made without prior consent in writing guarantee can no longer be invoked for the equipment 3 Use and operation The HDC and HDR charging bars are used for charging large...

Page 16: ...ar and metal parts must be 75 mm If more than 30 kV is applied to the charging bar special measures should be taken because of the risk of spark over to machine parts and the connection cable insulation values Please contact Simco Ion or your regional agent for further information If you have any questions concerning proper charging or installation please contact Simco Ion or your regional agent 5...

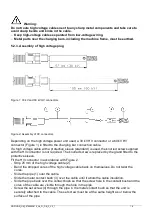
Page 17: ...ive sleeve standard is used the knurled screw supplied with the HV connector is not required The knurled screw is replaced by the gland fitted to the protective sleeve Fit the HV connector in accordance with Figure 2 Strip 25 mm of the high voltage cable 2 Bend the stripped cores of the high voltage cable back on themselves Do not twist the cores Slide the pipe 1 over the cable Slide the metal con...

Page 18: ...r unit please refer to the manual of the DC high voltage power unit 7 Functional check The proper functioning is established by checking the material bonding Charging is affected by changes in the distance from charging bar to material as well as by charging voltage and current changes 8 Maintenance Warning When carrying out work on the equipment de energise the equipment Keep the charging bar cle...

Page 19: ...lean the charging bar Spark over from charging bar to material High voltage set too high Lower high voltage Distance from charging bar to material too small Mount the charging bar farther away from the material 10 Repair Warning Repairs shall be made by a skilled electrical engineer When carrying out work on the equipment De energise the equipment Except for the cable protection the charging bar d...

Page 20: ...on et fonctionnement 20 4 Spécifications techniques 21 5 Installation 21 5 1 Contrôle 21 5 2 Montage 21 5 2 1 Aperçu 21 5 2 2 Montage 21 5 2 3 Montage de la prise haute tension 22 6 Mise en service 23 7 Contrôle du fonctionnement 23 8 Entretien 23 9 Pannes 24 10 Réparation 24 11 Mise au rebut 24 ...

Page 21: ...que La haute tension peut présenter un danger pour les personnes portant un stimulateur cardiaque Les parties métalliques aux abords de barres chargeantes doivent être mises à la terre y compris le bâti de la machine La garantie de l appareil s annule en cas de modification d adaptation etc sans accord préalable écrit 3 Application et fonctionnement Les barres chargeantes HDC et HDR sont utilisées...

Page 22: ...ante et les parties métalliques doit être d au moins 75 mm Pour des applications de plus de 30 kV sur la barre de charge il faut adopter des précautions spéciales pour éviter que les composants de la machine reçoivent des étincelles et du fait des valeurs d isolement du câble de connexion Contactez à ce sujet Simco Ion ou son agent dans votre région Pour plus d informations à ce sujet Contactez Si...

Page 23: ...igure 1 sur le câble de raccordement de la barre chargeante Lorsque le câble haute tension est utilisé avec une gaine de protection standard la vis à molette livrée avec le connecteur HV n est pas utilisée Dans ce cas la vis à molette est remplacée par le presse étoupe monté sur la gaine de protection Montez le connecteur HV comme illustré à la Figure 2 Dénudez le câble haute tension 2 sur 25 mm P...

Page 24: ... service en mettant le générateur d électricité statique DC sous tension voir la notice d utilisation du générateur d électricité statique DC 7 Contrôle du fonctionnement Le contrôle du fonctionnement consiste à contrôler l adhésion du matériau Le chargement peut être influencé en modifiant la distance qui sépare la barre chargeante et le matériau ou bien la tension et le courant de chargement 8 E...

Page 25: ...rre de chargement encrassée Nettoyer la barre chargeante Décharge entre la barre chargeante et le matériau La haute tension a été ajustée trop haut Réduire la haute tension La distance entre la barre chargeante et le matériau est trop petite Monter la barre chargeante à une plus grande distance du matériau 10 Réparation Attention La réparation doit être réalisée par un électricien qualifié En cas ...

Reviews: