English
English
English
English
6
User tips:
Prevent deep discharging of the batteries. The battery life will be reduced significantly.
Charge a deep discharged battery as soon as possible.
Let the battery charger finish the charge cycle completely.
If the battery is not charged for a longer period, for example during winter, connect the
battery charger every month to charge the battery. Battery self-discharge and the quiescent
current of the connected users will drain the battery charge slowly.
It is also possible to keep the battery charger connected to the battery and the mains during
this period.
Do not charge batteries below 0°C. Move the battery to a warmer place and start the
charge.
Keep the ventilation openings clean and free of accumulated dust. Blow away the dust and
clean the battery charger enclosure with a slightly moistened cloth, if required.
Despite the fact that the battery charger power consumption during stand-by is very low,
it is recommended to unplug the battery charger from the mains if it will not be used for a
longer period. This is to prevent unnecessary energy consumption.
5. Problem solving
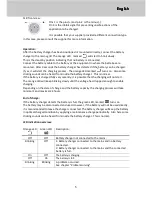
In case there is a problem or there is a suspicion the charger is not operating as expected,
first check which of the indication LEDs are on.
If the orange and the green LED are blinking simultaneously, they are indicating an error.
( ½ second on, ½ second off followed by a 1 second pause).
The number of flashes, between the pauses are indicating the error code.
Consult the next tables to diagnose the problem.
Table 1: Fault diagnostics
Problem
Possible causes
Solution
None of the LEDs
are on
No mains voltage.
Check mains voltage.
Battery charger or mains
cable broken.
Consult Your supplier.
All LEDs are on
continuously
Battery charger broken.
Consult Your supplier.
All LEDs are blinking
simultaneously
Problem detected.
Count the number of flashes between
the pauses and consult table 2

