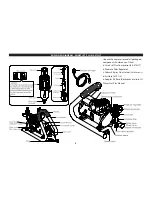
1. Screw the moisture filter regulator onto 1/4” fitting on compressor.
2. Screw airbrush.spray gun holder onto side metal plate with provided screws.
3. Screw the coiled air hose onto the compressor.
4. Screw the other end of the coiled air hose onto the moisture trap’s small screw.
5. Screw the straight air hose’s big end onto the moisture trap’s big screw.
6. Screw the straight air hose’s small end onto the airbrush.
a. Note: If you’re using a brand of airbrush other than Iwata, use the appropriate adapter from the adapter kit.
You might have to try them out to see which one is right.
7. Place the moisture trap into the compressor’s front-mounted metal ring. The moisture trap should snap into place. By snapping into place
it will not rattle when the unit is running.
8. The airbrush should fit into the black airbrush holder by placing the front end of the airbrush into the holder.
9. Plug the compressor into a grounded wall outlet. (Avoid using an extension cord.)
10. Turn the compressor ON by pressing down the switch on top of the unit. The unit will run for a couple seconds then stop. This is OK! When
you push down the trigger on your airbrush, the compressor will come on and when you release the trigger the unit will stop. This is the
Auto Shut-Off feature effect. This feature will prolong the life of your motor since the unit doesn’t run the whole time it’s turned on.
11. As the unit is being used, water may collect in the moisture trap’s clear, plastic bowl. Release the water by following the maintenance
instructions on page 9.
GETTING STARTED
7
Summary of Contents for IS-875HT
Page 2: ......
Page 12: ...Rev2 9 16 w w w I W A T A A I R B R U S H c o m...


