REL1.2
Page 58 of 62
iWave Systems Technologies Pvt. Ltd.
RZ/G1E SODIMM SOM Hardware User Guide
3.3.2
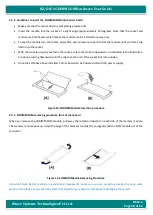
Guidelines to insert the SODIMM SOM into Carrier board
•
Make sure that the carrier board is completely powered off.
•
Insert the module into the socket at a slight angle (approximately 25 degrees). Note that the socket and
module are both keyed, which means the module can be installed one way only.
•
To seat the module into the socket, apply firm, even pressure to each end of the module until you feel it slip
down into the socket.
•
With the module properly seated in the socket, rotate the module downward, as indicated in the illustration.
Continue pressing downward until the clips at each end of the socket lock into position.
•
Once the SOM have been installed, Carrier board can be Powered ON with 5V power supply.
Figure 10: SODIMM Module Insertion procedure
3.3.3
SODIMM SOM removing procedure from Carrier board
When you remove the SODIMM SOM module, pull away the retention clips (A) on each side of the memory module.
The memory module pops up. Grasp the edge of the memory module (B), and gently pull the SOM module out of the
connector.
Figure 11: SODIMM Module Removing Procedure
Important Note: Before touching any electronic components, make sure you are properly grounded by using some
static control device to prevent static electricity stored on your body or clothing from damaging the system.
Summary of Contents for iW-RainboW-G22M
Page 49: ...REL1 2 Page 49 of 62 iWave Systems Technologies Pvt Ltd RZ G1E SODIMM SOM Hardware User Guide...
Page 50: ...REL1 2 Page 50 of 62 iWave Systems Technologies Pvt Ltd RZ G1E SODIMM SOM Hardware User Guide...
Page 51: ...REL1 2 Page 51 of 62 iWave Systems Technologies Pvt Ltd RZ G1E SODIMM SOM Hardware User Guide...
Page 62: ...REL1 2 Page 62 of 62 iWave Systems Technologies Pvt Ltd RZ G1E SODIMM SOM Hardware User Guide...

