background image

SeapiX 

  Installation Manual


SSD-C-1306  Ed. A 

 01/2020


80


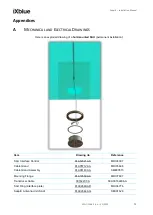
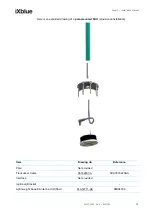
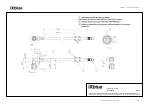
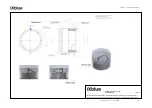
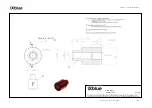
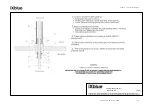
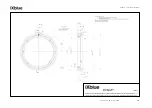
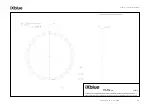
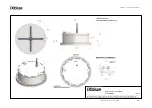
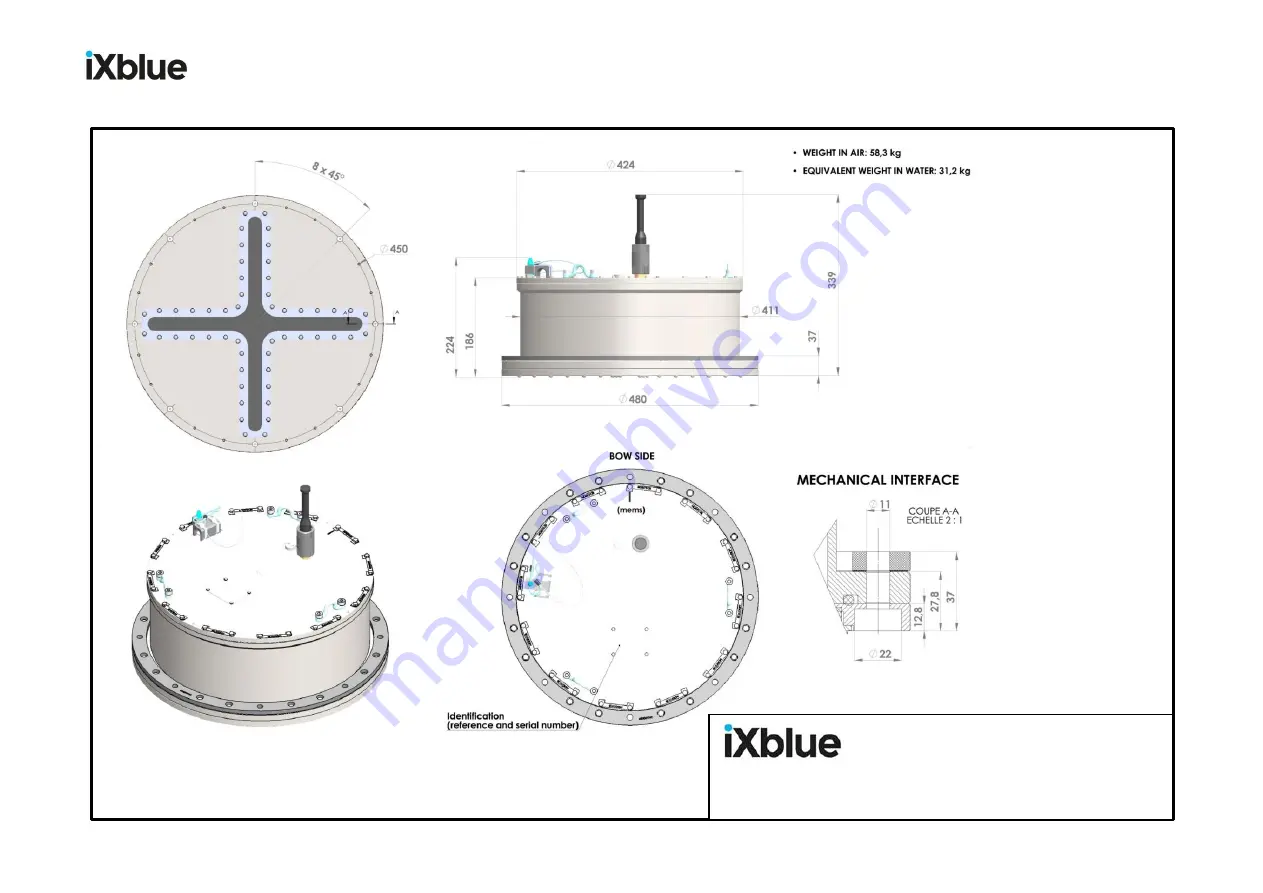
SeapiX Antenna Unit (SAU) 

                                              PLA02664 AG


12/2016


__________________________________________________________________ 

Ce document est la propriété d’iXblue et ne peut être reproduit ou transmis sans son autorisation écrite. 
This document is the property of iXblue and shall not be reproduced nor transmitted without written approval. 

Summary of Contents for SeapiX

Page 1: ...SeapiX Installation Manual...

Page 2: ...SeapiX Installation Manual SSD C 1306 Ed A 01 2020 2 Revision History Edition Date Comments A 01 2020 Creation...

Page 3: ...es of merchantability and fitness for a particular purpose with respect to this product and documentation iXblue reserves the right to revise or make changes or improvments to this product or document...

Page 4: ...air damage caused by improper use or connection to incompatible equipment and specifically the opening of the housing of the equipment under warranty shall cause the warranty to be automatically cance...

Page 5: ...make must contain the same copyright and other proprietary notices that appear on or in the software You shall not modify adapt or translate the software You shall not reverse engineer decompile disa...

Page 6: ...nd the use of software will be terminated without prejudice to any legal action iXblue may carry out against the defaulting party The Buyer will be obliged at its own expense and risk to return to iXb...

Page 7: ...ys whichever is longer iXblue makes no other warranties than the above limited warranties iXblue makes no warranties expressed implied statutory or in any communication with you and iXblue specificall...

Page 8: ...es and regulations related to export control iXblue products and services shall not be exported re exported or used in the following countries including their territorial waters Cuba Iraq Iran North K...

Page 9: ...gives some recommendations Part 4 Installation Process This part details SeapiX installation process Part 5 SeapiX Commissioning This part details how to set up SeapiX for the first time Part 6 Seapi...

Page 10: ...atellite System including GPS MRU Motion Reference Unit RX Reception SAT Sonar Axial Tiltable mode SATA Data transfer format SAU Sonar Antenna Unit SAV Sonar Axial Volumetric mode SED Single Echo Dete...

Page 11: ...ferencing to other document titles Icons The Note icon indicates that the following information is of particular interest and should be read with care Important The Important mention indicates that th...

Page 12: ...and BFU VPU 30 4 2 3 Control Command Cable ITU BFU 31 4 3 CHECKING THE SYSTEM BEFORE INSTALLING 32 4 4 INSTALLING SEAPIX ANTENNA UNIT SAU 33 4 4 1 Considering the Slamming 33 4 4 2 Cooling Down the S...

Page 13: ...NG STATUS THROUGH MAIN CONTROLS 54 6 5 SOFTWARE VERSION UNITS 55 7 SHUTDOWN PROCEDURE 56 8 SOFTWARE UPGRADES 57 9 PREVENTIVE MAINTENANCE 58 10 TROUBLESHOOTING 62 11 SUPPORT THROUGH TEAMVIEWER 66 11 1...

Page 14: ...ss multibeam sonar array this compact system is able to generate one or more scan swaths along or across a vessel axis The result is a total three dimensional coverage of the water column it also prov...

Page 15: ...roposed along and across the vessel track is either axial or transverse Swaths are tiltable to control the biomass all around the vessel For each swath 3 echogram sectors are formed from 1 to 120 beam...

Page 16: ...WATH Downward looking swath axial transverse 1 2 2 FORWARD LOOKING SWATH Forward looking swath axial transverse 1 2 3 SIDE LOOKING SWATH Side looking swath axial transverse Axial swaths correspond to...

Page 17: ...W and Chirp Across track multibeam swath 64 channels stabilized Along track multibeam swath 64 channels stabilized Beam stabilization TX RX built in MRU Beam resolution 1 6 angular 7 5 cm radial Tripl...

Page 18: ...ilized Along track multibeam swath 64 channels stabilized Beam stabilization TX RX built in MRU Beam resolution 1 6 angular 7 5 cm radial Triple echograms from all swaths Adjustable from 1 to 120 each...

Page 19: ...wath 64 channels stabilized Along track multibeam swath 64 channels stabilized Beam stabilization TX RX built in MRU Beam resolution 1 6 angular 7 5 cm radial Triple echograms from all swaths Adjustab...

Page 20: ...ack that you have received CAUTION PACK NON CONFORMITY OR DAMAGE It is recommended to check the content of the pack and all equipment items immediately after reception Specifically you should check th...

Page 21: ...l have to order and pay for it 3 2 Description of the Pack Items Item Reference Designation either including or SMI01628 MDI04776 SMI04796 Sonar Antenna Unit SAU for SeapiX F and SeapiX R SAU ring int...

Page 22: ...VPU SCA00162206 A former ref SCA00130 Transducer Cable 20 m SME00573 Cable Gland SCA00132 ITU BFU Ethernet Cable 30 m SCA00131 ITU BFU Control Command Cable 30 m IOP00122 SeapiX VPU Dongle FCO00212 B...

Page 23: ...explains how to connect the different units together and how to interface with the vessel ancillaries and servitudes Simplified SeapiX architecture UPS is recommended to protect electronic devices The...

Page 24: ...ages Enter names and references Circle the correct answers when there are Y N yes or no proposals Complete your answer with photo s when there is a camera icon Complete your answer with screenshot s w...

Page 25: ...SeapiX Installation Manual SSD C 1306 Ed A 01 2020 25 Fill in the form Make a photo Make a screenshot Then e mail it all to ix support seapix ixblue com Installation Checklist page 1 2...

Page 26: ...SeapiX Installation Manual SSD C 1306 Ed A 01 2020 26 Installation Checklist page 2 2...

Page 27: ...y manipulated and installed to avoid any system malfunction The following characteristics and constraints shall be considered CAUTION DAMAGE TO THE TRANSDUCER CABLE IF EXCESSIVE STRESS OR TENSION OR I...

Page 28: ...06 Ed A 01 2020 28 4 2 1 1 Bending Radius 4 2 1 2 Connectors On SAU side the connector is un pluggable underwater Transducer connector SAU side A fluorescent CABLE sticker indicates the way the connec...

Page 29: ...r All sockets should be completely sealed and a transparent layer of grease left visible on the connector face 2 After greasing fully mate the male and female connectors and remove any excess grease f...

Page 30: ...6 Ed A 01 2020 30 4 2 2 ETHERNET CABLES ITU BFU AND BFU VPU Both Ethernet cables ITU BFU and BFU VPU shall be terminated during the installation as per the following instructions Ethernet cable lockin...

Page 31: ...SeapiX Installation Manual SSD C 1306 Ed A 01 2020 31 4 2 3 CONTROL COMMAND CABLE ITU BFU ITU BFU Control Command cable shall be terminated during the installation as per the following instructions...

Page 32: ...m Please go to next chapters and run SeapiX Commissioning chapter 5 and SeapiX Configuration chapter 6 If any anomalies it will be detected during the check iXblue recommands to perform it with its Su...

Page 33: ...lowing box to check 4 4 2 COOLING DOWN THE SAU Please note that the SAU must always be fully immersed CAUTION DAMAGE TO THE ANTENNA SAU When using SeapiX as the SAU is cooled down by thermal dissipati...

Page 34: ...ive Maintenance 4 4 4 HULL MOUNTING AN SAU STEP BY STEP Step Action 1 Check that the mounting flange has been welded to the boat s hull to host the SAU 2 Position the plastic ring on the SAU and screw...

Page 35: ...stomer responsability The cable gland delivered has been designed for steel hull configuration 5 Connect the transducer cable onto the SAU screw it completely but without forcing Refer to plan 0016220...

Page 36: ...Fix the SAU onto the ship s hull inside the mouting flange using a flat wrench and an Allen wrench screw the eight 8 M10 screws and washers inox A4 70 The appropriate torque is 30N m 10 Important The...

Page 37: ...4 4 4 1 Views of Hull Mounted Antennas The antenna SeapiX F or SeapiX R SAU can be installed in different places on a ship s hull it can be side looking or down looking Here are a few examples of side...

Page 38: ...SeapiX Installation Manual SSD C 1306 Ed A 01 2020 38 Here are a few examples of downward looking antennas Side blister Side keel blister...

Page 39: ...ing towards the bow There is also a fluorescent arrow on the SAU front face 3 Connect the transducer cable refer to plan 00162207 A and to 4 2 1 Transducer Cable SAU ITU to have information on the aut...

Page 40: ...SeapiX Installation Manual SSD C 1306 Ed A 01 2020 40 4 4 5 1 Views of Pole Mounted Antennas Examples of pole mounted SAUs...

Page 41: ...REAR OF THE ITU Enough space shall be available at the rear of the ITU for cable connections The connectors are located at the back of the ITU Figure 1 ITU back face and connections The ITU power cab...

Page 42: ...back face and connections The BFU power cable is plugged into a 110VAC or 230VAC electrical outlet The ITU BFU control command cable with DE 9 male termination on BFU side is connected to the DE 9 fem...

Page 43: ...U power cable is plugged into a 110VAC or 230VAC electrical outlet The BFU VPU Ethernet cable is connected to the RJ45 port labeled LAN BFU An Ethernet cable to connect to the vessel network is insert...

Page 44: ...EAPIX SOFTWARE REINSTALLATION SeapiX software can be reinstalled on a VPU Follow the different steps then at some point the Fishing Mode window will open You can select only 1 fishing mode out of 4 Ch...

Page 45: ...connected properly see 4 Installation Process 2 Check the power supply voltage and connect the power cords 3 Check that the ITU is shut down 4 Power on the BFU 5 Power on the ITU The ITU shall start...

Page 46: ...rd if needed Click OK to validate 11 From the main menu on top of the display select SeapiX Service information to check the connection status Note If any No Connections text shows in red please check...

Page 47: ...68 16 9 8989 A program opens which lets you set different controls start with the Offsets tab then the Inputs tab and the Outputs tab You can then check them all through Main controls tab 6 1 Setting...

Page 48: ...as going deeper When all settings are done click OK to validate 6 2 Setting the Inputs SeapiX system uses the navigation information from the vessel in order to geo reference data These inputs are con...

Page 49: ...lets you set the connections Choose a Protocol among PFEC GPatt xxHDT Select on which device the data will be transmitted in the Physical Link drop down list Serial or Ethernet data is transmitted via...

Page 50: ...the address specified is that of the terminal which sends or receives data The specific terminal will need to send or listen to data from the BFU software With UDP Broadcast the address specified is a...

Page 51: ...ing of the information received Inputs Attitude tab lets you select a port If internal port nothing to do If external port Input A B C D fill in the menu which opens similar as Heading and choose a pr...

Page 52: ...s you configure SeapiX according to different modes If None SeapiX is the master and there is no synchronization of its internal clock If External SeapiX is a slave and cannot ping unless it receives...

Page 53: ...ne The outputs available as a stream from SeapiX are OLEX protocol read by OLEX software system for navigation and charting developed by the norwegian company OLEX AS DELPH XTF protocol read by DELPH...

Page 54: ...Checking Status through Main Controls Once all settings have been done click MAIN CONTROL to check the BFU SAU and navigation status Correct Problem to fix or just a warning Critical issue Not workin...

Page 55: ...ght side of the top menu let you When clicking Maintenance you can check the software version reset the calibration or check the temperature and high voltage hardware status When clicking Options you...

Page 56: ...below Step Action 1 Stop pinging pressing Start button in SeapiX Software on the VPU 2 Shut down the BFU press the push button Note At that stage the ITU SAU should be shut down too 3 Check that the...

Page 57: ...r Downloads section on iXblue web site then click Downloads button Each release usually consists in An Upgrade Note to explain how to upgrade your SeapiX Please note that the procedures might change d...

Page 58: ...ar 2 hours needed Clean the SAU front face using vinegar type liquid and a scraper remove seaweeds shells Caution While scraping the stainless steel part be careful when approaching the cross clean it...

Page 59: ...tersil if necessary sand down using abrasive paper P150 180 or G150 apply primer on all the surface then blow with fresh and dry air Mix the antifouling for a few minutes to have a complete homogeneit...

Page 60: ...epth should be applied to the female connector All sockets should be completely sealed and a transparent layer of grease left visible on the connector face After greasing fully mate the male and femal...

Page 61: ...e unclip and slide the filter cover Remove the filter and dust it with a brush Slide and clip the cover 5 min Check the control command DE 9 connection on the ITU rear face tighten it if loose screws...

Page 62: ...ly check that you have copied the license files in the new software installation folder SeapiX Software Start button is not available appears in grey and is not clickable BFU VPU connection problem Fr...

Page 63: ...nection into the ITU 4 Reset the BFU The SAU does not start 1 Check that the ITU is powered and that the blue LED is ON 2 Check that the current meter is showing a consuming device If any doubt restar...

Page 64: ...ould get a 12VDC voltage between pin 9 and pin 1 The ITU internal AC DC power supply is faulty Contact iXblue Support The Echogram is not showing progression The Echogram is set in History mode Click...

Page 65: ...iX specifications No biomass data is shown Biomass data is not selected Click the button The selected Biomass swaths sources are not pinging Check the sources of biomass in Seapix Settings Source The...

Page 66: ...port you can directly use TeamViewer interface and follow the process 1 From Windows desktop on the VPU go to the notification area and click the TeamViewer icon 2 The Host interface opens As you can...

Page 67: ...red here for confidentiality reasons fill in the Description field as follows Vessel s name TeamViewer ID Email address Telephone number Description of the problem Then click Request support Important...

Page 68: ...e following network link https get teamviewer com seapix You will have to follow the process described below 1 Connect USB_1 into the VPU 2 In the C IXBLUE SeapiX folder copy the TeamViewer_Host_Setup...

Page 69: ...lation Manual SSD C 1306 Ed A 01 2020 69 5 Select Company Commercial use and click Next 6 Check I accept the terms of the Licence Agreement and click Next 7 After a few seconds TeamViewer wizard appea...

Page 70: ...Ed A 01 2020 70 8 Fill in the fields Computer name with the vessel name and Password Confirm password with ixblue then click Next 9 The vessel ID blurred here for confidentiality reasons is displayed...

Page 71: ...OK 12 A pop up informs you that TeamViewer is still running click this message to disable it in the future Next time the VPU is switched off then on the following window will open Check the Don t sho...

Page 72: ...ted SAU permanent installation Item Drawing nb Reference SAU Interface Control PLA12021 AA MDI08307 Cable Gland Cable Gland Assembly PLA05712 AA PLA06149 AA MDI05698 SME00573 Mounting Flange PLA10550...

Page 73: ...re is an exploded drawing of a pole mounted SAU provisional installation Item Drawing nb Reference Pole Not provided Transducer Cable 00162207 A SCA00162206 A Interface Not provided optional Bracket L...

Page 74: ...2019 __________________________________________________________________ Ce document est la propri t d iXblue et ne peut tre reproduit ou transmis sans son autorisation crite This document is the prop...

Page 75: ...AG 12 2016 __________________________________________________________________ Ce document est la propri t d iXblue et ne peut tre reproduit ou transmis sans son autorisation crite This document is the...

Page 76: ...016 __________________________________________________________________ Ce document est la propri t d iXblue et ne peut tre reproduit ou transmis sans son autorisation crite This document is the proper...

Page 77: ...08 2014 __________________________________________________________________ Ce document est la propri t d iXblue et ne peut tre reproduit ou transmis sans son autorisation crite This document is the p...

Page 78: ...2017 __________________________________________________________________ Ce document est la propri t d iXblue et ne peut tre reproduit ou transmis sans son autorisation crite This document is the prop...

Page 79: ...18 __________________________________________________________________ Ce document est la propri t d iXblue et ne peut tre reproduit ou transmis sans son autorisation crite This document is the propert...

Page 80: ...G 12 2016 __________________________________________________________________ Ce document est la propri t d iXblue et ne peut tre reproduit ou transmis sans son autorisation crite This document is the...

Page 81: ...2 2018 __________________________________________________________________ Ce document est la propri t d iXblue et ne peut tre reproduit ou transmis sans son autorisation crite This document is the pro...

Page 82: ...747 7027 iXblue CONTACT SALES by email fishery sales ixblue com contacting one of SeapiX authorized retailers and dealers listed on iXblue web site www ixblue com FISHERY menu North America NORAM 1 80...

Reviews:

Related manuals for SeapiX