27
27
27
27
!
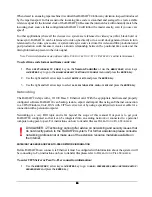
7. The
DNS DOMAIN NAME
entry does not apply for this application, you may leave entry blank.
8. The
PRIMARY DNS
setting does not apply for this application, you may leave entry blank.
9. The
SECONDARY DNS
setting does not apply for this application, you may leave entry blank.
10. Although the
FTP SERVING
setting does not apply for this application, make sure it is disabled when
you are not using this feature. The following menu items will only appear if
FTP SERVING
is enabled.
11. The
FTP LOGIN NAME
entry does not apply for this application, you may leave entry blank.
12. The
FTP PASSWORD
entry does not apply for this application, you may leave entry blank.
IMPORTANT NOTE: If FTP serving is left enabled and your RADAR
24 is connected to
another computer or network it is possible for someone to gain unauthorized access to
your machine. This would give an intruder the ability to modify or delete files on your
RADAR
24.
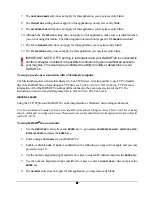
To setup a peer-to-peer connection with a Macintosh
computer:
The Macintosh requires software that allows it to be a CIFS server. It is also possible to use FTP to transfer
files from RADAR
24 to a Mac using an FTP Client; see C
ONFIGURATION
: N
ETWORKING
: FTP for more
information. All of the RADAR
24 settings will be identical to the peer-to-peer setup for the PC. For
instructions on how to transfer files please refer to O
PERATIONS
: F
ILE
T
RANSFER
WINDOWS SERVER
Using the TCP/IP protocol RADAR
24 can be integrated into a Windows
networking environment.
Note: In a networked environment you must be very careful about the network settings you choose. There is a real risk of causing
network conflicts and/or creating security issues. Please consult your network administrator for the appropriate network settings for
your RADAR
24.
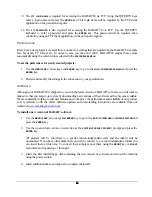
To setup RADAR
24 on
a network:
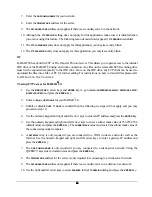
1. Use the
MENU/PREV
, arrow keys and
ENTER
key to go to
MAIN / PREFERENCES MENU / NETWORK SETUP/
INTERFACE PREFS
and press the
ENTER
key.
2. Enter a unique
HOST NAME
for your RADAR
24.
3. Enable or disable
DHCP
. If
DHCP
is enabled then the following six steps will not apply and you may
proceed to step 10.
4. Use the numeric keypad and right and left arrow keys to enter an IP address and press the
ENTER
key.
5. Use the numeric keypad and right and left arrow keys to enter a
SUBNET MASK
value and press the
ENTER
key.
6. The
GATEWAY
entry does not apply for this application, you may leave entry blank.


