background image


April 28th,  2016 


25 

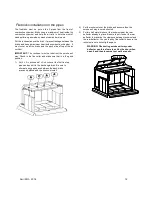
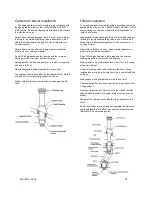
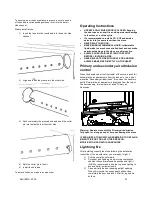
Fiberglass rope replacement 

Use a ½ inches (12.7mm) braided fiberglass rope. 

It is possible to replace the braided fiberglass rope with the 
door on the stove, but if you want you can remove door. 

Fiberglass rope preparation 

1)  Take the end of the fiberglass rope and push fiber 

inside to make a clean end. 

2)  Add little touch of high temperature latex inside the 

end of the fiber glass rope.  

3)  Remove old fiberglass rope and clean the groove  
4)  Starting at the lower corner near the hinge put the 

fiberglass rope into the grove without giving any 
tension and cut it ½ inches over the require length  

5)  Take the fresh cut end of the fiberglass rope and push 

the fiber inside to make a clean end. 

6)  Add high temperature latex inside the end of 

fiberglass rope. 


Fiberglass rope installation 

1)  Put a high temperature latex inside the clean groove 

to glue the fiberglass rope. 

2)  Starting at the lower corner near the hinge put 

fiberglass rope into the groove without giving any 
tension  

3)  Align the two fiberglass rope ends and put some high 

temperature latex between. 

4)  Install the door if you have uninstall it 


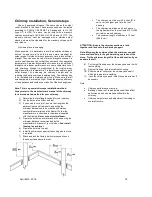
What to do in case of Chimney 
Fire 

Contact your local authority to know what to do in case of 
Chimney fire. And be sure to know procedure in case of 
chimney fire. 

1.  Close all door and put the handle to secondary position. 
2.  Close damper  
3.  Spay water on combustible material around stove. 
4.  Call Fire department and trigger alarm. 
5.  Never touch the chimney while is burning. 
6.  Do an inspection to chimney and repair it when needed. 
.

.


Summary of Contents for SIRIUS

Page 1: ...l 418 849 8095 Fax 418 849 0077 www jaroby com Certified and tested according to CAN ULC S627 00 UL 1482 2011 2020 U S Environmental Protection Agency s crib wood emission standard Product 10 000 STO...

Page 2: ...ral steps 16 Inside Masonry Chimney Vertical Installation 17 Outside Vertical Installation 17 Cathedral Vertical Installation 17 Offset Installation 18 Vertical Installation 19 External combustion air...

Page 3: ...only a listed double wall connector pipe The appliance must be fixed on the floor Do not install in a sleeping room Exterior air inlet is mandatory for mobile home use BTU Efficiency Specifications Av...

Page 4: ...April 28th 2016 4 Nameplate...

Page 5: ...es 68 3 cm Exterior Depth 25 pouces 64 8 cm 25 pouces 64 8 cm 25 pouces 64 8 cm Door Opening 15 5 8 po x 9 1 8 po 40 0 cm x 23 2 cm 15 5 8 po x 9 1 8 po 40 0 cm x 23 2 cm 15 5 8 po x 9 1 8 po 40 0 cm...

Page 6: ...ove runaway should have an ignition to the floor and the coating Flow of creosote when there is a fire chimney The coating used must be non combustible and approved according to standard UL1618 for US...

Page 7: ...7 9cm 10 0 25 4cm In the case with a smoke simple pipe without heat shield you must installed the stove that the smoke pipe is to 18 inches 47 5 cm of all combustible material therefore the MINIMUM cl...

Page 8: ...s 3 Put the stove on the back and be careful to protect the paint 4 Unscrew the nut not completely 5 Install the legs 1 like the illustration and secure it with nut and washer 2 3 Attention Be sure th...

Page 9: ...For the smoke double pipe you must remove the pre cut metal part on the top inside and in front of the warmer see pictures beside 1 Put the packaging product on the ground and put the back on it to pr...

Page 10: ...ix the top with the back and with the front too 6 Fix the left decorative panel side and finish to install the left chrome decoration 7 Fix the right decorative panel side and finish to install the ri...

Page 11: ...ricks installation 1 Put 4 bricks A and 2 brick B Back firebricks installation 1 Put 3 bricks A and 1 brick C on the back wall Floor firebricks installation 1 Put 2 Bricks A near the wall and 2 bricks...

Page 12: ...lue collar and make sure that is in the good position 1 Put 3 A bricks and 1 C brick over the first tree top pipes and push it to the back angle brick Be sure to eliminate any gap space between the ba...

Page 13: ...stove and have to cut through a beam Be sure to keep the structural integrity of your house by following state of the art and National building code Note This appliance have to be connected to 6 inche...

Page 14: ...ctor assembly installation Make a summary installation of all sections and elbows if necessary to ensure that you meet the clearances and inclinations of the horizontal sections and check that you hav...

Page 15: ...shing The Storm collar Cap with spark arrester Firewall Chimney ceiling support Decorative collar e If the chimney is exposed outside from a wall and placed lower than 7 feet 213 cm above the ground l...

Page 16: ...ine the total length needed for your chimney 2 Cut the holes into all floor and roof 3 If you need to cut a joist be sure to strengthen the adjacent joists and frame hole respecting the minimum dimens...

Page 17: ...of the manner you have to To install the stove onto an abandoned masonry fireplace and use the good condition masonry chimney the chimney must have inside a certified metallic sleeve cover up all the...

Page 18: ...ith the applicable local laws or the CAN CSA B365 NFPA211 USA norms Follow the chimney manufacturer s instructions to install the chimney Always pass chimney between joists If a joist need to be cut r...

Page 19: ...tified Installer Always frame around chimney Keep minimal clearances written into your chimney manual Do not fill the gap between the fire stop and the chimney Nothing must be in contact with the chim...

Page 20: ...pe is sealed 2 Cut the exterior wall and install Air Inlet kit following the manufacturer installation instructions Be sure to seal it correctly to preserve the vapour barrier of your house 3 Install...

Page 21: ...H GRATE OR ANDRION ALWAYS MAKE FIRE DIRECTLY ON THE HEART Primary and secondary air admission control When the handle under the front tablet of the stove is push full backward the air admission is fro...

Page 22: ...over the ember keeping it away from the glass door to avoid flame touching the ceramic glass DO NOT BUILD A FIRE TOO CLOSE OF THE WINDOW 6 Close the door slightly and wait few minutes to be sure the...

Page 23: ...om to help maintain a hot charcoal bed The ash have to be removed periodically every 2 or 3 days into heavy warming period Never had excessive accumulation into the combustion chamber because it can r...

Page 24: ...etween the frontage of stove and braided fiberglass rope and close and lock the door 4 If the paper easily slide when you pull it do steps 1 to 3 another time 5 If the door side touch the frontage of...

Page 25: ...fiber inside to make a clean end 6 Add high temperature latex inside the end of fiberglass rope Fiberglass rope installation 1 Put a high temperature latex inside the clean groove to glue the fibergla...

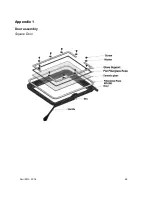
Page 26: ...April 28th 2016 26 Appendix 1 Door assembly Square Door...

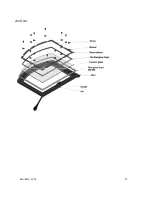
Page 27: ...April 28th 2016 27 Arc Door...

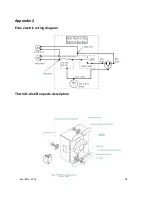
Page 28: ...April 28th 2016 28 Appendix 2 Fans electric wiring diagram Therm O disk Box parts description...

Page 29: ...Parts that can be replaced Bricks Doors glass Spring Handle Stove Door with handle Fans Flat fiber glass rope around glass Round fiberglass rope Ash Plug Slotted Brick Washer To ordered parts call you...

Page 30: ...April 28th 2016 30 Appendix 4 Bricks dimension and quantity...

Page 31: ...discretion decide to repair or replace any part or unit after inspection and investigation of the defect The manufacturer may at its discretion fully discharge all obligations with respect to this wa...

Reviews: