background image


7


INSTALLATION 


A good installation is extremely important for a safe and efficient use of your J.A. Roby 
Inc.  appliance.  If  you  doubt  on  the  way  to  install  the  appliance  correctly,  seek  for 
professional installation service. We suggest you to call masters fitters. 


1.


Withdraw firebricks placed inside the appliance in order to reduce the weight and 
to facilitate the installation. 


2.


You must install a fireproof protector under the appliance, which must exceed of 
18 inches to the front and of 8 inches on each side. 


3.


The  free  space  shall  not  be  reduced  except  under  the  approval  of  the  authorities 
responsible for the application of the building code. 


4.


Install  the  chimney  and  an  insulated  wall  thimble  for  an  installation  passing 
through a wall according to the instructions from the chimney manufacturer. 


5.


The chimney must exceed any part of the building or other obstruction within a 10’ 
(3.04m) distance by a height of 2’(0.6.m) rising above the roof to a minimum of 3’ 
(0.0m) from the uppermost point of contact. 


6.


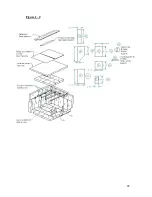
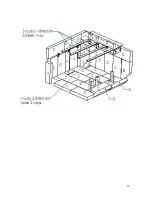
Install  the  firebricks  in  accordance  with  the  recommended  instructions  for  your 
model. 


7.


The appliance should not be connected to an hot air conduct 


8.


Installation  of  an  interior  chimney  is  always  preferable  to  an  exterior  chimney 
being heated up by the ambient air in the house and the gases which circulate will 
cool more slowly. 


Summary of Contents for ULTIMATE

Page 1: ...Argon Qu bec Qu bec G2N 2C9 Phone 418 849 8095 Fax 418 849 0077 www jaroby com OWNER S MANUAL ULTIMATE WOOD STOVE Revised October 22 2012 ULTIMATE Certified and tested according to UL 1482 00 and ULC...

Page 2: ...G 13 FANS AND THERMODISC 14 PREVENTIVE MEASURES AND MAINTENANCE 15 REPLACEMENT PART L IST 16 INSTALLATION OF THE FIREBRICKS 17 Figure 1 0 18 LIMITED LIFE WARRANTY 20 READ CAREFULLY THIS MANUAL AND KEE...

Page 3: ...xterior conduct or a single pipe as an exterior exit Minimum clearances found in this manual must be observed Install all firebricks before lighting the stove if it is not already done Never use a non...

Page 4: ...of the procedure to be followed in case of a chimney fire Think of an emergency plan In case of a chimney fire Hermetically close the doors and the air intakes Water the combustible material adjacent...

Page 5: ...d the doors in order to ensure good ventilation This special paint is conceived to tolerate temperatures until 1200 F 650 C CREOSOTE The wood burning slowly produces tar and other organic steams which...

Page 6: ...t 33 5 in 85 1 cm Exterior width 27 5 in 70 0 cm Exterior depth 37 in 94 cm Door openning 16 X 10 5 in 41 0 X 27 0 cm Interior height 13 5 in 34 3 cm Interior width 20 5 in 52 1 cm Interior depth 25 2...

Page 7: ...oval of the authorities responsible for the application of the building code 4 Install the chimney and an insulated wall thimble for an installation passing through a wall according to the instruction...

Page 8: ...CAN CSA B365 ULC S635 ULC S640 UL 1777 norms For the chimney follow the chimney manufacturer s instructions EXTERIOR VERTICAL INSTALLATION The Ultimate must be installed in accordance with the applic...

Page 9: ...LATION ON A CATHEDRAL ROOF The Ultimate must be installed in accordance with the applicable local laws or the CAN CSA B365 ULC S635 ULC S640 UL 1777 norms For the chimney follow the chimney manufactur...

Page 10: ...B365 ULC S635 ULC S640 UL 1777 norms For the chimney follow the chimney manufacturer s instructions VERTICAL INSTALLATION The Ultimate must be installed in accordance with the applicable local laws or...

Page 11: ...fectly your decoration by its originality and its heat With the addition of A heat shield it requires only 10 inches of clearance to the back and 20 inches of the sidewalls when the installation is ma...

Page 12: ...wood stove should be placed on a non combustible plate under the appliance which must exceed 18 inches to the front 8 inches on each side and 8 inches to the back Only use non combustible materials Ex...

Page 13: ...by twisting together a few sheets of newspaper in a torch Light up the paper torch and hold it as close as possible to the pipe inside the chamber to warm up the chimney 2 Place papers and kindling in...

Page 14: ...ction the heat reaching a temperature of 120o F activates the thermo disc At this moment the thermo disc activates the fans for a better distribution of heat in your home As soon as the heat goes unde...

Page 15: ...5 Do not alter or modify the air intakes of the appliance in order to get a stronger fire 6 To clean the glasses J A Roby Inc recommends using products sold for this purpose or an oven cleaner Avoid...

Page 16: ...16 REPLACEMENT PART L IST BRICKS WOOL PLATES USED TO RETAIN WOOL PIPES GLASS BRICKS SUPPORTS DOOR HANDLE FANS CORDS TO ORDER PARTS PLEASE CONTACT YOUR AUTHORIZED RETAILER...

Page 17: ...lled you can then tighten the screws 4 Third install C 12 B 2 A 2 E 2 bricks on the side wall 5 To install the last top bricks the rock wool and the retaining plate follow the last step before lightin...

Page 18: ...18 Figure 1 0...

Page 19: ...19...

Page 20: ...nsportation charges The 2nd year J A ROBY Inc assume 50 of repairs according to the above conditions The 3rd year J A ROBY Inc assume 45 of repairs according to the above conditions The 4th year J A R...

Reviews: