background image

3/11

Tools Required 

CAUTION

: Do not use tools other than those required, as this 

can damage your new item

NOTE 

  Please check you have all hardware before assembling. 

  If you are missing any hardware, please contact the store of purchase. 

  Please ensure you have the  required hardware part and quantity.

  Please retain your receipt as proof of purchase to validate your warranty. 


CAUTION 

  Do not tighten screws before all screws are in the right place. 

  Do not use this product unless all bolts  

screws

 and  

 are firmly secured. 

  Check that all bolts  

screws  

and 

  are securely tightened at least every 4 months.


WARNING 

  If parts are missing, broken, damaged or worn,  stop using the product until all repairs 

are made using manufacturer authorised parts . 

  Failure to follow these warnings could result in serious injury. 


DANGER 

  CHILDREN MUST BE SUPERVISED. 


 Officeworks Ltd. | 236-262 East Boundary Road | Bentleigh East VIC 3165 | AUSTRALIA

Summary of Contents for JBSHEF2DOW

Page 1: ...ASSEMBLY INSTRUCTIONS SHEFFIELD 2 DRAWER DESK JBSHEF2DOW JBSHEF2DWB This design and instruction booklet is subject to copyright 1 Carton www officeworks com au For spare parts or hardware call 1300 OF...

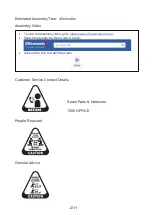
Page 2: ...mbly Video Customer Service Contact Details Spare Parts Hardware 1300 OFFICE People Required General Advice To view an assembly video go to https www officeworks com au Search the product by item code...

Page 3: ...te your warranty CAUTION Do not tighten screws before all screws are in the right place Do not use this product unless all bolts screws and are firmly secured Check that all bolts screws and are secur...

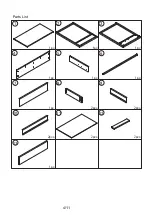
Page 4: ...4 11 1 2 3 4 1pc 1pc 5 6 1pc 2pcs 2pcs 2pcs 2pcs 2pcs 7 8 9 10 13 11 12 1pc 1pc 1pc 1pc 1pc Parts List...

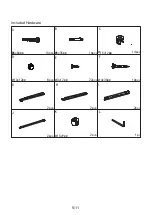
Page 5: ...5 11 A B C D E F G H I J K L 2pcs M6x35mm M6x60mm 15x12mm 15x9mm 4x35mm 3x12mm 10x12mm 10pcs 16pcs 14pcs 2pcs 2pcs 8pcs 22pcs 2pcs 1pc 10pcs 2pcs Included Hardware...

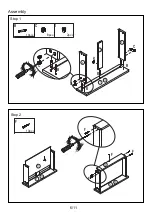
Page 6: ...6 11 Step 1 Step 2 B B B B 10pcs C C C 8pcs F F F K K 2pcs F 10pcs 7 8 9 11 10 12 13 7 13 7 13 B C F Assembly...

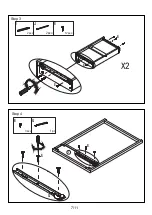
Page 7: ...7 11 E 12pcs I 2pcs J 2pcs Step 3 Step 4 E E I J G 1pc E 3pcs G E 2 X2 E I G E...

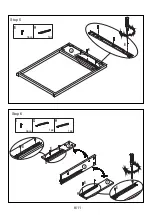
Page 8: ...8 11 G E E E E H 1pc E H 3pcs G 1pc 1pc E H 4pcs E H 3 5 5 5 Step 5 Step 6 E...

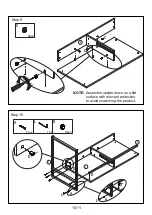
Page 9: ...9 11 Step 7 Step 8 B B B 6pcs 1 4 4 5 C C 2pcs...

Page 10: ...10 11 Step 9 Assemble upside down on a flat surface with relevant protection to avoid scratching the product Step 10 L 1pc A 5pcs 1 3 4 6 C C C 4pcs L A D D D D D 4pcs L A NOTE...

Page 11: ...weight indicated Exceeding the maximum weight will result in instability and may cause injury Thank you for your purchase Please retain your receipt to validate warranty If you would like to know mor...

Reviews: