background image

A

B

1

2

4

1. After assembling the uprights
2.  Remove all of the components from the box and lay them out in an orderly fashion on the floor where you 

intend to assemble.

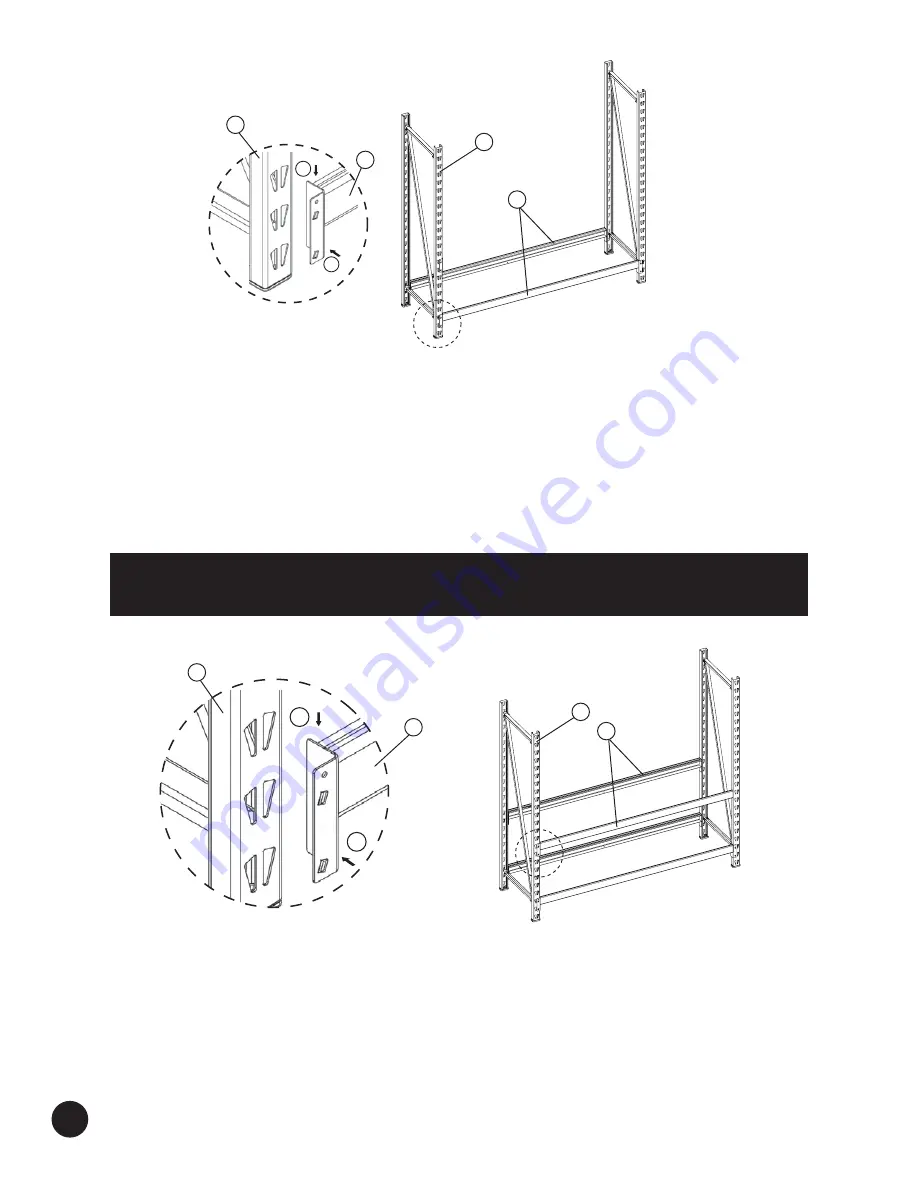
3.  Take one of the cross beams (Part B, Fig.2) and bring it over to one of the upright frames (Part A, Fig. 2). 

The upright frame should be stood up (it is best to work with an assistant who can hold the upright frame 
in place). Then attach the cross beam (B) to the upright frame (A) by inserting the tabs into the two key 
holes (Part B, Fig.2). This first cross beam should be inserted into the lowest two key holes. Tap down 
on the cross beam with the rubber mallet to seat the cross beam.

4.  The properly positioned cross beam should slip into place with by moderately tapping with rubber mallet. 

If it doesn't, recheck the alignment as too much applied force may damage the interlock between the 
upright and beam.

5. Bring the other upright frame (Part A, Fig. 3) over to the opposite end of the first cross beam you 

assembled. Make sure you assemble this end into key holes at the same level as the other side. Use the 
same process that was used to lock in the first set of tabs to the key holes.

6. Now move over to the other side, opposite the first cross beam you assembled. Repeat steps 3, 4 and 5 

to lock this cross beam in place. Make sure this cross beam is at the same level as the first one.

NOTE 

- Make sure the cross beam is positioned properly. The flange that the wood deck fits into 

needs to be facing upwards. 

A

B

ASSEMBLY INSTRUCTIONS (Cont.)

Fig. 2

Fig. 3

1

2

A

B

A

B

Summary of Contents for Smith & Miller

Page 1: ...ASSEMBLY INSTRUCTIONS Smith Miller Stout Rack To view assembly video please visit the followitng link HTTP WWW JHANLONSTORAGE COM V1 ...

Page 2: ...scale 2 A B C D E F G H I J K L M Vertical Beam Cross Beam Wood Deck Caps and Feet Shelf Strap Wall Mounting Bracket Locking Pins Wrench Diagonal Beam Horizontal Beam Nuts Carriage Bolts Stacking Bracket 4 8 4 8 4 1 20 1 2 4 18 18 4 4 6 3 8 3 1 16 1 2 4 16 16 4 Part Description 4 Shelf Qty 3 Shelf Qty B E F G H I J L K Tools Required Rubber Mallet Wrench provided A M D C ...

Page 3: ...art K to the opposing side do not tighten until the assembly is complete 5 At the top of the upright insert the opposing end of the short horizontal beam that was placed into the upright and the long diagonal beam Part I into the U shaped bracket and align the holes After doing so place a carriage bolt into the hole and apply opposing a nut to the opposing side do not tighten until the assembly is...

Page 4: ...positioned cross beam should slip into place with by moderately tapping with rubber mallet If it doesn t recheck the alignment as too much applied force may damage the interlock between the upright and beam 5 Bring the other upright frame Part A Fig 3 over to the opposite end of the first cross beam you assembled Make sure you assemble this end into key holes at the same level as the other side Us...

Page 5: ...s done in the same manner as all of the other cross beams NOTE The cross beams are adjustable and can be set at your desired height 7 To continue assembly repeat steps 2 through 6 on the second and third sets of cross beams Part B Fig 4 Make sure each set of cross beams is at the same level as on the opposite side Fig 5 Fig 4 A B 1 2 A B 1 2 A B A B ...

Page 6: ...wood decks Fig 6 Fig 7 L E C B 9 The shelf strap Part E Fig 6 is to be attached to the pre drilled holes provided on the bottom of each side of the cross beams Use the included hardware Part L Fig 6 to fasten the shelf strap to the cross beams Part B The screw should be fed up through the bottom of the shelf strap and secured in place with the provided nut Part K Be sure to tighten with the includ...

Page 7: ...ge Fig 8 Connect multiple racks to create customized storage solutions WARNING Adult assembly required due to the presence of small parts sharp points and sharp edges IN EARTHQUAKE PRONE AREAS SECURE RACK TO WALL OR OTHER SOLID PART OF THE STRUCTURE ADDITIONAL RACKS SOLD SEPARATELY ...

Page 8: ...hat allow you to adjust the L shaped portion of the bracket against the wall 6 After the L shaped portion of the bracket is adjusted against the wall it s recommended to screw the bracket into a stud located within the wall rather than wallboard only If there s no option to screw into a stud wall anchors should be used when mounting into the wallboard Note Wall mounting screws and anchors are incl...

Page 9: ... plastic cap D should not be used between the upright beams and needs to be removed 4 Take the stacking bracket and apply to the upright beam making sure to engage the tabs into the top and bottom upright beams 5 Apply stacking brackets M to ALL 4 uprights before assembling any shelf beam on the top rack 6 After the brackets are in position insert the locking pin G into the holes provided 7 Assemb...

Page 10: ...ugh JS Products This warranty covers manufacturer defects and workmanship The warranty excludes misuse or abuse and normal wear and tear Work safely with tools by wearing safety goggles JS PRODUCTS 6445 MONTESSOURI STREET LAS VEGAS NV 89113 800 255 7011 FAX 775 898 8773 WWW JHANLONSTORAGE COM 10 ...

Reviews: