


Page: 7
1.3
CAUTIONS
-
READ CAREFULLY
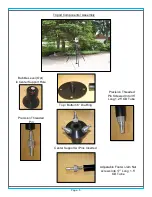
The RUG
-
ID Tripod as supplied is designed to be used as shown on the cover of this
document. All three legs must be on the ground and the center mast section must also be
resting on the ground via the bottom base plate. This results in an approximate 9 ft height, 4
-
legged, very stable support.
Do Use Extreme Caution
to prevent any part of the TEMS assembly from coming in
contact with live AC power lines.
ALWAYS LOOK UP !!! Coming in contact with a power
line can result in your death.
Do Not
place more than 15lbs of weight on top of the mast. Make sure the mechanical
load on top of the mast is centered and as balanced as possible.
Do
stake the Base Ring where the mast resets on the ground using the supplied
12”
long
screw style stake. Adding additional weights to the top of the Base Ring is also a good
idea; rocks, stones etc.
Do
use guy ropes if you are located in a windy area. If using a 12 ft version of the TEMS,
always use guy ropes and stakes (Opt).
Do not
place the tripod in a location where, if it were to blow over, it would hit a human or
personal property.


