background image


USB 3.0 MULTI-ADAPTER             


USER MANUAL


27 


TECHNICAL SUPPORT


If you have any issues using this product please follow the instructions below before returning 

this product to the store. 


1.


The User Manual  

It contains detailed instructions and a troubleshooting section. Many common issues can 

be easily resolved by reading the user manual. 

2.


Online Support 

Please visit the j5create website (www.j5create.com) to find the latest software for your 

device.  If you are still experiencing the same issue, you can submit a description of your 

problem via email 

service@j5create.com

 . Our j5create technical service support team 

will reply to you within the next 24 business hours. 

3.


Telephone Support  

Please feel free to call us at 888-689-4088 and one of our support technicians will be 

happy to assist you. 


Customer Service: Toll free number: 888-988-0488 

Technical Support: Toll free number: 888-689-4088 


Email: service@j5create.com 


Please contact Technical Support during business hours. 10:00AM-6:00PM E.S.T Monday- Friday 
for further assistance. 


LIMITED WARRANTY


j5create offers a limited 1-year warranty.  User’s wear & tear damage is not included.


The user shall call or email j5create customer service with defective information concerning the product and obtain a return 

authorization number. 

Users are responsible for one way return freight cost and we will take care of one way freight back.  


In order to obtain a return authorization, user should have the following information handy when calling or emailing the service 
team: 


(i)


a copy of original purchase invoice to verify your warranty  

(ii)


a product serial number  

(iii)


a description of the problem 

(iv)


customer’s Name, address, and telephone number 


j5create does not warrant that the operation of the product will be uninterrupted or error-free.  j5create is not responsible for 

damage arising from failure to follow instructions relating to the product’s use. This warranty does not apply to:(a) consumable 

parts, unless damage has occurred due to a defect in materials or workmanship; (b) cosmetic damage, including but not 

limited to scratches, dents ,and broken plastic on ports; (c) damage caused by use with non-j5create products; (d) damage 

Summary of Contents for JUA370

Page 1: ...JUA370 USB 3 0 MULTI ADAPTER VGA Gigabit Ethernet JUA370 User Manual...

Page 2: ...nstallation 6 Verify Device Driver Installation 9 Uninstalling the Device Driver 9 INSTALLATION FOR MAC 10 Device Driver Installation 10 Verify Device Driver Installation 13 Network Setting on MAC 13...

Page 3: ...create a new visual environment in seconds The gigabit multi adapter allows you to add networking capabilities to a computer without them through a Wi Fi connection It has an RJ 45 connector that supp...

Page 4: ...tended Mirror Display Rotation 0 90 180 270 Ethernet Transfer Rate 1000 Mbps Half Duplex 1000 Mbps Full Duplex IEEE IEEE 802 3az IEEE 802 3 802 3u and 802 3ab IEEE 802 3x Modes Supports Wake on LAN fu...

Page 5: ...1680 x 1050 16 32 bits 16 9 1600 x 900 16 32 bits 16 10 1440 x 900 16 32 bits 16 9 1360 x 768 16 32 bits 16 10 1280 x 800 16 32 bits 15 9 1280 x 768 16 32 bits 16 9 1280 x 720 16 32 bits Standard Disp...

Page 6: ...please refer to your PC system OS installation in the next section Note install driver completely before following steps 2 through 5 2 Connect the USB 3 0 cable connector to the host laptop 3 Connect...

Page 7: ...rms of the license agreement click Next 4 When the Install Shield Wizard is complete select Yes I want to restart my computer now Click Finish to restart 5 After restarting your computer connect the U...

Page 8: ...s XP You can modify the corresponding position of each extended display via display settings Go to Start Control Panel Display Properties Settings When the Display Properties window appears each monit...

Page 9: ...Windows XP Right Click My Computer Manager Device Manager click sign of Display Adapter Network adapter Sound video and game controllers Universal Serial Bus controllers Uninstalling the Device Drive...

Page 10: ...efore you begin installing Make sure the USB cable is unplugged from your Mac Desktop or Mac Notebook before executing the setup program This section illustrates the device driver installation procedu...

Page 11: ...Type in your password and click OK Installation is processing This will take a few moments 5 Installation is completed click Close 6 After the Lan driver installation has finished choose the OS versio...

Page 12: ...lick Continue to proceed 8 Type in your password and click OK 9 Click Continue Installation 10 Installation is processing This will take a few moments 11 Click Restart to complete the software install...

Page 13: ...elow to verify the driver installation status of the USB 3 0 Display Adapter 1 GO select About This Mac and select More Info 2 The picture shows the installation process for the USB 3 0 Multi Adapter...

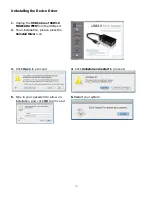
Page 14: ...USB 3 0 MULTI ADAPTER from the USB port 2 To un installation please press the Uninstall Driver icon 3 Click Open to proceed 4 Click Uninstall and restart to proceed 5 Type in your password to allow un...

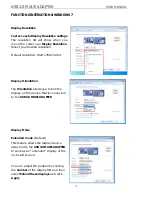
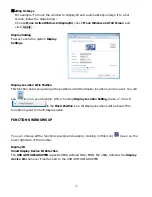
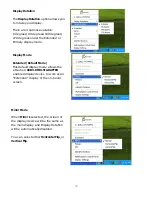
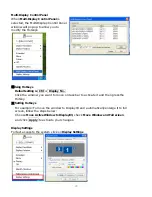
Page 15: ...resolution 1024 x 768 x 32 bit Display Orientation The Orientation allows you to turn the display on the device that is connected to the USB 3 0 MULTI ADAPTER Display Mode Extended mode Default This f...

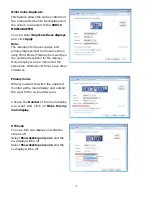
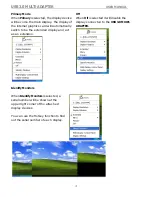
Page 16: ...r than the preferred resolution for the display Only 2 displays can be mirrored at the same time Windows 7 OS may have other limitations Primary mode When you want to switch the enabled monitor as the...

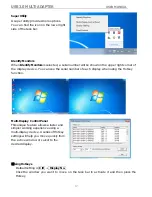
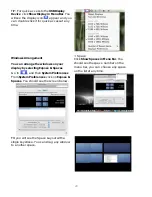
Page 17: ...display device You can see the serial number of each display when using the Hotkey function Multi Display Control Panel This unique feature allows a faster and simpler working experience using a multi...

Page 18: ...display locations you have set You will see icon on your desktop After choosing Display Location Setting make a Check in the Fixed Position box All display locations will be fixed This function is gre...

Page 19: ...ow up as Unknown Monitor In some cases the attached display device does not support EDID in this case the ID will also show up as Unknown Monitor Display Resolution Default Resolution 1024 x 768x 32 b...

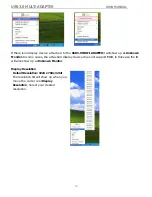
Page 20: ...ode Display Mode Extended Default Mode This default display mode allows the attached USB 3 0 MULTI ADAPTER enabled display device to work as an Extended display of the on board screen Mirror Mode When...

Page 21: ...tically switch to be the extended display and act as an extension Off When Off is selected it will disable the display connected to the USB 3 0 MULTI ADAPTER Identify Monitors When Identify Monitors i...

Page 22: ...y No Click the window you want to move on task bar to activate it and then press the Hotkey Setting Hotkeys For example To move the window to Display03 and automatically enlarge it to full screen foll...

Page 23: ...tion display mode and color range Display Mode Click on the Arrangement tab and uncheck Mirror Displays to turn the Mirror display option off Another window will automatically appear on the screen tha...

Page 24: ...rrange the windows on your display by selecting Expos Spaces Go to and then System Preferences From System Preferences click on Expos Spaces You should see the screen below Space Click Show Spaces in...

Page 25: ...l other USB devices from the system Try connecting the USB cable of USB Display device directly to the computer instead of through a hub Reset refresh resynchronize your monitor Media Playback During...

Page 26: ...e problems during the boot up process start your computer in Safe Mode and uninstall the driver Hold the CTRL key until the Windows startup menu appears and select Safe Mode To verify the driver versi...

Page 27: ...M E S T Monday Friday for further assistance LIMITED WARRANTY j5create offers a limited 1 year warranty User s wear tear damage is not included The user shall call or email j5create customer service w...

Page 28: ...device may not cause harmful interference This device must accept any interference including interference that may cause undesired operation of the device CE This equipment is in compliance with the r...

Page 29: ......

Reviews: