TP-83N Wireless programmable indoor thermostat
1 / 2
MKL51907
TP-83N Wireless programmable indoor thermostat
The TP-83N is a wireless programmable indoor thermostat with a weekly heating
schedule. It can regulate the economical or comfort temperature inside residential
buildings. It offers a few programmable modes. Every mode regulates pre-set
temperatures (Comfort, Economy, Holiday, Party).
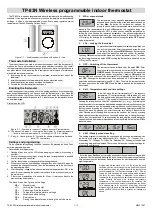
Figure 1
: 1 – knob (encoder) combined with button; 2 – tab
Thermostat installation
The product can only be used in an indoor environment. Install the thermostat 1.5
m above the floor in a place where there is good natural air circulation. Don´t install
the thermostat where the measuring can be influenced by drafts, sunlight, heaters or
any other effects. Avoid mounting the thermostat on metal objects or metal bases
which block radio communication.
1. By pressing the tab (by screwdriver for instance) release the front part of the
thermostat.
2. Install the rear part of the thermostat at the chosen place (tab down).
3. Insert the batteries; the polarity is marked on the plastic.
4. Put back the front thermostat part and close it.
Enrolling the thermostat
Install and connect the receiving unit to the heating appliance. If the receiver has
been bought independently, you have to enroll the thermostat to it first. Open the
enrollment mode on the receiver (see its manual) and insert the batteries into the
thermostat or press and hold the knob for 5 s. In both cases the thermostat will send
an enrollment signal.
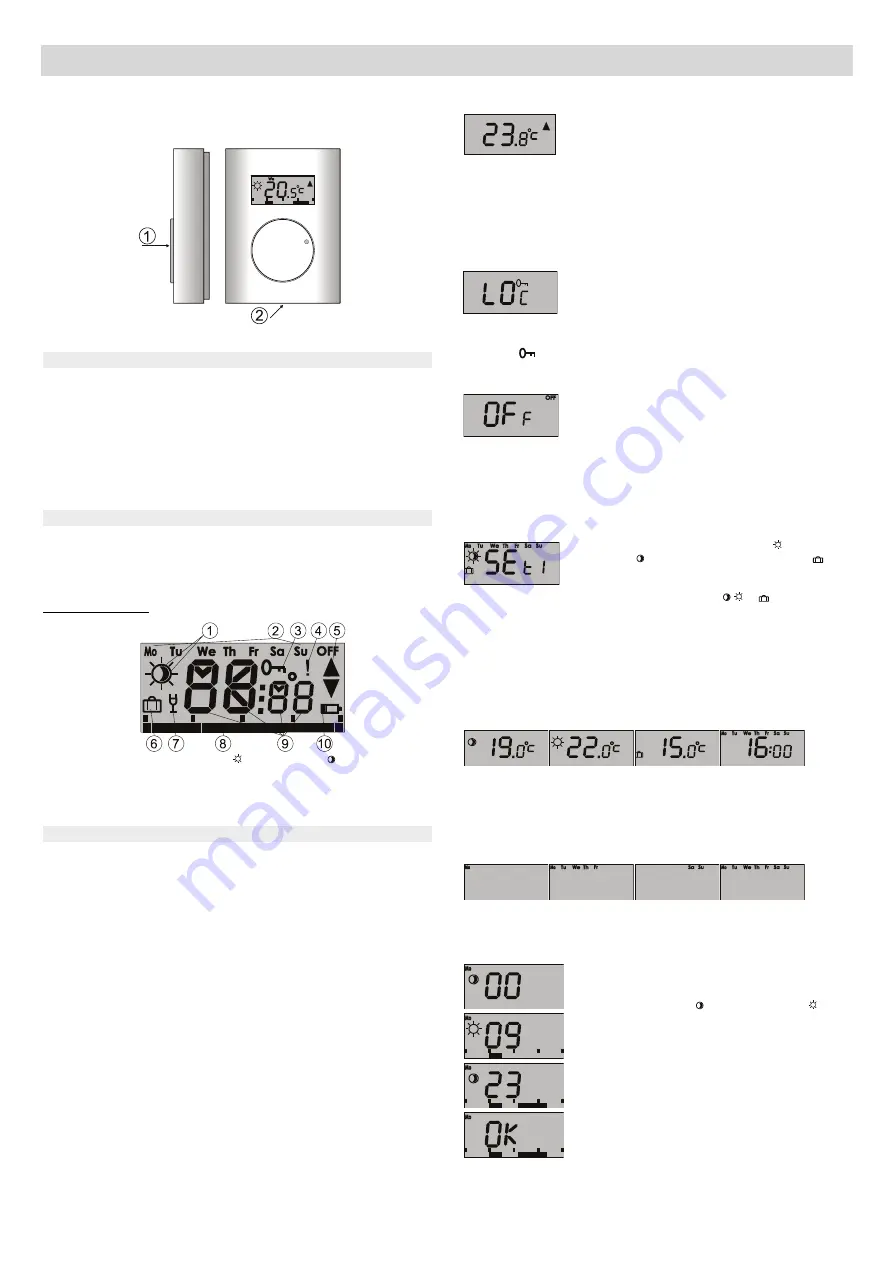
Symbols on the LCD:
Figure 2: 1 – Symbols for comfort and economical temperatures;
2 – The days of the week; 3 – Locking the thermostat; 4 – Alarm temperature
– limits / loss of communication; 5 – Heating ON / OFF; 6 – Holiday;
7 – Party; 8 – Heating times; 9 – Symbols for showing temperature time and
texts; 10 – Low battery
Settings and programming
Do the complete settings using the knob – encoder. By pressing the knob 2 sec
enter the programming mode.
General rules for programming:
1. Flashing of any icon on the LCD allows changing the option(s) or choosing a
next item.
2. Perform choosing or changing by turning the knob (turning the knob is possible
from left to right and vice versa).
3. Confirm the selection or change by briefly pressing the knob.
4. When the value of an item has been changed, then after this briefly press the
knob and the changes are saved. Then the thermostat goes to the next item in
the programming menu.
5. After the setting / change of the chosen items, select the parameter „OK“, in the
menu. By short pressing the system returns back to the previous menu (up to
the main menu).
6. If there is no manipulation of the knob for 30 sec, it returns you back to the
previous menu automatically.
The basic menu has 7 groups of settings.
MA
n
Manual mode
LO
c
Locking the thermostat
OF
F
Switching off the thermostat
SE
t1
Temperature, date and time settings
SE
t2
Weekly schedule setting
SE
t3
Service menu
OK
Saving the parameters and leaving the service menu
1. MAn – manual mode
The temperature is set manually regardless of the weekly
schedule and is kept. Enter the menu and press the knob on
the item
Man,
the option ON (switched on) appears. By
turning the knob select the requested state and confirm by
pressing. The temperatures
tLo
and
tHi
determine the regulation range pre-
programmed in the service menu SE t3, in which you can select the temperature by
turning the knob. Choose the requested temperature. If the chosen temperature is
lower than the required temperature, the thermostat shows the symbol (▲) on its
LCD display. By entering the menu
Man
and confirming the option
OFF
, manual
mode is terminated.
2. LOc – Locking the thermostat
To protect the thermostat against unwanted manipulation you
can lock the thermostat. Enter the menu and press the knob
on the item
LOc,
the options
ON/OFF
appear. By turning the
knob select the requested state and confirm by pressing.
Choosing
ON
enables the function
Lock
, and blocks thermostat control. To unlock
the thermostat choose the option
OFF.
Locking the thermostat is indicated on the
LCD by the
symbol.
3. OFF – Switching off the thermostat
The thermostat can be switched off by the option
OFF
. Enter
the menu and press the knob on the item
OFF,
the options
ON/OFF
appear. By turning the knob select the requested
state and confirm by pressing. Choosing
ON
enables the
function
OFF
, and switches off the thermostat. This is indicated on the LCD by the
text
OFF
. Although the thermostat has been switched off, it still measures and
detects the antifreeze temperature (see SE t3, Stby). To unlock the thermostat enter
the menu and choose the option
OFF.
When the knob is pressed the thermostat will
be unlocked.
4. Set1 - Temperature, date and time settings
In the Set1 menu the comfort temperature ( ), the economy
temperature ( ), the temperature for Holiday mode ( ), and
the data and time can be preset. Enter the menu
Set1
, and
on the LCD the symbol of the economy temperature starts
flashing. By turning the knob select the requested item ( , or ), by pressing the
knob the symbols for temperature start flashing and again by turning the knob set the
required temperature and by repeatedly pressing the knob confirm this setting. The
last item serves for setting the current time. It indicates using flashing symbols of the
days of the week. By pressing you enter the current time setting. It starts with the
year. Pressing gets it flashing, and by turning the knob set the year, by pressing
again it saves the setting and then you continue the same way in setting the current
month, day, hour and minute. Then by pressing the knob after the minute setting the
values are saved and the thermostat is back in the menu
Set1
. Select the item
OK
to
leave this menu.
5. SEt2 – Weekly schedule setting
The heating program for switching the comfort and the economy temperatures can
be set for every single day independently (Mo - Monday, Tu - Tuesday, We -
Wednesday, Th - Thursday, Fr - Friday, Sa - Saturday, Su - Sunday) or it can be split
into working days and the weekend. There is one more option - the same settings for
all days with no difference.
Enter the menu
Set2
, and by turning the knob select the combination of days which
is required. Confirm by briefly pressing the knob. It enters the programming of heating
time periods when the thermostat switches between the day temperature and the
night temperature.
Programming always starts at 00 hrs. By turning the knob
clockwise, you can move through the time line. Press the knob
at the point from which you want to start with the heating to the
comfort temperature. The symbol changes to the . Now by
turning the knob clockwise the points appear which represent
the hours for which heating is performed to the economy
temperature. By turning the knob anti-clockwise the points are
erased. Pressing the knob more switches the economy
temperature to the comfort temperature. By repeating this
procedure the comfort and economy temperatures can be set
for a selected day (or for a group of a few days). After the
programming of the whole day has been finished, the thermostat
shows you
OK
. When the knob is pressed, all settings are
saved.


