background image

5

5

11

10

9

8

17

12

13

14

15

16

18

19

20

21

22

23

25

FLUSH

FILL

DRAIN

4A

4B

1

2

3

24

5

6

  7

4C

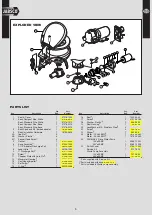
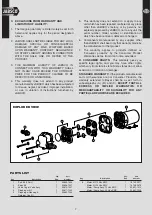
eXPloDeD VieW

Parts list


Qty.  

Part

 Key 

Description 

Req. 

Number


Seat & Cover 

37078-1000 

  2 

Bowl, Compact Size, White 

37076-0010


Bowl, Standard Size, White 

37076-1010


Bowl, Compact Size, Bone 

37076-2010


Bowl, Standard Size, Bone 

37076-3010

  3 

Bowl Spud and 3/4

"

 barbed adaptor 

18753-0609

  4 

Bowl Installation Hardware 

18753-0604

  4A 

Tee Nut** 

4

  4B 

Washer, Plastic** 

4

  4C 

Socket Head Screw** 

4

  5 

Gasket* 

37017-0000

  6 

Base Assembly** 

37004-1000

  7 

1-1/2

"

 Adaptor, Discharge Port 

98023-0080

  8 

Joker Valve* ** 

44106-1000 

  9 

1

"

 Discharge Port** 

37077-1000

  10 

Screw** 

96050-0568

  11 

Chopper Plate with Lock Nut† 

37056-1000

  12 

Macerator Housing † 

37014-0000

  13 

Centrifugal Impeller†  

37006-0000

  14 

Set Screw† 

18753-0492

  15 

O-ring*† 

43990-0066


Qty.  

Part

 Key 

Description 

Req. 

Number


16 

Seal† 

1040-0000

  17 

Screw† 

91010-0144

  18 

Washer, Plastic*† 

35445-0000

  19 

Seal Housing† 

37043-1000

  20 

Lock Washer #10, Stainless Steel† 

4

  21 

Screw† 

91027-0011

  22 

Slinger†  

6342-0000

  23 

Motor - 12 Volt EMC† 

18753-0582


Motor - 24 Volt EMC† 

18753-0583

  24 

PAR-MAX 4 Rinse Water Pump 


12 Volt EMC 

30631-1092


24 Volt EMC 

30631-1094

  25 

Switch Panel 

37047-1000


Service Kit 

90197-0000


Waste Pump Assembly


12 Volt EMC 

37072-0092


24 Volt EMC 

37072-0094

*   Parts supplied with Service Kit.
** Parts included with base 37004-1000.

†  Parts included in Waste Pump Assembly

Summary of Contents for 37275 Series

Page 1: ...when desired as well as a means of raising the water level in the bowl when appropriate for user comfort It also allows for complete evacuation of the bowl water while underway in rough sea conditions Model Number Description 37275 0092 Compact White Toilet 14 12 Volt EMC 37275 0094 Compact White Toilet 14 24 Volt EMC 37275 1092 Standard White Toilet 17 12 Volt EMC 37275 3092 Standard Bone Toilet ...

Page 2: ...olid mounting surface with the flow arrow pointing towards the pump The inlet hose should be cut and each end attached to the strainer s ports Connect the hose from the discharge port of the strainer to the PAR MAX pump s inlet port Connect another length of hose from the pump s discharge port to the area at the back of the Designer Styled Toilet with adequate length to connect with the 3 4 19 mm ...

Page 3: ...and very gently with a 10 mm wrench screw the provided toilet hold down fastener into the pilot hole drilled earlier Do not overtighten these fasteners as this may crack the china It is only necessary to make the fasteners snug enough to prevent the toilet from sliding around Screw the dress cap into the top of the hold down screw ELECTRICAL The electrical wiring should be independent of all other...

Page 4: ...es out of the base with the pump The pump chopper will engage the macerator housing and it may be necessary to gently tap the chopper against the macerator housing to free it from the base Prevent the motor shaft from turning by inserting a screwdriver in the shaft slot at the rear of the motor and remove the self locking nut Remove the chopper and macerator housing from the motor shaft Remove the...

Page 5: ...ischarge Port 1 37077 1000 10 Screw 3 96050 0568 11 Chopper Plate with Lock Nut 1 37056 1000 12 Macerator Housing 1 37014 0000 13 Centrifugal Impeller 1 37006 0000 14 Set Screw 1 18753 0492 15 O ring 1 43990 0066 Qty Part Key Description Req Number 16 Seal 1 1040 0000 17 Screw 2 91010 0144 18 Washer Plastic 2 35445 0000 19 Seal Housing 1 37043 1000 20 Lock Washer 10 Stainless Steel 4 21 Screw 4 91...

Page 6: ...ach diaphragm retainer cap through the diaphragm and into the socket of the wobble plate Secure each retaining cap to the wobble plate with a 1 phillips head retainer screw Place the motor on its rear end bell and position the valve cage against the diaphragm ensuring each cavities seal groove is seated on its sealing bead molded into the diaphragm Ensure the O ring seal that separates the pumps i...

Page 7: ...warranty does not extend to or apply to any 5 unit which has been repaired or altered at any place other than JABSCO s factory or by persons not expressly approved by JABSCO nor to any unit the serial number model number or identification of which has been removed defaced or changed Components manufactured by any supplier other 6 than JABSCO shall bear only that warranty made by the manufacturer o...

Page 8: ...ire EN11 0BU Tel 44 0 1992 450145 Fax 44 0 1992 467132 JAPAN NHK Jabsco Company Ltd 3 21 10 Shin Yokohama Kohoku Ku Yokohama 222 0033 Tel 81 045 475 8906 Fax 81 045 477 1162 ITALY Jabsco Marine Italia Via Tommaseo 6 20059 Vimercate Milano Tel 39 039 685 2323 Fax 39 039 666 307 GERMANY Jabsco GmbH Oststrasse 28 22844 Norderstedt Tel 49 40 53 53 73 0 Fax 49 40 53 53 73 11 Warranty All products of th...

Reviews: