background image

Assembly (continued)

cs@jack-post.com

Please contact 1-800-800-4950 for further assistance.
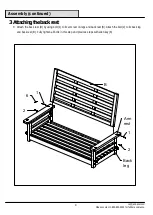
13

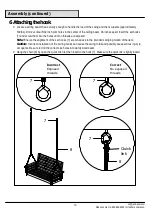
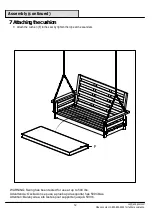
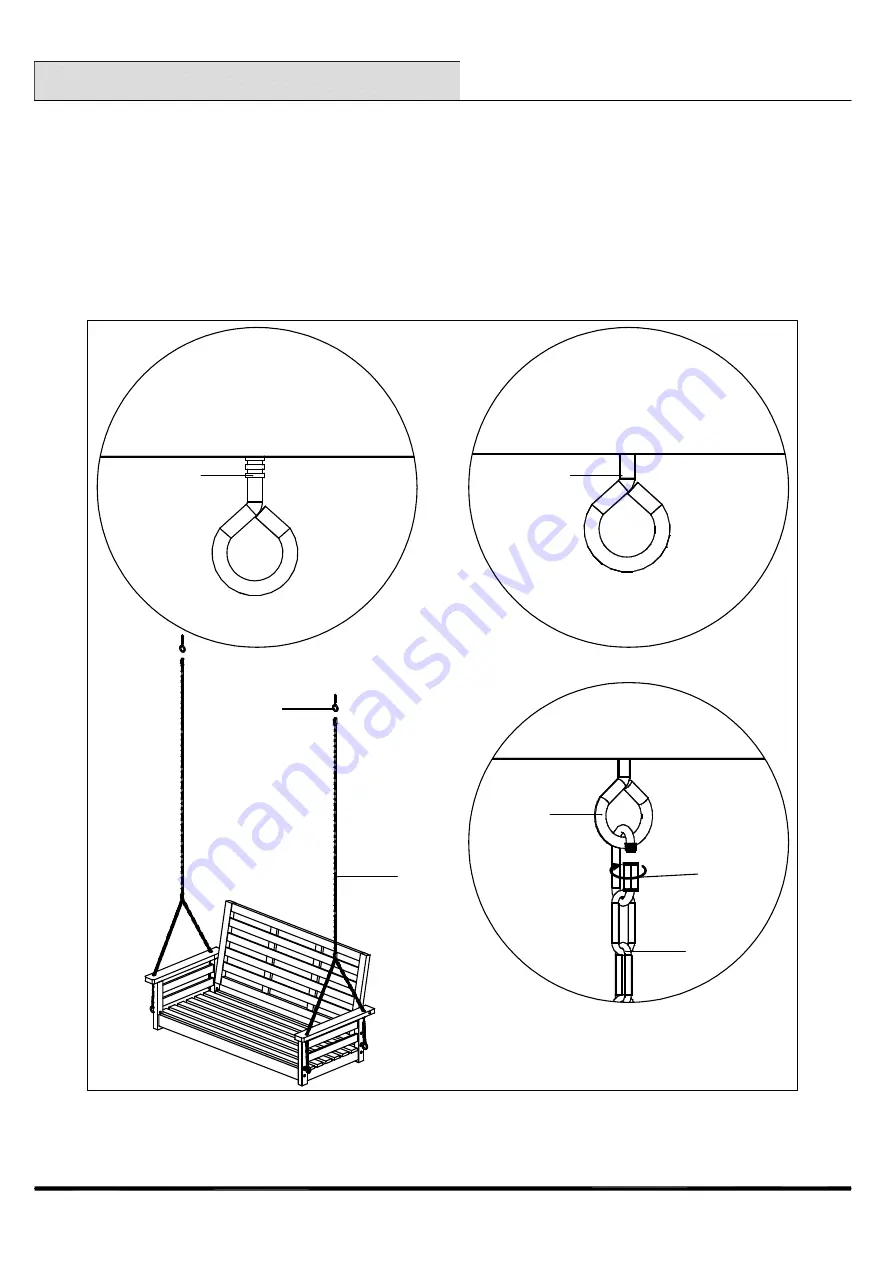
6 Attaching the hook

Locate a ceiling beam that is sturdy enough to handle the load of the swing and the occupants (approximately

500lbs). Drill 2 vertical 5/32 inch pilot holes in the center of the ceiling beam, 46 inches apart. Insert the set hooks
(7) and screw them into the holes until no threads are exposed.

     Note :

Ensure the alignment of the set hooks (7) are conducive to the intended swinging motion of the item.

     Caution :

 Incorrect installation of the ceiling hooks can cause the swing to fall and possibly cause serious injury to

occupants. Be sure to drill the correct size holes into sturdy wood beam.

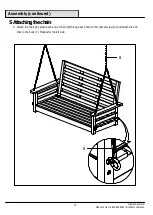
Hang the chain (8) by open the quick link first then insert to the hook (7). Make sure the quick link is tightly locked.

7

7

Quick

link

7

Incorrect

Exposed

threads

Correct

No exposed

threads

8

7

8

Summary of Contents for JPC-307OL

Page 1: ...ND CARE GUIDE PORCH SWING Questions problems missing parts 1 800 800 4950 Mon through Fri 8 00am 8 00pm EST E mail cs jack post com cs jack post com Please contact 1 800 800 4950 for further assistanc...

Page 2: ...Table of Contents Do not Return 3 Use and Care Wood Care Guide 4 Instructions 5 Customer Service Contact Info 14 cs jack post com Please contact 1 800 800 4950 for further assistance 2...

Page 3: ...fficulty with assembly missing parts or use please DO NOT return this item to the store Retail stores are unable to properly assist you Contact our Customer Service Department directly for assistance...

Page 4: ...nd excessive cracking do not store in a heated place CARE AND MAINTENANCE 1 We recommend cleaning the surface of dirt bird droppings tree sap grease etc Scrub with a cloth or soft brush using a mild h...

Page 5: ...50 for further assistance 5 TOOLS REQUIRED HARDWARE INCLUDED NOT SHOWN ACTUAL SIZE Part Decsription Quantity 1 2 3 4 BOLT M6 x 60 mm 2 2 4 SCREW M4 x 32 mm EYE BOLT 1 2 3 5 6 7 8 2 2 SET HOOK CHAIN 5...

Page 6: ...inued cs jack post com Please contact 1 800 800 4950 for further assistance 6 PACKAGE CONTENTS Part Decsription Quantity A B C D Seat 1 1 1 1 Back rest Right leg Left leg E Front back panel 2 A B D C...

Page 7: ...800 800 4950 for further assistance 7 1 Attaching the eye bolt Lay the right leg C insert eye bolt 5 from the outer side Make sure the opening for the eye bolts 5 should be facing down Repeat these st...

Page 8: ...Attach the back panel E to right left leg C D the by insert bolt 2 using allen key 6 Do not fully tighten the bolt until step 3 Attach the seat A to the assembly by inserting dowels of seat A into the...

Page 9: ...her assistance 9 3 Attaching the back rest Attach the back rest B by using bolt 1 to fix arm rest on legs and back rest B Attach the bolt 2 to fix back leg and back rest B Fully tighten all bolts in t...

Page 10: ...800 4950 for further assistance 10 3 4 4 4 Attaching the screw Attach the screws 3 to fix seat A and front back panels E Attach the screws 4 to fix seat A and right leg C Repeat the procedure to the...

Page 11: ...m Please contact 1 800 800 4950 for further assistance 11 5 Attaching the chain Attach the chain 8 place each end of chain 8 through each hole on the right arm rest C and attach the end links to the h...

Page 12: ...nd screw them into the holes until no threads are exposed Note Ensure the alignment of the set hooks 7 are conducive to the intended swinging motion of the item Caution Incorrect installation of the c...

Page 13: ...nce 12 7 Attaching the cushion Attach the cushion F to the seat by tighten the rope at the seat slats WARNING Swing has been tested for use at up to 500 lbs Advertencia Oscilaci n se puso a prueba par...

Page 14: ...ntact 1 800 800 4950 for further assistance 14 Customer Service Questions problems missing parts Please call Customer Service 1 800 800 4950 For more information about warranty please visit WWW JACK P...

Reviews: