background image

Use and Care

cs@jack-post.com

Please contact 1-800-800-4950 for further assistance.

4

OIL-BASED PAINTED

WOOD CARE GUIDE

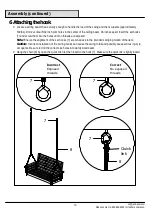
PLEASE READ THIS INFORMATION CAREFULLY -  IT WILL HELP YOU TO MAINTAIN YOUR FURNITURE

This furniture has been made from seasoned wood and has already been factory primed and finished with an oil-based

paint.  With proper maintenance, it will give you years of enjoyable service.  Wood is a natural material and its appearance

will change when exposed to the elements; surface splits and checking may appear, particularly on the end grain and to a

lesser extent on the surface within a few weeks if left exposed to the elements.  The furniture is designed with this in mind to
remain strong and durable. If left exposed to the weather, your furniture will fade in color. The exact color will depend on the

environment; for example, less fading will occur if the furniture is placed in a shady location under a tree. To help preserve
the color, cover the furniture with a garden furniture cover when not in use. Wood expands and contracts with changes in

relative humidity. To prevent over drying and excessive cracking, do not store in a heated place.

CARE AND MAINTENANCE

1. We recommend cleaning the surface of dirt, bird droppings, tree sap, grease. etc. Scrub with a cloth or soft brush

using a mild household cleaner, dish or laundry detergent.

2. Rinse thoroughly.
3. Allow to dry completely and retighten all hardware.

 REFINSHING

      Based on exposure to the elements the finish may need to be restored.  Proceed as follows:

1. Cover the floor area with a suitable liquid resistant ground sheet to contain dust, dirt or spills.

2. Use suitable protective clothing, i.e., rubber gloves, apron, safety glasses, dust mask, etc.
3. Check and retighten all furniture hardware
4. Remove any finish that has become loose or cracked by using a scraper or wire brush.

DO NOT USE STEEL WOOL

as the fine particles may result in dark rusty blotching.

5. In a well-ventilated area or outdoors, lightly sand using 100-200 grit sand paper.
6. Remove any dust by wiping with a damp cloth.
7. Allow item to dry completely.
8. Use an oil-based primer on any bare wood spots.
9. Brush or spray on new finish using the manufacturer's instructions - using an oil-based paint available at any paint

retailer.

  Customer Service Mon - Fri 8:00 am to 8:00 pm Eastern Time

Jack-Post Corp.

800 East Third Street

Buchanan, MI USA 49107

1-800-800-4950

cs@jack-post.com

Summary of Contents for JPC-307OL

Page 1: ...ND CARE GUIDE PORCH SWING Questions problems missing parts 1 800 800 4950 Mon through Fri 8 00am 8 00pm EST E mail cs jack post com cs jack post com Please contact 1 800 800 4950 for further assistanc...

Page 2: ...Table of Contents Do not Return 3 Use and Care Wood Care Guide 4 Instructions 5 Customer Service Contact Info 14 cs jack post com Please contact 1 800 800 4950 for further assistance 2...

Page 3: ...fficulty with assembly missing parts or use please DO NOT return this item to the store Retail stores are unable to properly assist you Contact our Customer Service Department directly for assistance...

Page 4: ...nd excessive cracking do not store in a heated place CARE AND MAINTENANCE 1 We recommend cleaning the surface of dirt bird droppings tree sap grease etc Scrub with a cloth or soft brush using a mild h...

Page 5: ...50 for further assistance 5 TOOLS REQUIRED HARDWARE INCLUDED NOT SHOWN ACTUAL SIZE Part Decsription Quantity 1 2 3 4 BOLT M6 x 60 mm 2 2 4 SCREW M4 x 32 mm EYE BOLT 1 2 3 5 6 7 8 2 2 SET HOOK CHAIN 5...

Page 6: ...inued cs jack post com Please contact 1 800 800 4950 for further assistance 6 PACKAGE CONTENTS Part Decsription Quantity A B C D Seat 1 1 1 1 Back rest Right leg Left leg E Front back panel 2 A B D C...

Page 7: ...800 800 4950 for further assistance 7 1 Attaching the eye bolt Lay the right leg C insert eye bolt 5 from the outer side Make sure the opening for the eye bolts 5 should be facing down Repeat these st...

Page 8: ...Attach the back panel E to right left leg C D the by insert bolt 2 using allen key 6 Do not fully tighten the bolt until step 3 Attach the seat A to the assembly by inserting dowels of seat A into the...

Page 9: ...her assistance 9 3 Attaching the back rest Attach the back rest B by using bolt 1 to fix arm rest on legs and back rest B Attach the bolt 2 to fix back leg and back rest B Fully tighten all bolts in t...

Page 10: ...800 4950 for further assistance 10 3 4 4 4 Attaching the screw Attach the screws 3 to fix seat A and front back panels E Attach the screws 4 to fix seat A and right leg C Repeat the procedure to the...

Page 11: ...m Please contact 1 800 800 4950 for further assistance 11 5 Attaching the chain Attach the chain 8 place each end of chain 8 through each hole on the right arm rest C and attach the end links to the h...

Page 12: ...nd screw them into the holes until no threads are exposed Note Ensure the alignment of the set hooks 7 are conducive to the intended swinging motion of the item Caution Incorrect installation of the c...

Page 13: ...nce 12 7 Attaching the cushion Attach the cushion F to the seat by tighten the rope at the seat slats WARNING Swing has been tested for use at up to 500 lbs Advertencia Oscilaci n se puso a prueba par...

Page 14: ...ntact 1 800 800 4950 for further assistance 14 Customer Service Questions problems missing parts Please call Customer Service 1 800 800 4950 For more information about warranty please visit WWW JACK P...

Reviews: