


3.2 监控参数表
参数编号
参数描述
参数编号
参数描述
0 1 0
针数计数
0 2 5
踏板电压采样值
0 1 1
计件数
0 2 6
机头传动比实际值
0 1 2
机头实际速度
0 2 7
电机累计运行时间(Hour)
0 1 3
霍尔状态
0 2 8
机头交互量电压采样值
0 2 0
母线电压
0 2 9
DSP 软件版本号
0 2 1
机头速度
0 2 A
模拟输入 1 采样值
0 2 2
相电流
0 2 B
模拟输入 2 采样值
0 2 3
初始角度
0 2 C
错误计数器
0 2 4
机械角度
0 3 0 - 0 3 7
历史故障代码
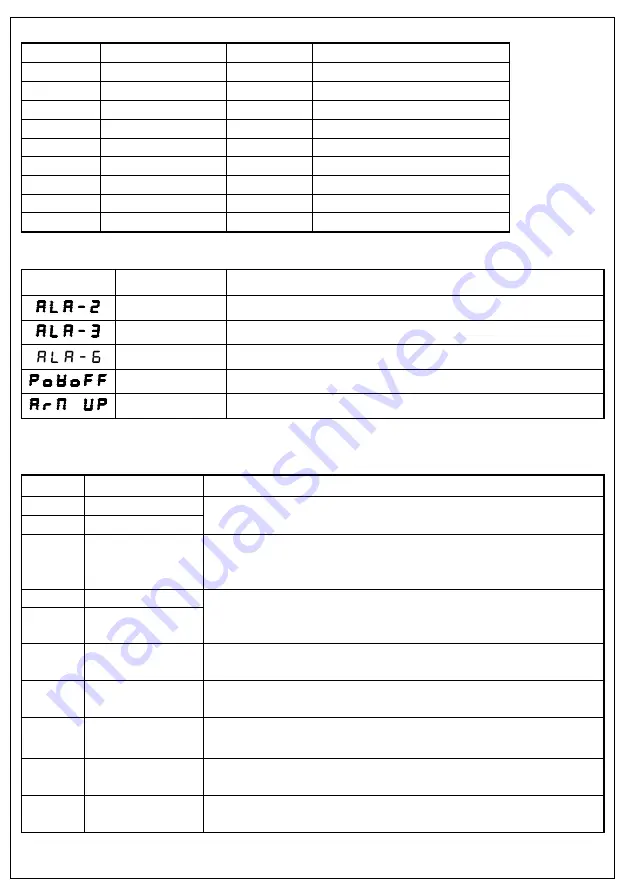
3.3 安全报警表
报警代码
代码含义
解决措施
计针数报警
表示计针数已达所设上限,按 P 键可取消报警并重新计数
计剪线数报警
表示计剪线数已达所设上限,按 P 键可取消报警并重新计数
底线报警
表示底线即将用完,请更换底线.按 P 键可恢复
断电提醒
请等候 30 秒再重新打开电源开关
翻台开关报警
摆正机头,确保翻台开关复原
3.4 故障代码表
若系统出现报错或报警,请首先检查如下项:
1、先确认机器的连接线是否连接完好;2、确认电控和机头是否匹配;3、确认恢复出厂是否准确。
故障代码
代码含义
解决措施
E r r- 0 1
硬件过流
关闭系统电源,30 秒后重新接通电源,控制器若仍不能正常工作,请更换控制器并通知厂方。
E r r- 0 2
软件过流
E r r- 0 3
系统欠压
断开控制器电源,检查输入电源电压是否偏低(低于 176V)。若电源电压偏低,请在电压恢
复正常后重新启动控制器。若电压恢复正常后,启动控制器仍不能正常工作,请更换控制器
并通知厂方.
E r r- 0 4
停机时过压
断开控制器电源,检查输入电源电压是否偏高(高于 264V)。若电源电压偏高,请在电压恢
复正常后重新启动控制器。若电压恢复正常后,启动控制器仍不能正常工作,请更换控制器
并通知厂方
E r r- 0 5
运行时过压
E r r- 0 6
电磁铁
回路故障
关闭系统电源,检查电磁铁连线是否正确,是否有松动、破损等现象。若有则及时更换。确
认无误后重启系统,若仍不能工作,请更换控制器并通知厂方。
E r r- 0 7
电流检测
回路故障
关闭系统电源,30 秒后重新接通电源观察是否能正常工作。重试几次,若该故障频繁出现,
请更换控制器并通知厂方。
E r r- 0 8
电机堵转
断开控制器电源,检查电机电源输入插头是否脱落、松动、破损,是否有异物缠绕在机头上。
排除后重启系统仍不能正常工作,请更换控制器并通知厂方。
E r r- 0 9
制动回路故障
关闭系统电源,检查电源板上白色的制动电阻接头是否松动或脱落,将其插紧后重启系统。
若仍不能正常工作,请更换控制器并通知厂方。
E r r- 1 0
HMI 通讯故障
检查控制面板与控制器的连线是否脱落、松动、断裂,将其恢复正常后重启系统。若仍不能
正常工作,请更换控制器并通知厂方。
6
/
7
Summary of Contents for JK-58420B
Page 1: ......
Page 2: ......
Page 3: ......
Page 4: ...1 2 3 4 5 6 7 8 9 10 11 12 13 14 15 1 2 3 4...
Page 6: ...58420J 58420J Electronic Control Instructions...
Page 8: ...1 3 AC 2 2 1 2 1 2 2 1 12 2 13 W 14 15 16 17 18 2 7...
Page 23: ...2019 03 Edition 2019 March...


