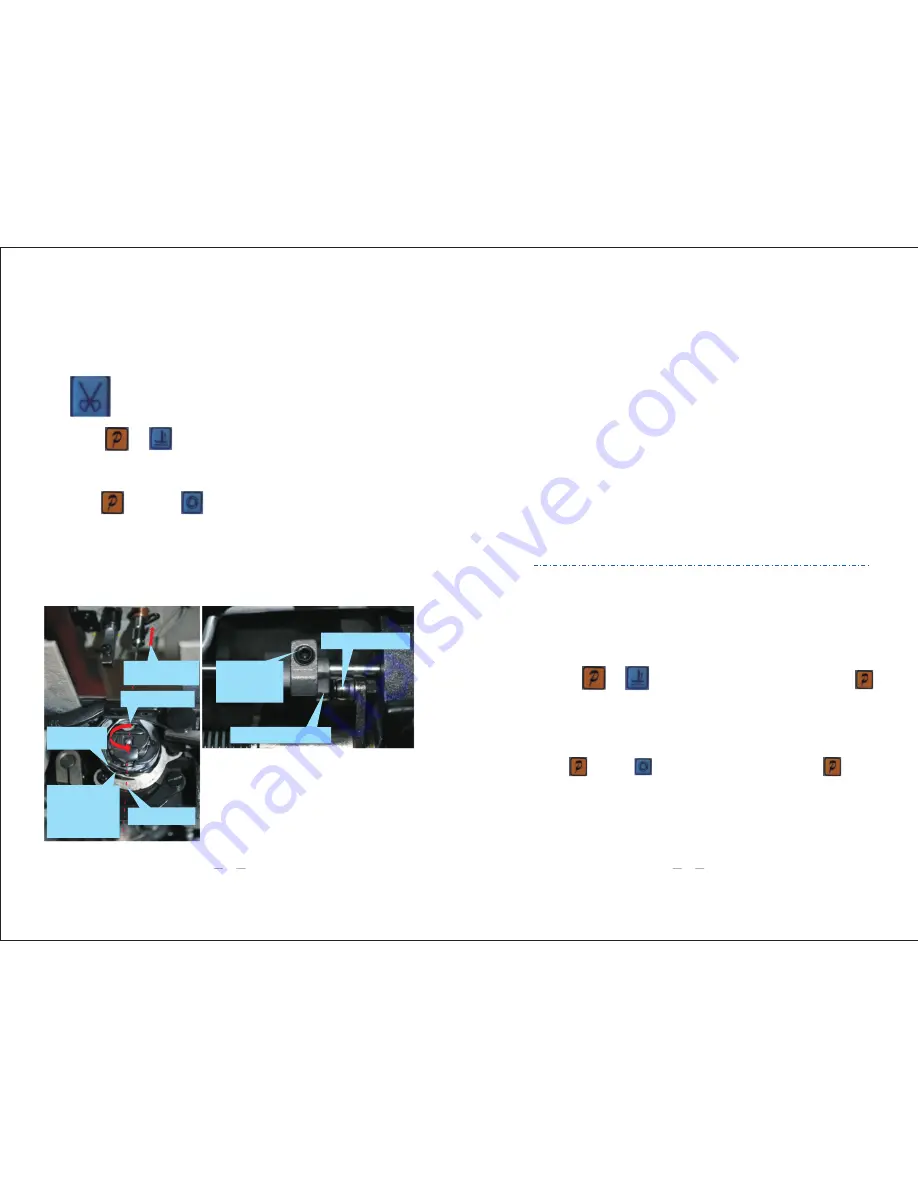
background image

Thread


trimming

Standard method of adjustment trimming

Needle bar running
direction

Hook running 
direction

Hook scattering 
thread point

Needle center line

The distance 
between hook 
scattering thread 
point and need 
center line is about 
5mm

Retaining screw 
of trimming cam

Trimming driving ball

Movable knife start point

Adjust method:

Before adjusting the trimming time, we must adjust the height of needle 
bar, the time of hook drawing thread and needle position.

When the hook scattering thread point is about 5mm away from the 
needle center line as the picture shows, adjust the trimming cam to the 
position where the trimming movable knife just starts.

Adjust Description

When the movable knife scattering thread, do not let the hook loose 
thread. Make sure the hook take in enough thread so that the thread tail 
will be longer.

Introduction of system operation

Setting to technician parameter

Setting to system officer parameter

Keep pressing the                                at the same time . Then loosen both button and press           

again to access to technician parameter

Keep pressing 

button and

button at the same time, loosen, then press

button 

again to access to system officer parameter.


Press the button can turn on or turn off  the 
thread trimming function.

Press                           at the same time, can enter the technician 

parameter mode.

P05: Set the trimming speed

Press          and press             at the same time, can enter system 

parameter mode.

P03: Start angle shear line 
P04: End angle shear line 
P0A: Shear line strength angle

+

+

14

15

Summary of Contents for JK-SHIRLEYIIE

Page 1: ...Operation and Daily Service Manual JK SHIRLEYIIE www chinajack com Edited by Customer Service Center Translated by International Trade Department...

Page 2: ...djustment of feed dog Adjustment of Presser foot lifter Thread Trimming Standard method of adjustment of trimming Introduction of System Operation Factory reset Common fault treatment 1 7 Daily mainte...

Page 3: ...JK SHIRLEYIIE With powermax control box Presser foot PK Simple Beautiful Efficient Saving energy Stable Low noise 1...

Page 4: ...nstructions Needle position key Press foot lifter key Trimmer key Start end back tacking key Free sewing key Multi segment sewing mode key W mode sewing key Function key Thread tension key Speed key 2...

Page 5: ...can be changed by adjusting the following parameter P30 Pedal Curve mode setup 0 Auto Calculated liner Curve 1 Two segment liner Curve 2 Arithmetic Curve 3 S curve P34 Pedal trimming position set the...

Page 6: ...pattern bar tacking sewing mode the bar tacking stitches and times are set up by the operator through control panel and sewing will be finished automatically The operator only needs to pedal the spee...

Page 7: ...t when the beginning reinforced sewing The speed of mainshaft when the finishing reinforced sewing The speed of mainshaft when W reinforced sewing Trial sewing The control panel parameter can be adjus...

Page 8: ...ure of sewing demands 2 Press and hold button press button at the same time enter into system programmer parameter mode 4 P78 53revise as P78 200 solenoid full output strength time P79 05revise as P79...

Page 9: ...e the friction with needle plate Change the presser footer loose the footer screw then can change the presser footer Adjust the footer and needle When the needle is not in the middle of the presser fo...

Page 10: ...knife just starts Adjust Description When the movable knife scattering thread do not let the hook loose thread Make sure the hook take in enough thread so that the thread tail will be longer Introduct...

Page 11: ...is 220V 20V with a multimeter 06 Err REASON Solenoid circuit fault The way to check 1 check the DC resistance of each solenoid is normal or not with a multimeter you can compare with the normal machin...

Page 12: ...erchange the control box to check control box have problem or not Solution 1 Make sure there is no any mechanical fault from machine 2 Use P43 change the last digital parameter from 0 to 2 step on the...

Page 13: ...tenance After work off turn off the power first Clean the dust on the machine and machine head table thread holder and make sure the oil are clear of oil tank Weekly maintenance Clean the machine surf...

Page 14: ...thread loose under the fabric skipped stitching during sewing skipped stitching when starting sewing The tension of upper thread is weak or the tension of bottom thread is too strong To adjust the ten...

Page 15: ...parameter settings of trimming position and Presser Foot Lift position the method of getting into The technician parameters as above Increase the value of P35 appropriately Increase the numerical dif...

Page 16: ...ng Workers can be attracted by this advantage How to raise presser foot a little instead of too much in order to make sew thin 15 Q Will the electromagnet be short circuit or electricity leakage with...

Page 17: ...the top left corner of the panel to adjust the stitching speed within the max rotating speed as the system presets 23 Q Why does the electromagnet always make a noisy sound when the machine lifts pre...

Page 18: ...MEMO MEMO...

Reviews: