background image

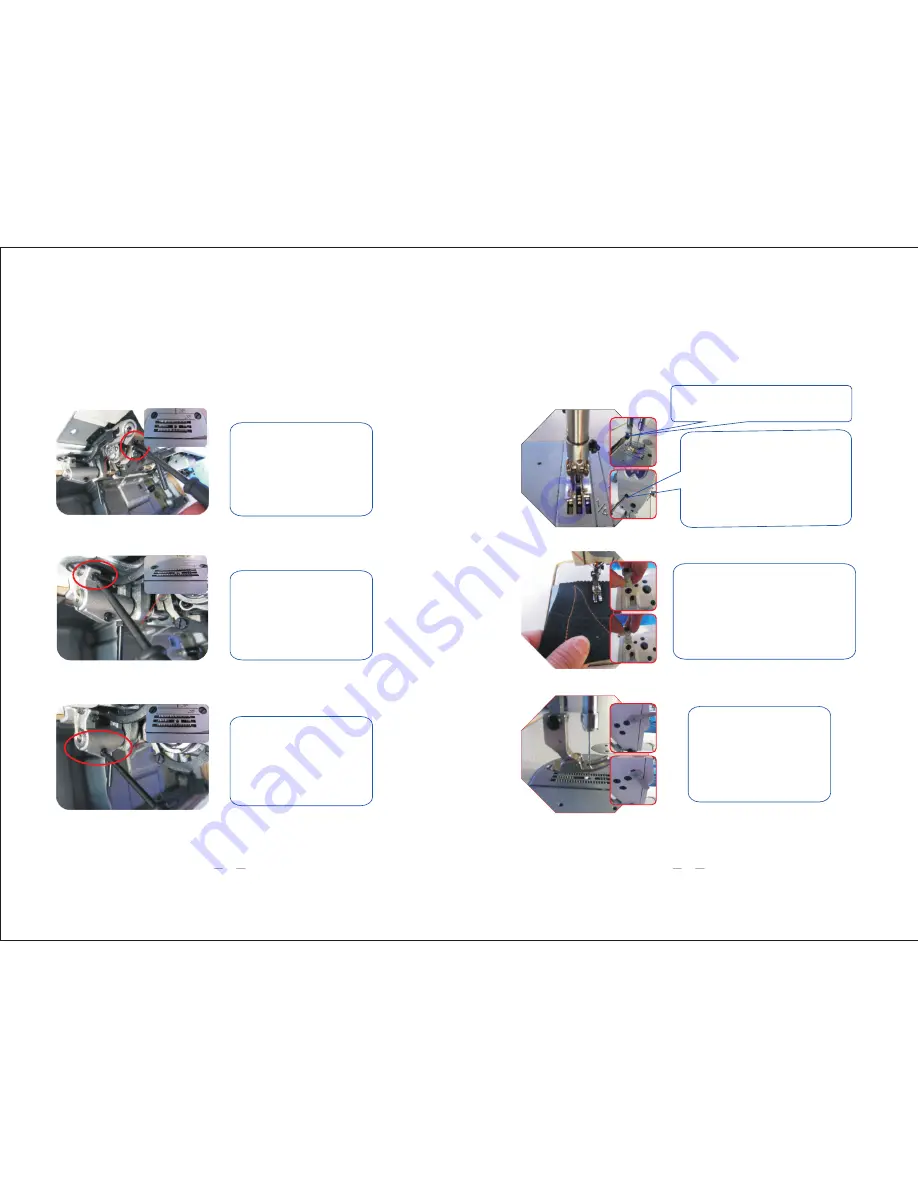
Adjustment of feed dog

Height adjustment for feed dog

Unscrew the braces screw
For light fabric, appropriately 
adjust feed dog lower
For heavy fabric, appropriately 
adjust feed dog higher .After 
finishing ,tighten the screws.

Adjustment for feed dog gradient

Unscrew the screw,turn the brace 
and adjust the eccentric shaft, it can 
adjust teeth front or back,high or 
low.This step depend on different 
fabric.

Front or back for feed dog

Adjust the needle spacing to 
maximum, unscrew the braces screw, 
and it can adjust feed dog front and 
back, when the machine is running, 
please pay attention  to the teeth 
front and back and can not touch the 
throat plate ,and feed dog left and 
right also can can not have the 
friction with needle plate.

Change the presser footer:

loose the footer screw then can change 
the presser footer.

Adjust the footer and needle:

When the needle is not in the middle of the 
presser footer ,or the feed dog is in low 
position. Unscrew and adjust the presser to 
the right position . Then tighten it.

Adjusting the pressure of 
the presser footer:

Lifting the footer, put the fabric below the footer, 
put down the footer, pull the fabric by hand, if 
the fabric can be easily pull out, so need increase 
the pressure of the footer. Loose the press rod 
nut, rotate it in the clockwise direction, if you 
want to reduce the pressure, please rotate it in the 
anticlockwise direction.

Footer protect:

When the machine work without 
fabric, must move up the presser 
footer protection wrench, lift the 
footer, can reduce the ware rate of 
the teeth and presser footer.

Adjustment of the presser foot lifter 

12

13

Summary of Contents for JK-SHIRLEYIIE

Page 1: ...Operation and Daily Service Manual JK SHIRLEYIIE www chinajack com Edited by Customer Service Center Translated by International Trade Department...

Page 2: ...djustment of feed dog Adjustment of Presser foot lifter Thread Trimming Standard method of adjustment of trimming Introduction of System Operation Factory reset Common fault treatment 1 7 Daily mainte...

Page 3: ...JK SHIRLEYIIE With powermax control box Presser foot PK Simple Beautiful Efficient Saving energy Stable Low noise 1...

Page 4: ...nstructions Needle position key Press foot lifter key Trimmer key Start end back tacking key Free sewing key Multi segment sewing mode key W mode sewing key Function key Thread tension key Speed key 2...

Page 5: ...can be changed by adjusting the following parameter P30 Pedal Curve mode setup 0 Auto Calculated liner Curve 1 Two segment liner Curve 2 Arithmetic Curve 3 S curve P34 Pedal trimming position set the...

Page 6: ...pattern bar tacking sewing mode the bar tacking stitches and times are set up by the operator through control panel and sewing will be finished automatically The operator only needs to pedal the spee...

Page 7: ...t when the beginning reinforced sewing The speed of mainshaft when the finishing reinforced sewing The speed of mainshaft when W reinforced sewing Trial sewing The control panel parameter can be adjus...

Page 8: ...ure of sewing demands 2 Press and hold button press button at the same time enter into system programmer parameter mode 4 P78 53revise as P78 200 solenoid full output strength time P79 05revise as P79...

Page 9: ...e the friction with needle plate Change the presser footer loose the footer screw then can change the presser footer Adjust the footer and needle When the needle is not in the middle of the presser fo...

Page 10: ...knife just starts Adjust Description When the movable knife scattering thread do not let the hook loose thread Make sure the hook take in enough thread so that the thread tail will be longer Introduct...

Page 11: ...is 220V 20V with a multimeter 06 Err REASON Solenoid circuit fault The way to check 1 check the DC resistance of each solenoid is normal or not with a multimeter you can compare with the normal machin...

Page 12: ...erchange the control box to check control box have problem or not Solution 1 Make sure there is no any mechanical fault from machine 2 Use P43 change the last digital parameter from 0 to 2 step on the...

Page 13: ...tenance After work off turn off the power first Clean the dust on the machine and machine head table thread holder and make sure the oil are clear of oil tank Weekly maintenance Clean the machine surf...

Page 14: ...thread loose under the fabric skipped stitching during sewing skipped stitching when starting sewing The tension of upper thread is weak or the tension of bottom thread is too strong To adjust the ten...

Page 15: ...parameter settings of trimming position and Presser Foot Lift position the method of getting into The technician parameters as above Increase the value of P35 appropriately Increase the numerical dif...

Page 16: ...ng Workers can be attracted by this advantage How to raise presser foot a little instead of too much in order to make sew thin 15 Q Will the electromagnet be short circuit or electricity leakage with...

Page 17: ...the top left corner of the panel to adjust the stitching speed within the max rotating speed as the system presets 23 Q Why does the electromagnet always make a noisy sound when the machine lifts pre...

Page 18: ...MEMO MEMO...

Reviews: