background image

1

2

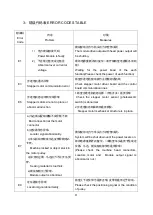
E11 

电源开启即自动找上定位,但定位器有

插入控制箱,针上信号无法输出。


Power on    automatically find 

[position], but Locators insertion 

control box, the pin signal is not 

output. 

马达无法正常运行。(请检查定位器是否异常)。


The motor stops running.  (Please check  locator is 

abnormal).


E12 

电源开启时,未插入定位器。


At power is turned on, not inserted 

locator. 

自动进入无定位器模式运作,且切线、扫线、上定位

等以及所有定针缝式样缝制功能亦无效。


马达可正常操作。(请检查定位器是否忘记插入或异

常)


Motor  still  can  run,  but  it  automatically  starts  the 

clutch mode. All constant-stitch sewing pattern and 

trimmer /wiper function is invalid.(Please check the 

Locators abnormal or not.) 

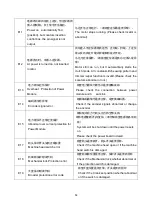
E13 

电力模块过热保护


Overheat   Protection of Power 

M

odule

检查电力模块与散热片是否接触良好。


Please  check  the  connection  between  power 

module and h      eat sink. 

E14 

编码器信号异常


Encoder signal error. 

检测编码器信号是否正常,或更换编码器。


Check  if  the  encoder  signals  abnormal  or  change 

the encoder. 

E15 

电力模块不正常过流保护


Abnormal over current protection for 

Power Module. 

模块驱动出力与机头出力将全部关闭。


等待电源重新开启

/

复位。

(请仔细检查电源板各项机

能)


System will be shut down until the power resets 

on. 

Please check the power board in detail. 

E17 

机头保护开关没到正确位置


Machine head switch error. 

检查机头是否掀开,机头开关是否损坏。


Check if the machine head open or if the machine 

head switch is dam aged. 

E18 

机械锁保护错误代码


Mechanical lock


Protection error 

检查机械锁位置是否正常,保护开关是否有损坏


Check if the Mechanical lock whether abnormal or 

if the protection switch is damaged. 

E19 

大盘保护错误代码


Broader protection error code 

检查大盘位置是否正常,开关是否有损坏


Check if the Crank set position whether abnormal 

or if the switch is damaged. 

Summary of Contents for JK-T718E

Page 1: ......

Page 2: ...ct operation and safety it is prohibited that using extension cable with multi outlet for power connection 5 AC 250V When connecting power supply cords to power sources it is necessary to make sure th...

Page 3: ...posed by the parts provided 7 When turn on the machine in the first time operate the sewing machine at low speed and check the correct rotation direction 8 Turn off the power before the following situ...

Page 4: ...t personnel liquids oils into the product physical disturbance or broken 2 Product failure or damage is caused by force majeure factors such as earth quake lighting fire flood salt corrosive moisture...

Page 5: ...PES OF STITCHES 8 17 SETTING UP THE MACHINE HEAD 9 17 ATTACHING THE BOBBIN 10 18 INSTALLATION REMOVAL OF BOBBIN CASE 11 18 HOW TO INSTALL THE NEEDLE 12 18 SETTING UP THE THREAD STAND 13 19 LUBRICATION...

Page 6: ...E OVEREDGING WIDTH AND OVEREDGING REFERENCE POSION 23 25 ADJUSTING THE PRESSER BAR PRESSURE 24 25 REPLACING THE KNIFE 25 26 ADJUSTMENT OF THE NEEDLE THREAD TRIMMER 26 27 ADJUSTMENT OF NEEDLE THREAD TR...

Page 7: ...wn mode stampede invalid anti riding presser foot lift press the key again to return to normal screen pedal stampede normal Enter parameter value selection 1 In 1Normal Mode press key to enter User Pa...

Page 8: ...SETTING 1 2 2 ENTER THE USER MODE TO MODIFY AND SAVE THE PARAMETER P11 ENTER F Press up and down key at the same time machine turn on and display P11 Press ENTER key to confirm Press F key to confirm...

Page 9: ...PARAMETER ENTER F Press up and down key to modify parameter Press ENTER key to confirm modification Press F key to confirm and exit Normal mode press F key to enter user parameter Press up and down k...

Page 10: ...F ENTER Press and hold the F key then turn on the power to enter into technician parameter mode Press up and down key to modify parameter Press ENTER key to save value ERNTER F 4...

Page 11: ...umerals Actual number 0 1 2 3 4 5 6 7 8 9 LCD Display 1 3 2 THE LCD DISPLAY MODE English Alphabet Actual A B C D E F G H I J Display Actual K L M N O P Q R S T Display Actual U V W X Y Z Display Press...

Page 12: ...7 8 1 4 2 NEEDLE NUMBER CHANGE AND INSTRUCTION Each time after start or replace gear and the program needs to confirm the current pattern of needle number so after start or replace needle number gear...

Page 13: ...130 10 speed of machine sewing start sewing actual speed display 10 P03 Cutter moving speed 10 100 55 10 rotating speed of machine head when cutting actual speed display 10 P04 The first needle limit...

Page 14: ...moving speed 0 6 3 Required number of needles coordinating with the cutter speed 2 2 TECHNICIAN PARAMETER Parameter Instruction Range unit Default Key Description P16 Protected stitches 1 990 400 Req...

Page 15: ...er setting press P22 B testing B 0 1 0 B P01 Option of Testing B keep speed P01 to functional testing after setting press P23 C testing C 0 1 0 C P01 Option of Testing C keep speed P01 to after settin...

Page 16: ...ctual speed display 10 P28 Presser foot highest position 0 400 250 Adjust the angle of the stepper motor position at the highest point of the presser foot lift P29 Presser foot middle position 0 400 8...

Page 17: ...motors are not in place or abnormal induction 1 Check the stepper motor sensor photoelectric switch is abnormal 2 Stepper motor mechanical structure is in place E7 a Bad connection at the motor connec...

Page 18: ...Please check the connection between power module and h eat sink E14 Encoder signal error Check if the encoder signals abnormal or change the encoder E15 Abnormal over current protection for Power Mod...

Page 19: ...5v 6 13 7 14 Trimming electromagnet 1 8 Sewing machine light 2 signal ground 9 5v Mechanical lock induction 5 signal ground 11 5v 12 induced signal End induction of crank set 3 induced signal 4 signa...

Page 20: ......

Page 21: ...otor encoder mouth and then take the motor power head butt and electronically controlled power port put inside the electric hole on the fastening screws 5 put the screws in position 6 6 5 7 Electronic...

Page 22: ...peration 4 Clean up the sewing hook and the bobbin thread trimmer every day after sewing work Also check the level of the lubricating oil 5 Never bring your fingers or hair close to or place anything...

Page 23: ...17...

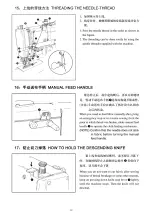
Page 24: ...shaft and then snap in the latch lever 11 HOW TO INSTALL THE NEEDLE DP x 5J l 8 2 3 Turn the motor power Use a DPx5J needle 1 Loosening needle setscrew8 hold needle 0 with its recessed part facing to...

Page 25: ...er observation of the Iubricating oil Drain dirty oil by loosening oil drain screw and fill the oil reservoir with esh oil F Adjusting the lubrication for the sewing hook Adjust the volume of lubricat...

Page 26: ...20...

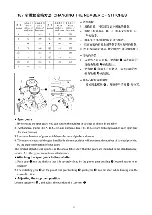
Page 27: ...tion 3 Use a combination of gears which have the same alphabetical marks 4 The numeral engraved the gear installed in the rear position will represent the number of stitched provided by the then combi...

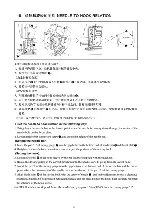
Page 28: ...g the hook 5 Loosen setscrew 0 0f the hook sleeve by the bar spanner supplied with the machlne 6 Rotate the driving pulley in the correct direction until the needle starts to go up from its lowest poi...

Page 29: ...n the rear face offabric 3 Adjust tension control1er No 2 8 for proper tension of the pa11arel sideseams by judging from the stitch formation Adjusting the thread te nsion fo r w hip stitch 1 Adjust t...

Page 30: ...se and decrease when turned counterclockwise 21 ADJUSTING THE OVEREDGING LENGTH BUTTONHOLE LENGTH X 1 Pull out cover 0 and raise cover 8 l 0 2 8 f 3 f 2 Loosen nut 8 by e spanner supplied with the mac...

Page 31: ...5 It is not necessary to adjust the position of left base line since it remains unchanged when the stitch width is changed However the left base line should be moved to the left by screwing in screw...

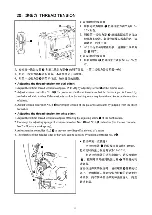
Page 32: ...plate is moved towards you the closing tirning is delayed with redu ced amount of closing NOTE Confirm that an allowance of 0 3 to 0 5mm is le between the blades of the trimmer when the trimmer has co...

Page 33: ...e When latch B 0 is engaged with latch A8 Needle thread trimmer holder 0 should be installed in such manner that it engages with cam fj by O 5mm 1 64 when the needle thread trimmer opens 27 TIMING FOR...

Page 34: ...28...

Page 35: ...ing seams 2 The tension and stroke of the OReadjust the take up spring take up spring is not enough ODecrease the bobbin thread 3 Bobbin thread tension is too tension 1 5 to 20g for purl high stitches...

Page 36: ...AR FRAME COMPONENTS 6 11 OVEREDGING WIDTH ADJUSTING COMPONENTS 7 13 NEEDLE THREAD TRIMMER COMPONENTS 8 15 SETTING UP THE MACHINE HEAD 9 17 KNIFE BAR COMPONENTS 10 19 FEED CAM TRIPPING SEGMENT COMPONEN...

Page 37: ...76...

Page 38: ...8001 DISC SPRING 1 36 402S20001 HINGE SCREW 1 38 40212004 HAND STOP LATCH 1 39 402S11014 SCREW 2 40 402S11001 SCREW 6 43 40222009 RUBBER PLUG 1 44 40222037 TOP COVER GASKET REAR 1 47 40203001 KNIFE ST...

Page 39: ...2 MAIN SHAFT COMPONENTS 30 30 3 24 13 45 3...

Page 40: ...ING 2 25 H03012 25 THRUST COLLAR 1 26 B07016 ROLLER BEARING 1 27 40205002 KNIFE BAR DRIVING CONNECTING ROD 1 28 40210001 KNIFE BAR DRIVING ECCENTRIC CAM 1 29 B02004 BALL BEARING 1 30 402S14006 SCREW 6...

Page 41: ......

Page 42: ...1 33 402S13001 SCREW 1 34 S05038 SCREW 1 35 H01009 THRUST COLLAR 1 36 B04012 BALL BEARING 1 37 40235008 TENSION PULLEY 1 38 40226005 ADJUSTING LEVER PIN 1 39 40205023 TENSION PULLEY LINK 1 40 40212102...

Page 43: ......

Page 44: ...11019 SCREW 1 27 40216002 WORK CLAMP CHECK 1 28 4021600300 WORK CLAMP CHECK HOLDER ASM 1 29 30 40212019 STITCH PLATE 1 31 4021202000 BRACKET COVER 1 32 402S11007 SCREW 2 33 40201004 WORK CLAMP ARM BRA...

Page 45: ...5 NEEDLE BAR FRAME COMPONENTS 16 ss C 9...

Page 46: ...LAR 1 25 402S14006 SCREW 2 26 0 27 40203013 CAM SHAFT 1 28 12923018 OIL WICK 1 29 402S30016 SCREW 1 30 40208003 THRUST COLLAR 1 31 S09011 SCREW 1 32 40201007 NEEDLE BAR FRAME 1 33 402S14001 SCREW 1 34...

Page 47: ...6 OVEREDGING WIDTH ADJUSTING COMPONENTS 5 43 45 11...

Page 48: ...REGULATING LEVER 1 22 40227004 SPRING 1 23 101S11006 SCREW 2 24 40204038 REGULATING LEVER BRACKET 1 25 401S13001 SCREW 2 26 40202011 REGULATING LEVER SHAFT 1 27 12923018 OIL WICK 1 28 40204011 BEARING...

Page 49: ...7 NEEDLE THREAD TRIMMER COMPONENTS S I 43 30 J jt g744 46 i _ _ _ _ _ J _ _ f Oo i lw j 11 I __ _ r 1 _J r I 1 _ l r II J f 1 1 L 47 13...

Page 50: ...038 DRIVING CAM 1 22 402S11014 SCREW 2 23 P03029 3 10 SPRING PIN 1 24 40201010 BRACKET 2 25 0 26 402S13001 SCREW 4 27 0 28 40226022 UNIVERSAL JOINT 1 29 40227009 SPRING 1 30 4020201300 NEEDLE THREAD T...

Page 51: ...8 BOBBIN THREAD TRIMMER COMPONENTS 1 35 39 40 20 18 21 21 1 15...

Page 52: ...13 1 402S11036 SCREW 1 14 40227012 PRESSER PLATE 1 15 40212044 BOBBIN THREAD TRIMMER LINK 1 16 402S20012 SCREW 1 17 40227013 BOBBIN THREAD GUIDE 1 18 402S11022 SCREW 2 19 40205008 BOBBIN THREAD TRIMM...

Page 53: ...9 KNIFE BAR COMPONENTS 9 13 54 55 56 59 1_1 64 65 ___66 63 33 17...

Page 54: ...18 P01011...

Page 55: ...10 FEED CAM TRIPPING SEGMENT COMPONENTS 47 1 Q 17 12 25 6 6 50 19...

Page 56: ...21 402S14006 SCREW 2 22 402S15002 SCREW 1 23 40211007 HANDLE SHAFT 1 24 40202022 HANDLE SHAFT 1 25 40225011 FEED CAM DRIVING GEAR 1 26 409S14001 M6 6 SCREW 2 27 N01010 M12 NUT 1 28 40228012 THRUST WAS...

Page 57: ...11 CONTROL BOX COMPONENTS...

Page 58: ...CONTROL BOX ASM 1 2 S05077 M4 16 SCREW 2 3 40222039 RUBBER WASHER 2 4 S05083 M5 25 SCREW 3 5 40230008 OPERATION PANEL 1 6 40211025 CONTROL BOX COVER 1 7 40230010 A PCB A 1 8 40230011 B PCB B 1 9 4023...

Page 59: ...12 SAFE PROTECTION COMPONENTS...

Page 60: ...MOUNTING PANEL 1 17 40226052 CONNECTING LINK PIN 1 18 40201072 MOTOR MOUNTING 1 19 413S30016 SCREW 1 20 413S30013 SCREW 1 21 413S13003 M4 6 SCREW 2 22 402S13014 M5 8 SCREW 2 23 413S13019 M5 10 SCREW 2...

Page 61: ...25...
Page 62: ...BASE 1 22 40210010 ROTARY CAM 1 23 40235025 BTW WHEEL 1 24 B04025 686Z BEARING 2 25 40208013 BOBBIN BEARING SPACER 1 26 40227045 SPRING 1 27 40222034 RUBBER 1 28 40201062 BTW LEVER 1 29 H05003 E 5 E R...

Page 63: ...14 THREAD TENSION COMPONENTS 2 54 27...

Page 64: ...0 2 32 40227031 1 33 40203032 1 34 402S11024 TENSION DISC TENSION POST THREAD TAKE UP SPRING THREAD POST SOCKET SCREW 1 35 40202029 TENSION RELEASE LEVER SHAFT 1 36 402S11003 0 36 1 W01013 0 37 402130...

Page 65: ...S T N E N O P M O C M S N A H C E M N O TS A C D RM U L 21 4 77 1 5 ifS1 49 70 1 70 71 89 U 47 r 70 1 71 89 U 29...

Page 66: ...8 OIL SHIELD 1 27 40212079 OIL SHIELD 1 47 40201066 OIL RESERVOIR 1 49 40222026 RUBBER CUSHION 4 50 402S11003 SCREW 4 51 40201020 300849 HINGE HOLDER 2 52 P03031 P6 28 PIN 2 53 S05016 M6 25 SCREW 4 53...

Reviews: