background image


INSTALLER FINAL CHECK LIST 


ˆ

  At least 36” clearance maintained from combustible constructions to the sides and back of this grill. 

ˆ

  There is no unprotected combustible construction over the grill. 

ˆ

  All internal packaging removed. 

ˆ

  Burners are sitting properly on orifices. 

ˆ

  Knobs turn freely. 

ˆ

  The regulator & hose connected to grill is provided by the manufacturer (pre-set for 11.0” water column). 

ˆ

  Unit tested and free of leaks. 

ˆ

  User informed of gas supply shut off valve location.


DEAR CONSUMER, PLEASE KEEP THIS MANUAL FOR FUTURE USE


GRILL LIGHTING INSTRUCTIONS 


„


BEFORE LIGHTING: 

Carefully inspect the gas supply hose before turning the gas “ON”. If there is evidence of cuts, wear, or 
abrasion, it must be replaced before use, the replacement hose assembly shall be that specified by the 
manufacturer. 

VERY IMPORTANT: ALWAYS INSPECT THE HOSE BEFORE EACH USE OF THIS GRILL. 


„


TO LIGHT MAIN BURNERS OF THE GRILL: 

1. 

Read instructions before lighting.


2. 

Turn all knobs to “OFF” then open the L.P. tank valve. Always keep your face and body as far from 
the grill as possible when lighting

3.  Open lid during lighting. 

4. 

Push and turn any control knob slowly to “HI” position. The built-in igniter will click and spark 
simultaneously to light the pilot and burner in sequence. Turn the control knob to OFF 
IMMEDIATELY if the burner does not light within 5 seconds, wait 5 minutes for gas to dispel, then 
repeat the lighting procedure.


5. 

Follow match lighting instructions if burner can’t be lit after repeated 3-4 times.


„


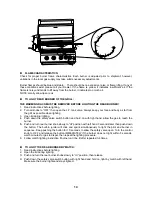
TO LIGHT THE MAIN BURNERS BY MATCH (AS THE FIGURE SHOWN ON NEXT PAGE): 

If the burner will not light after several attempts then the burner can be match lit.   
 
Tools: 

Lighting rod (hanging behind the right door)


Usage: 
1. Read instructions before lighting. 
2. Open the lid during lighting. 
3. Simply place a lighted match between the coils on the end of the lighting rod and hold next to the 

burner to ignite.


4. Push and turn the knob to “HI” position, make sure the burner lights and stays lighted. 
5. Repeat 3.4 to light other burner.   
 

Keep a spray bottle of soapy water near the gas supply valve and check the connections 
before each use. Do not light the grill if odor of gas is present, call our service center 


13

Summary of Contents for Classic PG-50403SRL

Page 1: ...3 Open lid 4 If odor continues keep away from the appliance and immediately call your gas supplier or your fire department If you smell gas DANGER WARNING 1 Do not store or use gasoline or other flam...

Page 2: ...that may occur in your future use Please record the serial number of your grill in your owner s manual Any questions please feel free to contact our service center we will be glad to assist you please...

Page 3: ...ue for quick reference If you need to obtain replacement parts for your Jackson Grill contact your local dealer NOTE It is normal for stainless steel surfaces to discolor due to high heat given off fr...

Page 4: ...nd follow all of the instructions CAUTION CAUTION Indicates a potentially hazardous situation which may result in minor or moderate body injury if not followed WARNING FOR YOUR SAFETY 1 Shut off the g...

Page 5: ...Installation Code 3 The L P tank used must conform with the specification for L P gas cylinders of the U S Department of Transportation DOT or the National Standard of Canada CAN CSA B339 Cylinders S...

Page 6: ...4 27 Lid Handle 1 09 Knob Seats Main Burners 4 28 Insulation Spacers 2 10 Knob Rear Burner 1 29 Name Plate 1 11 Knob Seat Rear Burner 1 30 Temp Gauge 1 12 Control Panel 1 31 Lid 1 13 Gas Valve Rear B...

Page 7: ...ements 1 Have type I outlet compatible with regulator provided 2 Have safety relief valve 3 UL listed Overfill Protection Device OPD This OPD safety feature is identified by a unique triangular hand w...

Page 8: ...e the grill until leak tested 4 Stop and call the fire department if any leak detected 5 If you cannot stop a gas leak close the L P tank valve IMMEDIATELY call L P supplier or the fire department DAN...

Page 9: ...gas supply piping system during any pressure testing in excess of psi 3 5 kPa The outdoor cooking gas appliance must be isolated from the gas supply by closing its individual manual shut off valve dur...

Page 10: ...ips screwdriver undo the 4 screws that hold the Back Cover plate to the Inner Hood 2 Once the Cover has been removed use a 7 mm wrench to remove the Rear Burner Orifice from the Rear Burner Place the...

Page 11: ...ure that the constructed island is well secured and the island is level in all directions Place the grill into the cut out located in the island Connect the gas line to the gas grill located on the ri...

Page 12: ...ifold pipe assembly the pipe that goes to the burner by brushing or spraying the soapy solution on the connections 5 If soap bubbles appear there is a leak Turn off L P tank valve IMMEDIATELY and reti...

Page 13: ...your face and body as far from the grill as possible when lighting 3 Open lid during lighting 4 Push and turn any control knob slowly to HI position The built in igniter will click and spark simultane...

Page 14: ...during lighting 4 Push down the safety valve switch button and hold on with right hand allow the gas to reach the burner 5 Push and turn rear burner knob slowly to HI position with left hand 3 second...

Page 15: ...insufficient air 5 Use grill at least 36 away from any wall or surface 120 away from objects that may spark and ignite gas i e live electrical appliances pilot lights of water heaters etc 6 Do not use...

Page 16: ...rs under the stainless steel cooking grids NOTE The hot grill sears the food sealing in the juices The longer the preheat the faster the meat browns WARNING Electrical Grounding Instructions 1 This gr...

Page 17: ...ITH PRINTING SUCH STRONG CLEANSER MAY CLEAN OFF THE PRINTING COOKING AREA CLEANING The easiest way to clean the grill is to clean immediately after turning off the flame and cooking is completed Wear...

Page 18: ...ith wires Orifice blocked Check the orifice for blockage Burner won t light after turning and pushing the knobs Wire is shorting Replace with new electrode assembly with wires No gas Open the LP tank...

Page 19: ...grilling FOOD SAFETY Always follow the following tips to enjoy a safe and heath outdoor grilling 1 Always use hot soapy water to wash hands surfaces utensils after processing raw meat 2 Always separa...

Page 20: ...at all stainless steel will discolor abrasive and chemical cleaners will also damage grill and grill surface Should deterioration occur to the point of non performance within the duration of the warra...

Reviews: