SERVICE PROCEDURES continued
(3)
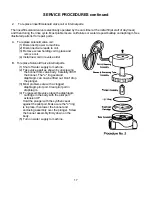
The ceramic is embedded in the impeller and normally does not need replacement,
but it should be checked for cracks or a worn surface. If ceramic does need .....
replacement, proceed as follows.
(4)
With a pointed, flat tool, work the ceramic and rubber cup out of groove in impeller.
(5)
Clean groove of all residue.
(6)
Apply small amount of adhesive in groove.
(7)
Press new ceramic gently into groove with rubber cup leading the way. (NOTE: The
Ceramic has one side that is grooved, this side should be facing down into the rubber
cup. The smooth surface should be facing up.
(8)
The seal is embedded in the pump mounting plate and usually will need replacement
when water leaks around motor shaft area. If replacement is required proceed as
follows.
(9)
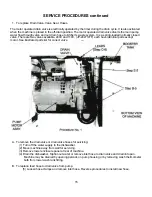
Remove mounting plate to motor.
(10)
Press seal out of housing carefully.
(11)
Clean hole where seal was installed.
(12)
Apply a small amount of non-hardening sealant to backside of seal. Insert new seal with
a seal driver to prevent ruffling the edges of seal. Never use a screwdriver or similar tool
to alternately force edge of seal in place.
(13)
Reverse procedures to assemble and reinstall pump motor. Note: Use a torque value
between 15-20 Ft/Lbs for all bolting.
4. Timer Check and Adjustment, Replacing Cam switch or Timer Motor.
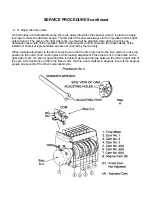
The timer is mounted in the electrical panel area behind lower kick panel. It controls the automatic
functions of the dishwasher. The timer operates on 110V (JP-24LT/LTF) or 240 V (JP-24/F, JP-24B/BF)
and takes 120 seconds to complete one full revolution. There are six micro-switches which are controlled
by rotating cams driven by the timer motor. Three of the cams are adjustable and can be adjusted to either
lengthen or shorten the desired operation.
WARNING: DISCONNECT POWER TO DISHWASHER WHEN MAKING TIMER ADJUSTMENTS
NOTE: Included and taped in each control panel is a spanner wrench. This wrench is needed to adjust the
cams on the timer. The cams are preset at the factory but may have to be readjusted for different brands
of detergent, rinse additive and sanitizing solutions.
20
Summary of Contents for JP-24B
Page 5: ...PARTS ID FUNCTION 3 ...
Page 6: ...PARTS ID FUNCTION 4 ...
Page 7: ...PARTS ID FUNCTION 5 ...
Page 30: ...SERVICE PROCEDURES continued ...
Page 62: ......
Page 63: ......
Page 64: ......


