07610-002-23-32-AD
16
10. Use a small wire or toothpick to remove remaining debris or lime deposits from
the nozzles.
11. Flush the arms with water.
12. Replace end-caps and ensure they have been tightened.
13. Spray or wipe out interior of the machine.
14. Replace wash and rinse arms.
15. Ensure sump strainer and scrap screen are clean and securely in place.
16. Use stainless steel polish to clean and protect outside of machine.
The coil on the VER machine must be inspected periodically. If the coil is greasy,
dirty, or there is scale build-up, click
here
for cleaning instructions.
SHUTDOWN &
CLEANING
OPERATING INSTRUCTIONS
OPERATION
VER COIL CLEANING
Summary of Contents for TEMPSTAR HH S
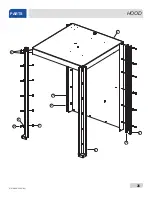
Page 35: ...07610 002 23 32 AD 26 1 5 4 2 3 6 7 10 8 9 HOOD PARTS ...
Page 61: ...07610 002 23 32 AD 52 VER SYSTEM PARTS 18 24 23 12 11 16 17 14 21 22 20 19 27 28 29 ...
Page 67: ...07610 002 23 32 AD 58 SCHEMATICS HH E VER 208 230 V NEW RINSE TANK ...
Page 68: ...59 07610 002 23 32 AD SCHEMATICS HH E VER 460 V NEW RINSE TANK ...
Page 69: ...07610 002 23 32 AD 60 SCHEMATICS HH E VER 208 230 V OLD RINSE TANK ...
Page 70: ...61 07610 002 23 32 AD SCHEMATICS HH E VER 460 V OLD RINSE TANK ...
Page 71: ...07610 002 23 32 AD 62 SCHEMATICS NB 208 230 V ...
Page 72: ...63 07610 002 23 32 AD SCHEMATICS NB 460 V ...
Page 73: ...07610 002 23 32 AD 64 SCHEMATICS HH S 208 230 V ...
Page 74: ...65 07610 002 23 32 AD SCHEMATICS SDI OPTIONS ...
Page 75: ......


