background image


Additional tips for proper computer installation: 

SFF and Thin Client:

  insert inside the top bay so that the on/off power button is facing the side opening.  

This will allow easy on/off of the unit when needed.  

Laptop:

  Open the laptop, place inside the top bay.  The work surface on the JACO 510 model Laptop Cart  

has a large opening that the laptop display will fit through as you install the work surface to the Cart. 

All-In-One:

  The unit must have a 75mm or 100mm VESA pattern on the rear surface to mount to the JACO 

520 model Mobile Cart.  The hardware to mount the All-In-One is provided. 

It is highly recommended that you use either the Velcro wrap strap or Velcro adhesive patches included 
with all Mobile Carts inside the accessories kit to hold the PC, Thin Client, or Laptop in place inside the 
Mobile Cart top assembly. 


Installing the Monitor: 


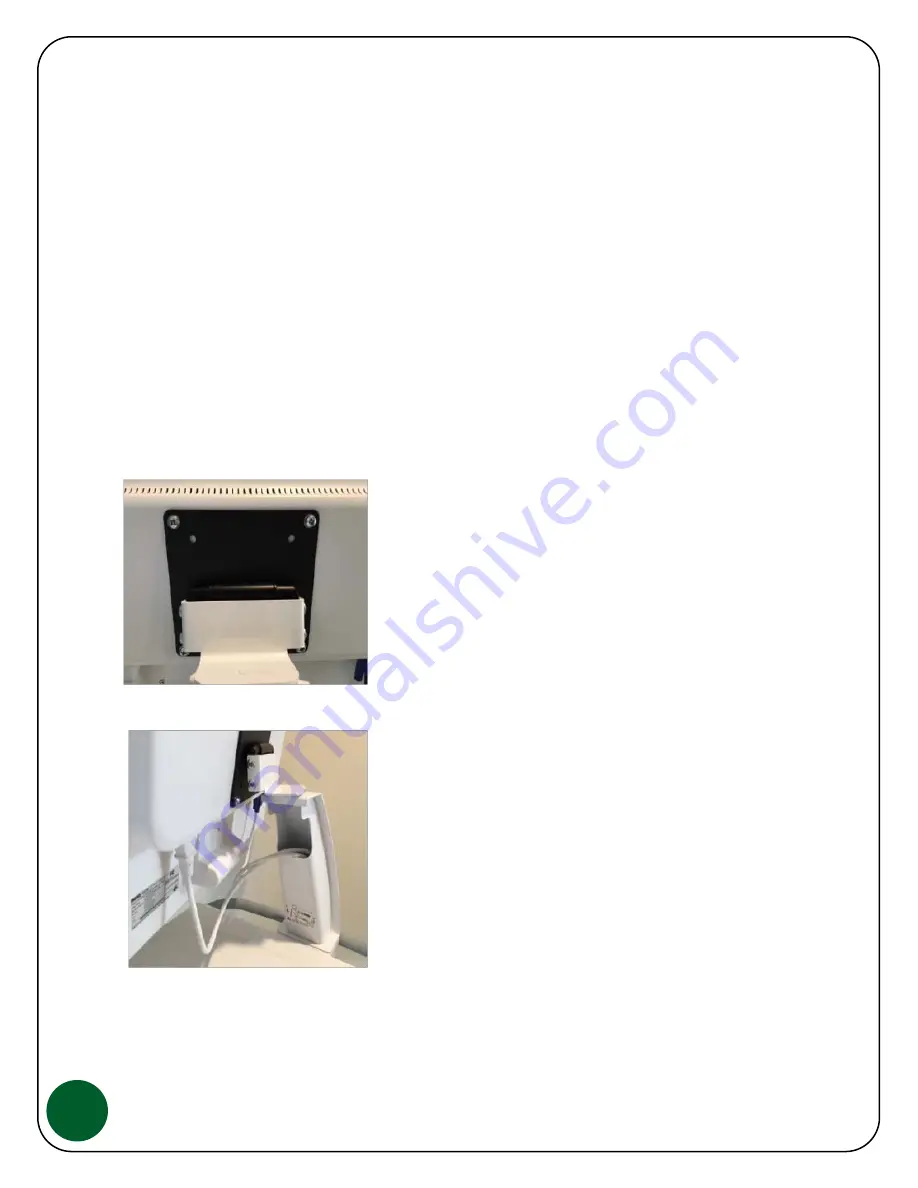
To attach the LCD to the stand.  A Phillips Head 

screwdriver or, if added security is needed for the LCD, a 

Torx Head driver is needed to attached the LCD to the 

VESA Stand.  Both Phillips and Torx screws are provided.  

It is recommended that one person hold the LCD while a 

2nd person inserts the hardware.  Make sure all 4 screws 

are installed and tightened properly. 


With the monitor and stand installed on the Cart, the LCD 

power and signal cables can be installed.  Route both 

cables down through the cable management area of the 

stand as shown to the left.  Pull the cables into the Top 

Assembly and attach to the PC or laptop computer that 

will be installed later. 


Summary of Contents for ULTRALITE 500 Series

Page 1: ...25 0186 Rev 01 ...

Page 2: ...D MOUSE ONTO THE CART 10 OPTIONAL JACO PATENTED TRAC WHEEL STEERING 10 KEYBOARD LIGHT 11 OPTIONAL LOCKING DRAWER OPERATION 11 BATTERY POWER SYSTEM OVERVIEW 13 BATTERY POWER SYSTEM SET UP 14 BATTERY POWER SYSTEM MAINTENANCE 15 BATTERY POWER SYSTEM SPECIFICATION 15 JACO CARTCARE SUITE POWER MONITORING SOFTWARE 16 JACO CARTCARE SERVICES 16 JACO CARTCARE CLIENT 16 JACO FLEET MANAGER 16 POWER SYSTEM TR...

Page 3: ...2 500 Series Model Part Numbers Model 510 Laptop Cart Model 520 PC LCD Cart ...

Page 4: ...Cart this label is located on the rear surface of the Top Assembly under the rear handle For the Battery Power System the label is located on the Inverter Charger Electronics Enclosure TO access this label information remove the Cart work surface computer or laptop if one is installed in the Cart and lift the tray that supports the PC or laptop The Battery Power System information label is located...

Page 5: ...0 x 18 Internal Laptop or PC Storage 510 520 Carts 16 x 12 x 2 6 Casters 5 Single Wheel Front Locking Wheel Base 16 x 13 x16 Cart Weight without options 510 Cart 60 lbs 520 Cart 65 lbs includes base counter weight Additional weight may be added based on Cart configuration options Battery Power Lithium Iron Phosphate LiFePO4 Single Battery JPS250 27 lbs Dual Battery JPS500 34 lbs ...

Page 6: ... WARNING Do not open or dismantle the JACO Battery System note that there are no serviceable parts This equipment must be serviced by trained personnel Additional JACO Battery System important information Use only in the applications intended Unplug the Power System from AC power to clean or if it is not working properly Do not short circuit the battery assemblies Do not expose the battery assembl...

Page 7: ...pes used in hospitals will be acceptable but it is recommended that you consult with JACO Customer Service if you are not sure it is safe to use Your JACO Mobile Cart does not require any scheduled maintenance however it is good practice to clean the casters and check that the Cart height adjustment is operating correctly at least once a year Please contact JACO Customer Service as needed for more...

Page 8: ...nal LCD 520 Cart Model and optional Scanner Mounts are not able to be attached at our factory Instructions for assembly are below Changing the Height Position Your JACO Mobile Cart is height adjustable for proper ergonomics when used in a standing or sitting position To change the height place the palms of your hands on the left and right sides of the work surface and on the right side squeeze the...

Page 9: ...aptop unlock both key locks at the rear of the top assembly as shown in the photo below Both locks must be opened before the top work surface can be pulled forward and removed from the Cart Once the work surface is removed the open bay area shown on left below is available for installing your computer or laptop Route all cables needed for proper operation before installing the work surface and loc...

Page 10: ...rap or Velcro adhesive patches included with all Mobile Carts inside the accessories kit to hold the PC Thin Client or Laptop in place inside the Mobile Cart top assembly Installing the Monitor To attach the LCD to the stand A Phillips Head screwdriver or if added security is needed for the LCD a Torx Head driver is needed to attached the LCD to the VESA Stand Both Phillips and Torx screws are pro...

Page 11: ... sliding keyboard tray With each JACO Mobile Cart we include an accessory kit that provides ty wraps and Velcro pads along with other helpful items for proper cable management Use the Velcro pads to fasten the keyboard to the keyboard tray and use the ty wraps to secure the cables Optional JACO Patented Trac Wheel Steering The optional Trac Wheel is designed to add true steering to the JACO Mobile...

Page 12: ...b icon button located on the far right on the touch pad Press again and the light will go off After approximately 20 minutes the light will automatically turn off The light can be turned back on immediately if needed For this keyboard light to function you must connect the internal USB cable to the computer system within the Mobile Cart The USB connection to the computer system is to provide the p...

Page 13: ...u will hear a beep indicating that a new 4 digit code can be entered If you enter an unacceptable code such as 1 1 1 1 you will hear a buzz noise indicating the code is not changed When entering an acceptable new code you will hear two short beeps indicating that the code is now changed If for some reason the electronic pass code system were to fail there is a rescue key lock located at the back o...

Page 14: ...This cable connects the LiFePO4 battery packs located in the Cart Base to the Electronics Box or Inverter Charger assembly which is located in the Cart Top Assembly Electronics Box input output connections are show below Make sure that you only use JACO approved devices and connections with the JACO Battery System Frontal view 1 AC Input 2 On Off AC Outlet Switch 3 AC Outlet 2 Rear view 4 Cooling ...

Page 15: ...ly The PC or Laptop must sit on the divider plate as shown below on the right Rout all cables neatly and use the ty wraps and Velcro pads provided in the Cart Accessory kit Top Assembly with Inverter Charger Assembly Top Assembly with Integrated PC 2 Wake up the Battery System Plug the recharge power cord that is hanging from the back of the Mobile Cart into any standard 120VAC wall outlet to Acti...

Page 16: ... section of this User Guide and if applicable follow the steps provided Please contact JACO Customer Support as needed to resolve the issue Battery Power System Specification Model JPS250 or JPS500 Battery Lithium Iron Phosphate also known as LiFePO4 and LFP AC Input 100vac to 240vac Input Current 3 5 amps Frequency 47 to 63 Hz Output Voltage 120VAC 60Hz standard Output Current 1 5A 120VAC continu...

Page 17: ...in software packages that aid the users in managing the Cart s power demand JACO CartCare Services The Services software acts as hub that resides on the Cart s computer and communicates with the power system CartCare Client and Fleet Manager JACO CartCare Client The CartCare Client software resides on the Cart s computer that receives power system data from the CartCare Services for onscreen displ...

Page 18: ...directly into a known good AC wall outlet This will help determine if the issue is with the JACO Power Inverter or the PC power adaptor itself 3 If the PC powers up normally when plugged into a wall outlet disconnect and plug back into the JACO Power Inverter If not you may have an issue with the PC power adaptor Contact the PC manufacturer for a replacement 4 Plug the JACO Mobile Cart power cord ...

Page 19: ...ow Depending on the battery system that was ordered you may only have one battery Wait for about one full minute before reconnecting Plug the JACO Mobile Cart power cord into a known good AC wall outlet Does the front status LEDs panel turn on Does the JACO Power Inverter fan turn on Does the PC and LCD power on If yes to all above no need to continue If not go to next step 6 Check the battery fus...

Page 20: ...PC but I do not have any front status LED indication showing 1 Check the Status LED Cable making sure that it is connected properly as shown You will need to remove the protective cover inside the Cart top assembly First remove the Cart work surface and then using an 11 32 nut driver remove the protective cover shown below If not seated correctly position and reconnect If the front status is still...

Page 21: ...t status readout You can remove the status enclosure by removing the top work surface and using an 11 32 nut driver and then push the front status enclosure inward until it is free of the top assembly Some JACO Cart models may require a Phillips screwdriver for removing this status enclosure If the replacement status enclosure works on both Carts contact JACO Support to process a replacement front...

Reviews: