MAINTENANCE 4
17
4.3
SHARPENING BLADES _____________________________________________________________________
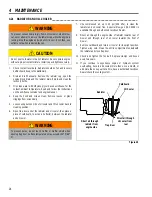
1. Place a wooden block between the blade and mower housing to
stop the blade from moving. To remove blade, turn screw holding
blade counterclockwise
.
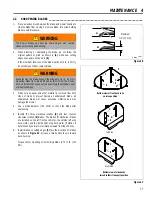
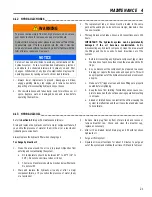
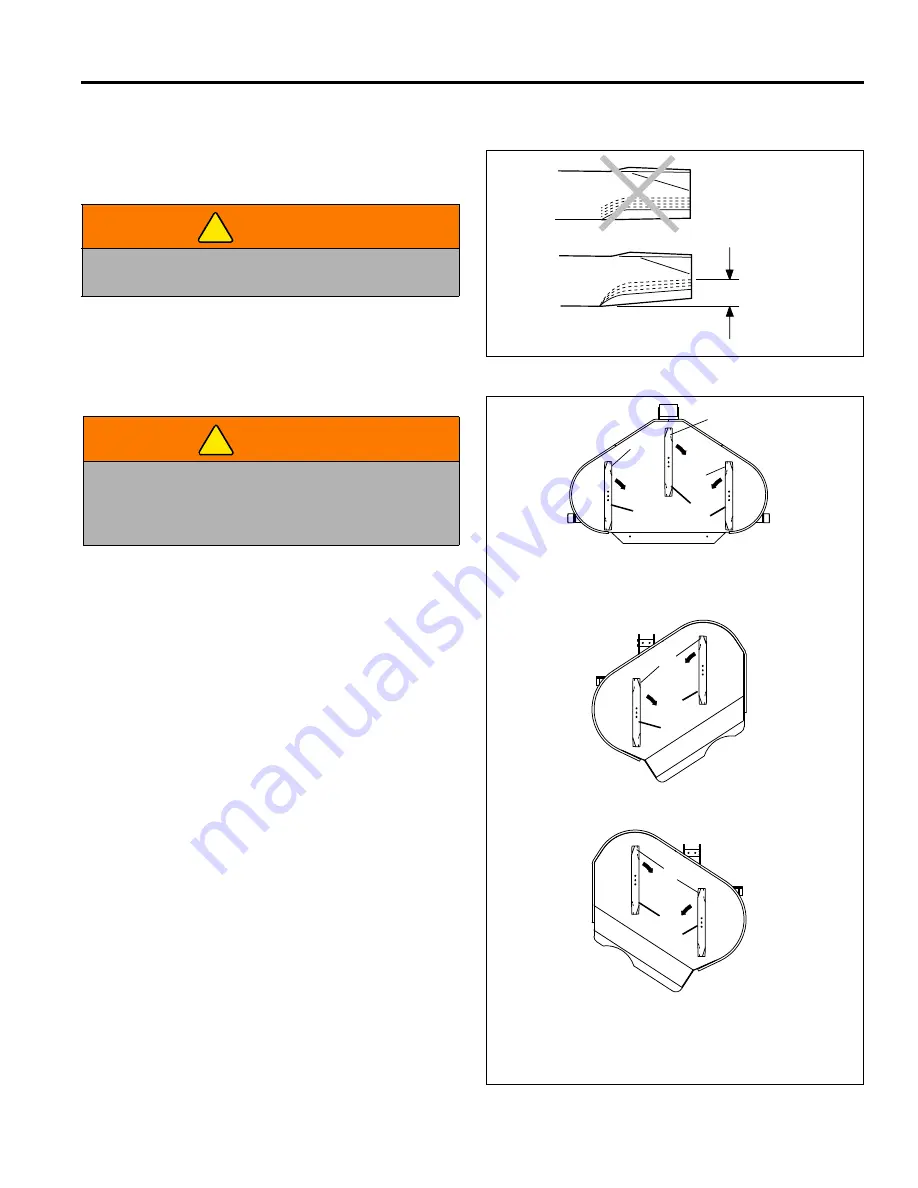
2. When dressing or sharpening the blade, do not follow the
original pattern of grind as shown in
(A)
. Grind new cutting
edges at an angle as shown in
(B)
.
If the maximum total loss of the blade reaches 1/2 in. (13 mm),
do not sharpen further, replace blade.
3. Make sure an equal amount of material is removed from both
sides of blade to prevent having an unbalanced blade. An
unbalanced blade will cause excessive vibration and may
damage the mower.
4. Use a blade balancer (JAC 5016) to check the blade after
sharpening.
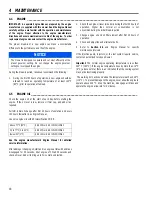
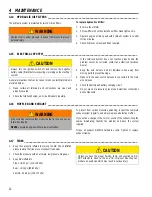
5. Identify the three clockwise rotation
(D)
and four counter-
clockwise rotation
(E)
blades. The blades for clockwise rotation
are installed on the left front deck motor, the outside left wing
deck motor, and the inside right wing deck motor. (Rotation is
determined by normal motor rotation viewed from top of deck).
6. Install blades so cutting edges
(C)
face the direction of rotation
as shown in
Figure 4C
. Air vane of blade must face in toward
deck housing.
Torque center mounting screw holding blade to 75 ft. lb. (102
Nm).
Figure 4B
Figure 4C
WARNING
The mower blades can develop sharp edges. Use caution
whenever servicing and handling.
WARNING
Resharpening the blade beyond the allowable 1/2 in. (13 mm)
may allow blade tip to break off and be thrown from the mower.
Such an incident can cause very serious injury to bystanders and/
or property damage.
!
!
A
B
HR024
1/2” (13 mm)
Maximum
HR024
Bottom view of front deck in its
service position
Bottom view of side decks
raised to their transport position
.
Left Side
Right Side
C
C
C
D
E
E
D
E
C
E
D
C
Summary of Contents for R-311
Page 29: ...NOTES 7 29 7 NOTES ...
Page 31: ......
Page 59: ...POZNÁMKY 7 29 7 POZNÁMKY ...
Page 94: ...64 2 3 5 6 7 8 9 10 12 11 13 14 16 18 19 20 21 4 17 15 1 R 311 18 1 Engine Serial No All ...
Page 171: ......

