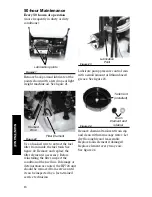
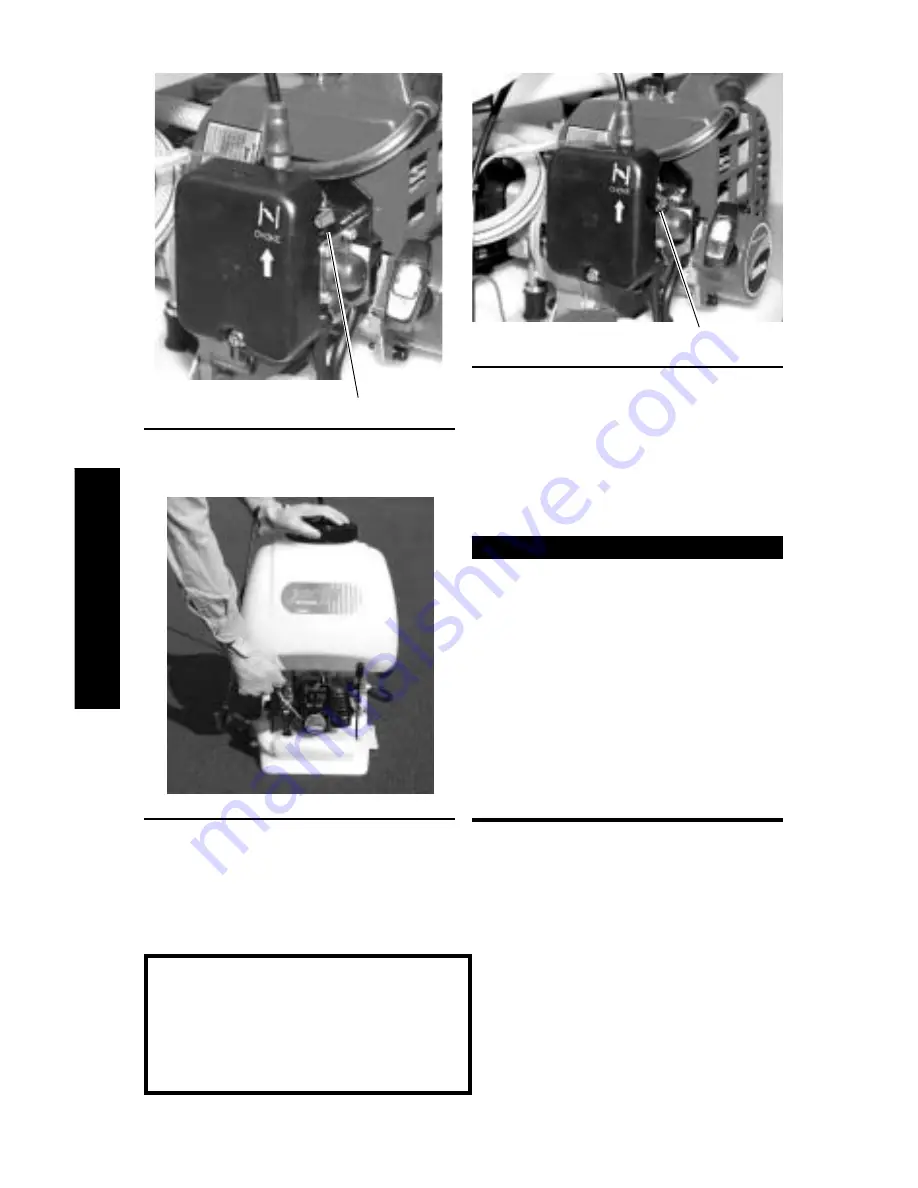
background image

10

Figure 12

7. Set the choke lever to the closed

position. See figure 12.

Figure 13

8. Hold the HP726 firmly with one

hand. Slowly pull the recoil starter
handle until resistance is felt, then
pull quickly to start the engine.
See figure 13.

Starting the Engine (Cont.)

  CAUTION!

Do not pull the recoil starter to the
end of the rope travel. Pulling the
recoil starter to the end of the rope
travel can damage the starter.

9. When the engine starts, slowly

move the choke lever to the
"OPEN" position. If the engine
stops after the initial start, close the
choke and restart.   See figure 14.

IMPORTANT!

If the engine fails to start after
several attempts with the choke in
the closed position, the engine may
be flooded with fuel. If flooding is
suspected, move the choke lever to
the open position and repeatedly pull
the recoil starter to remove excess
fuel and start the engine.
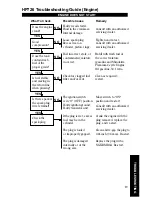
If the engine still fails to start, refer to
the troubleshooting section of this
manual.

Figure 14

Choke Closed

Choke Open

OPERATION

Summary of Contents for HP726

Page 1: ...MANUAL HP726 HighPressure BACKPACK ENGINE SPRAYER Always wear the recommended protective clothing and safety equipment as recomended by the chemical manufacturer when spraying or handling chemicals an...

Page 2: ...roduct there may be some differences between your HP726 and what is described in this manual Jacto Inc reserves the right to make changes to products without prior notice and without obligation to mak...

Page 3: ...lso contact Jacto Inc at the address printed on the back of this Manual WARNING A statement preceded by the word WARNING contains information that should be acted upon to prevent serious bodily injury...

Page 4: ...tanding your machine helps ensure top performance long service life and safer operation See figure 1 WARNING Do not make unauthorized modifications or alterations to any of these units or their compon...

Page 5: ...oggle switch Spayer Pump Type Horizontal duplex plunger Three Stage Pump Pressure Range 10 20 25 kgf cm2 142 284 357 psi Maximum Pump Pressure 25 kgf cm2 357 psi Chemical Tank Capacity 26 liters 7 gal...

Page 6: ...gger assembly wand and nozzles as shown See figure 2 Figure 4 Trigger Release Lever Filling The Chemical Tank Figure 5 1 Place the HP726 Engine spayer on a level surface Unscrew the chemi cal tank cap...

Page 7: ...essure settings are 0 for no pressure used during engine starting 1 for 142 psi 10 kgf cm2 pump pressure position 2 for 284 psi 20 kgf cm2 and position 3 for 357 psi 25 kgf cm2 Refer to the following...

Page 8: ...chemical applications the spraying pressure variance will be nominal and is dependent on nozzle orifice size OPERATION The HP726 is supplied with two sets of spraying nozzles Super Angle D 3 and Supe...

Page 9: ...g unleaded gasoline with Shindaiwa Premium 2 cycle Engine Oil at a ratio of 50 1 a gallon of gasoline mixed with 2 6 fl oz of 2 cycle mixing oil or 5 liters of gasoline with 100 ml of 2 cycle mixing o...

Page 10: ...uid in the chemical tank can cause severe sprayer pump damage 4 Set the toggle switch to the ON position See figure 10 5 Set the throttle lever to the idle position See figure 10 Figure 11 6 Press the...

Page 11: ...mage the starter 9 When the engine starts slowly move the choke lever to the OPEN position If the engine stops after the initial start close the choke and restart See figure 14 IMPORTANT If the engine...

Page 12: ...NOTE Standard idle speed is 3000 rpm 250 rpm Stopping the Engine Adjusting Engine Idle WARNING The pump must NEVER oscillate at engine idle WARNING Fuel mixture has been preset at the factory and furt...

Page 13: ...d a broad brimmed hat or helmet Always wear eye protection such as goggles or safety glasses Wear appropriate foot wear non skid boots do not wear open toed shoes or sandals Never work barefooted Keep...

Page 14: ...In addition read and follow the chemical manufacturer s instruc tions for the products being applied Failure to do so could result in serious injury CLEAN all chemical spills immediately Dispose of a...

Page 15: ...as necessary Carefully remove any accumulations of dirt or debris from the muffler and fuel tank Dirt build up in these areas can lead to engine overheating fire or premature wear Check for loose or m...

Page 16: ...s Clean the spark plug and check the gap at the electrode Counter Clockwise to Loosen Remove and clean the element Every 10 hours of operation more frequently in dusty or dirty condi tions Remove the...

Page 17: ...until it can be inspected by a Jacto trained service technician Filter Element Figure 22 Hooked Wire Figure21 Lubrication points Remove back pad and lubricate at the points shown with a few drops of...

Page 18: ...Jacto dealer for inspection WARNING Never operate this machine with a damaged or missing muffler or spark arrester Operating with missing or damaged exhaust components is a fire hazard and could also...

Page 19: ...maged parts Remove the air cleaner element from the carburetor and clean it thoroughly with soap and water let dry and reassemble the element Store the machine in a clean dust free area Short Term Sto...

Page 20: ...ixture incorrect NO YES Is fuel visible and moving in the return line when priming Check for clogged fuel filter and or vent Clean as required restart NO Is there spark at the spark plug wire terminal...

Page 21: ...Check Possible Cause Remedy Engine is rough at all speeds May also have black smoke and or unburned fuel at the exhaust Clogged air filter Loose or damaged spark plug Air leakage or clogged fuel line...

Page 22: ...ch and re start Refuel Replace filter Drain replace with clean fuel Clean and replace spark plug tighten the terminal Replace the ignition unit Consult with an authorized servicing dealer Engine diffi...

Page 23: ...worn out Too many nozzles are being used or are the wrong type Fill the chemical tank Consult with an autorized servicing dealer Consult with an authorized servicing dealer Clean or backflush suction...

Page 24: ...subject to the periods limitations and exclusions listed below Jacto will correct any defect in material or workmanship without charge for parts or labor at any authorized Jacto repair outlet during t...

Page 25: ...ing services do not confer to the owner the right to indemnity or to extension of the warranty period This warranty is limited to the terms stated herein Jacto disclaims all liability for incidental o...

Page 26: ...arranted for a period of two 2 years from the date this product is first delivered to the original retail purchaser OWNER S WARRANTY RESPONSIBILITIES As the engine owner you are responsible for the pe...

Page 27: ...e recommended fuel and oil or not perform ing required maintenance services b the replacement parts used for required maintenance services c consequential parts used for required maintenance services...

Page 28: ...RANTY SERVICE All repairs qualifying under this limited warranty must be performed by a dealer authorized by Shin Daiwa Kogyo Co Ltd If any emission related part is found defective during the warranty...

Page 29: ...28 Notes...

Page 30: ...acto Inc P O Box 2390 Tualatin Oregon 97062 Telephone 503 885 8723 FAX 503 691 4379 www jacto com 2000 Jacto Inc Part Number HP726OPMAN Printed in U S A Specifications subject to change without notice...

Reviews: