background image

31

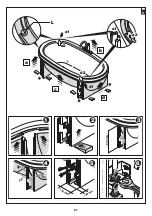
- ÓÒË, Ëϲ˘ËÂÒfl ̇ Ô‡ÌÂÎË, ÛÒڇ̇‚ÎË‚‡˛ÚÒfl ‚ ·ÓÍÓ‚˚Â
ÔÂÚÎË ÏÓÌÚËÓ‚‡ÌÌ˚ı ‡Ì ÍÓ̯ÚÂÈÌÓ‚ 

(

‰ÂÚ.1

)

.

á‡ÚÂÏ Á‡ÍÂÔËÚ¸ Ô‡ÌÂθ Í ‰‚ÛÏ ÍÓ̯ÚÂÈ̇Ï
ÔÓÒ‰ÒÚ‚ÓÏ Û͇Á‡ÌÌ˚ı „‡ÂÍ.

ÑÂÈÒÚ‚Ó‚‡Ú¸ Ú‡ÍËÏ Ê ӷ‡ÁÓÏ ‚ ÓÚÌÓ¯ÂÌËË Ô‡ÌÂÎË 

d

.


èÂ‰ÌË ԇÌÂÎË

(

30, ‰ÂÚ.1

) ëÌflÚ¸ Û˜ÌÓÈ ‰Û¯ Ò ÓÔÓ˚, ËÁ‚ÎÂ͇fl

ÒÓÓÚ‚ÂÚÒÚ‚Û˛˘ËÈ „Ë·ÍËÈ ¯Î‡Ì„ ÔÓ ‚ÒÂÈ Â„Ó ‰ÎËÌÂ.

(

‰ÂÚ.2

) èË·ÎËÁËÚ¸ ÔÂÂ‰Ì˛˛ Ô‡ÌÂθ 

Í ‚‡ÌÌÓÈ Ë

‚ÒÚ‡‚ËÚ¸ ÓÒË ‚ ·ÓÍÓ‚˚ ÔÂÚÎË ÍÓ̯ÚÂÈÌÓ‚.

(

‰ÂÚ.3

) èÓ‚ÂËÚ¸, ˜ÚÓ ‰‚ËÊÂÌË „Ë·ÍÓ„Ó ¯Î‡Ì„‡

Û˜ÌÓ„Ó ‰Û¯‡ ·ÂÁ ÔÂÔflÚÒÚ‚ËÈ; Á‡ÚÂÏ ‚ÌÓ‚¸
ÔÓÁˈËÓÌËÓ‚‡Ú¸ Û˜ÌÓÈ ‰Û¯ ̇ Â„Ó ÓÔÓÛ.

á‡ÚÂÏ Á‡ÍÂÔËÚ¸ Ô‡ÌÂθ Í ‰‚ÛÏ ÍÓ̯ÚÂÈ̇Ï
ÔÓÒ‰ÒÚ‚ÓÏ Û͇Á‡ÌÌ˚ı „‡ÂÍ.

ÑÂÈÒÚ‚Ó‚‡Ú¸ Ú‡ÍËÏ Ê ӷ‡ÁÓÏ ‚ ÓÚÌÓ¯ÂÌËË Ô‡ÌÂÎË 

Ò

.


ê„ÛÎËӂ͇ Ë ÍÂÔÎÂÌË ԇÌÂÎÂÈ

(

31, ‰ÂÚ.1-2

) èÓ‰ÌflÚ¸ ·ÓÍÓ‚Û˛ Ô‡ÌÂθ

‡, 

ÔÓ͇ Âfi

‚ÂıÌËÈ ·ÓÚ Ì ‚ÓȉfiÚ ÔË·ÎËÁËÚÂθÌÓ Ì‡ 5 ÏÏ ‚
͇̇‚ÍÛ ‰Â‚flÌÌÓ„Ó ·ÓÚ‡; 

ÔÓ‚ÂËÚ¸, ˜ÚÓ ‚ËÎ͇,

Ëϲ˘‡flÒfl ̇ ‰Â‚flÌÌÓÏ ·ÓÚ (a2) ÛÒڇ̇‚ÎË‚‡ÂÚÒfl
‚ ÒÎË‚ÌÛ˛ ˜‡ÒÚ¸ (a1) Ô‡ÌÂÎË.

á‡ÚÂÏ ÒÏÂÒÚËÚ¸ Ô‡ÌÂθ ‚ „ÓËÁÓÌڇθÌÓÏ Ì‡Ô‡‚ÎÂÌËË,
Ú‡ÍËÏ Ó·‡ÁÓÏ, ˜ÚÓ·˚ ‚ÂıÌËÈ ·ÓÚ ÔË‚Ó‰ËÎÒfl ‚ ÛÔÓ
Ò ‰‚ÛÏfl ÓÒÚ‡ÌÓ‚‡ÏË“L” (Ó‰ËÌ Ì‡ ÒÚÓÓÌÛ).

(

‰ÂÚ.2-3

)èÓÒ‰ÒÚ‚ÓÏ ÒÓÓÚ‚ÂÚÒÚ‚Û˛˘Ëı ‡ÒÔÓÓÍ

ÔÓ‰ÌflÚ¸ Ô‡ÌÂθ Ú‡ÍËÏ Ó·‡ÁÓÏ, ˜ÚÓ·˚ ‡ÒÒÚÓflÌËÂ
ÏÂÊ‰Û ‰Â‚flÌÌ˚Ï ·ÓÚÓÏ Ë ÌËÊÌÂÈ ÒÚÓÓÌÓÈ Ò‡ÏÓÈ
Ô‡ÌÂÎË ÒÓÓÚ‚ÂÚÒÚ‚Ó‚‡ÎÓ Û͇Á‡ÌÌÓÏÛ.

í‡ÍÊ ÔÓ‰ÌflÚ¸ ÔÂ‰ÌË ԇÌÂÎË 

Ë 

c

, ‰ÂÈÒÚ‚Ûfl ‚ Ú‡ÍÓÏ

Ê ÔÓfl‰Í ‰ÂÈÒÚ‚ËÈ.
(

‰ÂÚ. 4-5

) èÓ‚ÂËÚ¸, ˜ÚÓ: 

- Ô‡ÌÂÎË fl‚Îfl˛ÚÒfl ÔÂÔẨËÍÛÎflÌ˚ÏË ÔÓ ÓÚÌÓ¯ÂÌ˲ Í

‰Â‚flÌÌÓÏÛ ·ÓÚÛ.

- ÒÓÓÚ‚ÂÚÒÚ‚Û˛˘Ë ‚ÂÚË͇θÌ˚ ÒÚÓÓÌ˚ fl‚Îfl˛ÚÒfl

Ô‡‡ÎÎÂθÌ˚ÏË, ‡ Ú‡ÍÊ Òӷ≇˛ÚÒfl Û͇Á‡ÌÌ˚Â
‡ÒÒÚÓflÌËfl.

- ÌËÊÌË ·ÓÚ‡ Ô‡ÌÂÎÂÈ ‚˚Ó‚ÌÂÌ˚.

ê„ÛÎËÓ‚ÍË ÓÒÛ˘ÂÒÚ‚Îfl˛ÚÒfl ÔÓÒ‰ÒÚ‚ÓÏ ÔÂÚÂθ
ÍÓ̯ÚÂÈÌÓ‚. 

(

‰ÂÚ. 6

) ᇷÎÓÍËÓ‚‡Ú¸ Ô‡ÌÂÎË ‚ ÓÍÓ̘‡ÚÂθÌÓÏ

ÔÓÎÓÊÂÌËË, Á‡Úfl„Ë‚‡fl Û͇Á‡ÌÌ˚ „‡ÈÍË.

ÑÂÈÒÚ‚Ó‚‡Ú¸ Ú‡ÍËÏ Ê ӷ‡ÁÓÏ ‚ ÓÚÌÓ¯ÂÌËË Ô‡ÌÂÎË 

d

.

Ç ÍÓ̈ ۉ‡ÎËÚ¸ ‡ÒÔÓÍË ÒÌËÁÛ Ô‡ÌÂÎÂÈ

ÑÓÔÓÎÌÂÌËfl


(

32, ‰ÂÚ.1

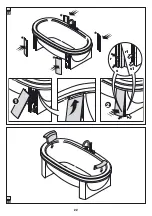
) ìÒÚ‡ÌÓ‚ËÚ¸ ÔÓÍ˚‚‡˛˘Ë ԇÌÂÎË,

‚ÒÚ‡‚Îflfl ËÁ ‚ ͇̇‚ÍÛ ÔÓ‰ ·ÓÚÓÏ ‚‡ÌÌÓÈ; (

‰ÂÚ.2

)

ÔÓ‚ÂËÚ¸, ˜ÚÓ ‚ ÌËÊÌÂÈ ˜‡ÒÚË ‚ËÎÍË (r1) ̇ıÓ‰flÚÒfl
‚ÌÛÚË ÒÎË‚Ì˚ı ˜‡ÒÚÂÈ (r).

èËϘ‡ÌËÂ:

ÔÓÍ˚‚‡˛˘Ë ԇÌÂÎË ÏÓ„ÛÚ ÏÓÌÚËÓ‚‡Ú¸Òfl

Ò Î˛·ÓÈ ÒÚÓÓÌ˚, ‰‡Ê ÔÂ‚Ó‡˜Ë‚‡fl Ëı.


èÓ‚ÂËÚ¸ ÒÓ‰ËÌÂÌËÂ Ò ÔÂ‰ÌËÏË Ë ·ÓÍÓ‚˚ÏË

Ô‡ÌÂÎflÏË, Ú‡ÍÊ ÔÓ‚Âflfl, ˜ÚÓ ÌËÊÌËÈ ·ÓÚ ÔÓÍ˚ÚËfl
‚˚Ó‚ÌÂÌ Ò ·ÓÚÓÏ Ô‡ÌÂÎÂÈ; ÔË ÌÂÓ·ıÓ‰ËÏÓÒÚË
‚ÓÁ‰ÂÈÒÚ‚Ó‚‡Ú¸ ̇ ÍÓ̯ÚÂÈÌ˚ ‰Îfl ÌÂÓ·ıÓ‰ËÏ˚ı
„ÛÎËÓ‚ÓÍ.


(

‰ÂÚ.2

) á‡ÚÂÏ ÔËÒÓ‰ËÌËÚ¸ ÔÓÍ˚‚‡˛˘Ë ԇÌÂÎË

ÔÓÒ‰ÒÚ‚ÓÏ ÒËÒÚÂÏ˚ ÍÂÔÎÂÌËfl (s-s1).


(

33

) èÓÁˈËÓÌËÓ‚‡Ú¸ ÔÓ‰„ÓÎÓ‚ÌËÍË (Ô‰ÓÒÚ‡‚ÎflÂÏ˚Â)

̇ ·ÓÚ ‚‡ÌÌÓÈ, Òӄ·ÒÌÓ Û͇Á‡ÌÌÓ„Ó.

Summary of Contents for AnimaDesign

Page 1: ...P CAREFULLY Notice d installation GARDEZ SOIGNEUSEMENT Installations Anweisung SORGF LTIG AUFBEWAHREN Manual de instalaci n CONSERVAR CON CUIDADO JACUZZI DESIGNER COLLECTION 1 2 3 DISEGNI ALL INTERNO...

Page 2: ......

Page 3: ...Italiano 4 English 7 Fran ais 10 Deutsch 23 Espa ol 26 29 AnimaDesign Index...

Page 4: ...canotto dal l erogatore 2 3 avvitare quindi la ghiera A e la ghiera B montando per ultima la guarnizione C NOTA conservare la vite s testa 5 Da sotto il bordo vasca infilare il canotto nel foro in dic...

Page 5: ...o perdite dai collegamenti effettuati Fissare definitivamente i piedini al pavimento 27 part 4 Installazione dei pannelli ove previsti 28 part 1 Per ogni puntello regolare la posizione del dado superi...

Page 6: ...istanziali da sotto i pannelli Completamenti 32 part 1 Installare i pannelli di copertura infilandoli nella gola ricavata sotto il bordo vasca part 2 verificare che nella parte inferiore le spine r1 r...

Page 7: ...3 then tighten ring nut A and ring nut B and afterwards install the gasket C NOTE keep the headless screw 5 From under the tub edge insert the cylinder in the indicated hole and tighten the coupling f...

Page 8: ...nect the drain to the floor using a hose Before attaching the tub to the floor check that none of the connections leak Permanently attach the feet to the floor 27 detail 4 Installation of panels where...

Page 9: ...l d Finally remove the spacers from below the panels Final steps 32 detail1 Install the covering panels by inserting them in the groove under the tub edge detail 2 check that in the lower part the peg...

Page 10: ...le montage de la robinetterie doit tre effectu a vec la baignoire hors de son emplacement d finitif et dans tous les cas avant de la fixer au sol 4 1 D visser la vis sans t te extraire le manchon du...

Page 11: ...n m tallique diff rente de celle fournie il faut la raccorder la borne quipotentielle voir 25 d tail 2 Une fois mont e la colonne agir sur l arbre pour fer mer la bonde et monter la commande de la col...

Page 12: ...es distances indiqu es les bords inf rieurs des panneaux soient align s Au besoin effectuer les r glages moyennant les orifices des brides d tail 6 Bloquer les panneaux dans leur position d finitive e...

Page 13: ...13 189 190 99 100 60 1 99 189 60 1a...

Page 14: ...14 50 cm G G 2 60 cm G G 2a 2 1 4 5 3 3...

Page 15: ...15 7 8 1 2 3 9 1 2 6 1 3 2 A B C 4 5...

Page 16: ...16 1 2 10 2 1 3 4 H I F G E J K L M 11 12 L M 2 1 13 14 1 J J 2 15...

Page 17: ...17 1 2 3 1 2 3 20 21 1 M5x5 mm 2 19 45 1 3 2 18 H H I K J H I 2 2 1 16 G H F E 17...

Page 18: ...18 1 2 3 22 23 1 2 3 24 25 3 2 1 26...

Page 19: ...19 333 mm D 1 2 3 28 2 3 4 1 27...

Page 20: ...20 a a1 d1 a2 d 1 2 d2 a1 a2 29 3 b c 2 1 4 30...

Page 21: ...21 150 mm 48 mm 90 c b a d a1 a2 d2 d1 493 mm 1 2 4 5 6 3 a1 a2 90 90 L 31...

Page 22: ...22 1 2 r s s1 r1 32 33...

Page 23: ...ionsbereich wegger ckten Wanne erfolgen und auf jeden Fall noch bevor sie am Fu boden befestigt wird 4 1 Die Madenschraube herausdrehen das Rohr aus dem Wanneneinlauf 2 herausziehen 3 die Gewinderinge...

Page 24: ...rie anschlie en Die Wanne wieder an ihren Installationsort bringen und die Schl uche an den vorbereiteten Austritten am Fu boden befesti gen Det 3 27 Das Ablaufrohr nach den Anweisungen die dem betref...

Page 25: ...nte vollkommen lotrecht stehen die entsprechenden senkrechten Seiten parallel zu einander stehen und die angegebenen Abst nde stimmen die unteren Kanten der Paneele aufeinander ausgerichtet sind Einst...

Page 26: ...t e con la ba era fuera del lugar de instalaci n y en cualquier caso antes de fijarla al suelo 4 1 Desenrosque el tornillo sin cabeza y extraiga el ca o del suministrador 2 3 enrosque a continuaci n l...

Page 27: ...e de equipotencialidad vea 25 det 2 Una vez montada la tuber a manipule el eje para cerrar la v l vula de desag e y a continuaci n monte el mando de la tuber a colo c ndolo como se indica es decir con...

Page 28: ...s de los faldones est n alineados Las posibles regulaciones deber n realizarse a trav s de las ranuras de los soportes det 6 Bloquee los faldones en su posici n definitiva apretando las tuercas indica...

Page 29: ...29 Anima Design 1 1a 2 2a 2 2 50 c 2 60 c 2a G 3 1 4 4 1 2 3 A B C 5 6 1 2 7 M 8 9 3 10 1 2 11 M 12 1 2 3 8 3 8 E F G H I 23 3 J K L 26 M 13 1 2 14 1...

Page 30: ...30 2 L M 15 J 16 1 I H K J 2 17 G F E H 18 18 1 45 2 45 19 4 1 20 1 1 2 2 3 21 22 23 1 2 3 24 1 2 3 25 26 1 3 27 25 2 3 27 4 28 1 D 2 3 4 29 a a2 a1...

Page 31: ...31 1 d 30 1 2 b 3 31 1 2 5 a2 a1 L 2 3 b c 4 5 6 d 32 1 2 r1 r 2 s s1 33...

Page 32: ...Marc 157 159 Graner local 2 08013 Barcelona Espa a Tel 93 238 5031 Fax 93 238 5032 www jacuzzi eu spagna jacuzzi it I dati e le caratteristiche non impegnano la Jacuzzi Europe S p A che si riserva il...

Reviews: