32
SETTING AND USING THE FUNCTIONS
SYSTEMS OF COMMAND/CONTROL
The Experience spas have two different systems of com-
mand/control of the functions: the pneumatic push buttons provid-
ed (which should be installed near the spa) and a control panel
attached to the cover of the electronic box installed on the spa-pak.
All settings and programming take place via the control panel, where-
as the pneumatic push buttons only let you switch on or off the
hydromassage pumps, the blower, the spotlight and water heating.
When you activate one of the two control systems, it overrides
the other. However, any default or user-set automatic cycles
remain in effect. By default, the control panel installed on the
electronic box is activated, but this setting can be changed by the
user (as described below) and have activation at system start-up
of the pneumatic push buttons as the default setting.
MANAGEMENT OF FUNCTIONS
VIA CONTROL PANEL
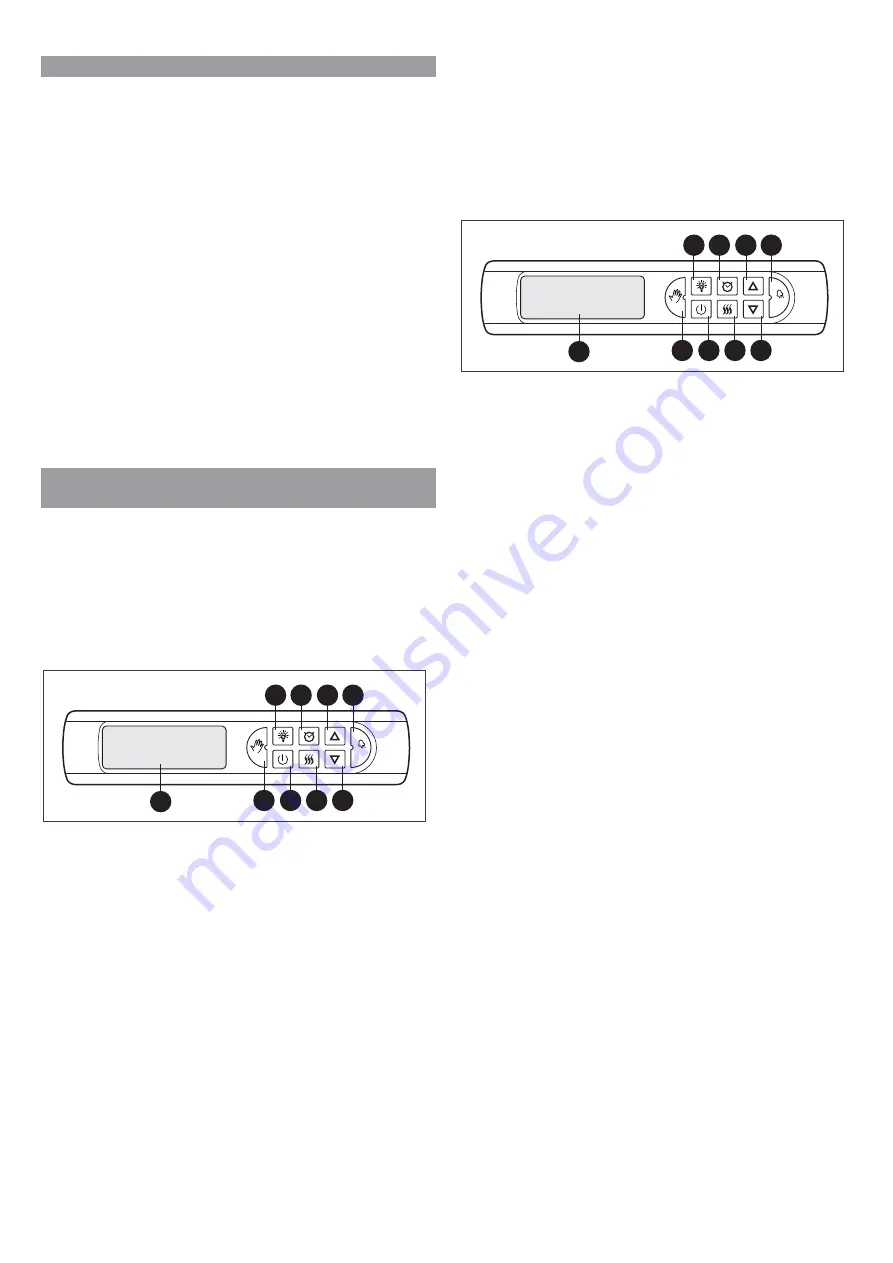
The cover of the electronic box includes a control panel that can
be used to programme the various parameters that characterize
each function. The panel also includes a 4-numeral digital display
(1)
. It acts as a clock, and also displays all system data and the
various programming phases, as well as any alarm conditions
which may occur in the event of abnormal operation.
Power on the system. All LED's and display segments come
on for a few seconds. The LED's of the keys will then go off, and
the display will show the current time
(if set)
.
This is the
"standing by for commands"
condition.
Press the
"start" key (3)
. It will light up and the system will
be activated as per the set parameters
(the display shows the
water temperature)
.
This is the
"system active"
condition.
Check that the
"hand" key (2)
is lit. If it is off, it means that
the pneumatic push buttons are active. To deactivate them and
activate the control panel, press and hold the key for about three
seconds.
SETTING THE DATE AND TIME
It is indispensable to set the current date and time to properly
programme the filtering and water heating cycles. A backup bat-
tery ensures the date and time are preserved even if the power
supply to the system is cut off. If the date and time are not set,
at each start-up the display will show hour 0 of day 1 of month
1. The count of minutes, hours and days starts at this point.
To set the current date and time, you must enter the proce-
dure for timer parameter programming
(the same one used to
set the cycles of filtering and water heating)
, by pressing and
holding for about 1-2 seconds the
"clock" key (7)
. The corre-
sponding LED will come on as well as those of the keys
“+” (8),
“-“ (5)
and
“set” (9)
, while the display will show the first pa-
rameter (A0—).
N.B.:
the system must be in "standing by for commands" con-
dition, i.e. with the
“start” key (3)
off.
Scroll through all initial parameters that concern filter-
ing/heating by repeatedly pressing the
“set”
key until you come
to the parameters identified with the codes
“t0—“
up to
“t6—“
.
In order,these parameters correspond to: year,
month, day, hour, month of start of summer time, and month of re-
turn to winter time. They can be modified, using the keys + and -
as follows:
-
t0—
: set the current year (two figures) from 00 to 99
-
t1—
: set the current month from 01 to 12
-
t2—
: set the current day from 01 to 31
-
t3—
: set the current hour from 00 to 23 (24 hours)
-
t4—
: set the current minute from 00 to 59
-
t5—
: set the month of start of summer time from 00 to 12
-
t6—
: set the month of return to winter time from 01 to 12
After correctly setting each parameter, press the "set" key to
memorize it and move on to the next one. After the last param-
eter (t6—), you will automatically exit the programming procedure,
but if necessary you can return to it by pressing the "clock" key
(7) for about 1-2 seconds.
You can also exit the programming procedure by pressing
any key that is not lit (except "start"), or you can wait 30 sec-
onds without touching any key ("timeout" time).
At three o'clock on the last Sunday of the month set in “t5”,
changeover to summer time will occur. At three o'clock on the
last Sunday of the month set in “t6”, changeover back to winter
time will occur. If “t5” is set to 0, no time change will occur, even
if “t6” is set to something other than 0.
set
00.00
1
3
2
4 5
6 7 8 9
set
00.00
1
3
2
4 5
6 7 8 9
Summary of Contents for Experience ALIMIA
Page 2: ......
Page 6: ......
Page 62: ...62 M5x35mm M5 5 3x15mm Z X OK NO Z g v v f f b d e a b c a c h FLOW 1...


