background image

63

J-400

CAUTION! READ THIS BEFORE DRAINING:

 To prevent dam-

age to the spas components, turn off power to the spa at the circuit 

breaker before draining it. Do not turn the power back on until your 

spa has been refilled.

CAUTION:

 There are certain precautions to keep in mind when 

draining your spa. If it is extremely cold, and the spa is out-

doors, freezing could occur in the lines or the equipment (see 

“WINTERIZING,” page 66). On the other hand, if it is hot out-

doors, do not leave the spa’s surface exposed to direct sunlight.

Draining Procedures:

1.  Turn off power to hot tub at the breaker.

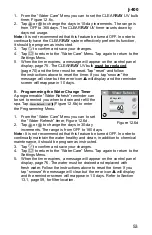
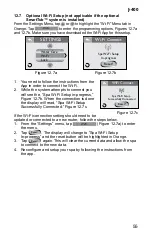
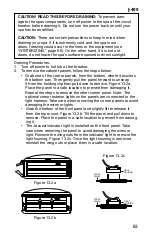
2.  To remove the cabinet panels, follow the steps below:

•  Grab one of the corner panels, from the bottom, where it touches 

the bottom pan. Then gently pull the panel forward to unsnap 

it from the holding clip then pull down to remove, Figure 13.2a. 

Place the panel in a safe location to prevent from damaging it. 

Repeat the steps to remove the other corner panel. Note: The 

optional corner exterior lights on the panels are connected to the 

light harness. Take care when removing the corner panels to avoid 

damaging the wires or lights.

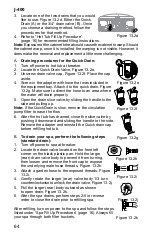
•  Grab the bottom of the front panel and slightly lift to release it 

from the top mount, Figure 13.2b. Tilt the panel and pull down to 

remove. Place the panel in a safe location to prevent from damag-

ing it. 

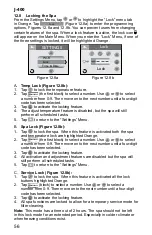
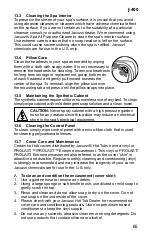
•  The Jacuzzi indicator light is installed on the front panel. Take 

care when removing the panel to avoid damaging the wires or 

light. Remove the wing nuts from the indicator light to remove the 

light housing, Figure 13.2c. Once the light housing is removed, 

reinstall the wing nuts or place them in a safe location.

100

6:45p

Figure 13.2a

100

6:45p

Figure 13.2b

FRONT 

PANEL

FRONT 

PANEL

LIGHT 

HOUSING

LIGHT 

HOUSING

Figure 13.2c

Summary of Contents for J-485

Page 1: ...J 495 J 485 J 475 J 445 J 435 J 425 OWNER S MANUAL 6530 274G Rev B...

Page 2: ...res an annual bulb replacement to properly sanitize your water TO DECREASE RISK OF INFECTION OR DISEASE Always maintain your spa filter as outlined below to ensure healthy spa water Refer to pages 59...

Page 3: ...e Waterfall Selector Diagram 21 9 3 J 495 Air Controls Diagram 22 9 4 J 485 Spa Features 23 9 5 J 485 Massage Waterfall Selector Diagram 24 9 6 J 485 Air Controls Diagram 25 9 7 J 475 Spa Features 26...

Page 4: ...ructions 48 12 1 Programming the Heating Mode 49 12 2 Programming the Primary Filter 50 12 3 Programming the Secondary Filter 51 12 4 Cleanup Cycle 52 12 5 Blow Out Cycle 52 12 6 Water Care Programmin...

Page 5: ...Bulb Replacement and Quartz Tube Maintenance 70 15 0 Error Display Messages 73 16 0 Troubleshooting Procedures 77 17 0 Typical Spa Wiring Diagrams 79 17 1 Wiring diagram for North American 60 Hz Mode...

Page 6: ......

Page 7: ...ired operation This equipment has been tested and found to comply with the limits for a Class B Digital Device pursuant to Part 15 of the FCC Rules These limits are designed to provide reasonable prot...

Page 8: ...to drowning or severe injury Never use the spa unless all suction guards filter filter lid or skimmer assembly are installed to prevent body and or hair entrapment Never operate or use the spa if the...

Page 9: ...as required by NEC Article 680 42 4 WARNING RISK OF SEVERE INJURY OR DEATH Extreme caution must be exercised to prevent diving or jumping into the spa or slipping and falling which could result in un...

Page 10: ...use may lead to unconsciousness with the possibility of drowning 7 WARNING RISK OF SEVERE INJURY OR DEATH Prolonged immersion in a spa may be injurious to your health Observe a reasonable time limit...

Page 11: ...en supervision or instruction concerning use of the appliance by a person responsible for their safety 12 NOTE This spa is not intended nor designed to be used in a com mercial or public application T...

Page 12: ...lvo de madera una sub stancia reconocida por el Estado de California como causante de c ncer Evite inhalar polvo de madera o utilice una m scara antipol vo u otros resguardos para protecci n personal...

Page 13: ...kimmer assembly This has been reported in persons who when submerge themselves underwater allowing hair to come close and or within the reach of the suction fittings suction covers or skimmer assembly...

Page 14: ...immer assembly Never allow children to play or get near the suction fittings suction covers filter filter lid or skimmer assembly 3 2 Hyperthermia Prolonged immersion in hot water may induce hyperther...

Page 15: ...imilar hardware within 10 feet 3m of the spa shall be bonded to the equipment grounding buss with copper conductors not smaller than No 6 AWG 10 mm 5 SAVE THESE INSTRUCTIONS 4 0 Choosing a Location IM...

Page 16: ...vent moist or heated air and air associated with chemical odors outdoors When the spa is in use considerable amounts of moisture will escape potentially causing mold and mildew This can cause health...

Page 17: ...in place measures to sufficiently handle excessive water spillage Be sure the flooring in which the spa rests on has adequate drainage and can handle the entire contents of the spa Be sure to make pro...

Page 18: ...equirements of the National Electrical Code USA NEC and any applicable state or local codes The electrical circuit must be installed by a qualified electrician and approved by a local building electri...

Page 19: ...l in a safe location to prevent from damaging it The Jacuzzi indicator light is installed on the front panel Take care when removing the panel to avoid damaging the wires or light Remove the wing nuts...

Page 20: ...Wireless Stereo Optional 14 SmartTub System Optional 15 Bridge optional for SmartTub System F1 10A 250VAC F7 30A 30A F6 K12 K1 K9 K15 K14 T1 TB1 4 3 2 1 K5 J22 N A N A J43 J2 K13 J65 J51 J3 J52 J4 J61...

Page 21: ...will operate when one jets pump is running but will not operate if more than one jets pump is running This is the factory setting In 60A configuration the heater will operate when two jets pumps are r...

Page 22: ...the footwell CAUTION TO DECREASE BUILD UP ON COMPONENTS AND MINIMIZE ACRYLIC DAMAGE Never fill with water from a water softener If your water is extremely hard it is preferable to fill half way with h...

Page 23: ...ge for the spa is 65 to 104 F 18 33 to 40 C To activate the Extended Temperature feature that allows the spa to reach 106 F 41 C page 76 Important Heater Details The maximum temperature for which the...

Page 24: ...495 560 Gal 2 120 L 14 0 oz J 485 435 Gal 1 647 L 11 0 oz J 475 440 Gal 1 666 L 11 0 oz J 445 380 Gal 1 438 L 9 5 oz J 435 360 Gal 1 363 L 9 0 oz J 425 340 Gal 1 287 L 9 0 oz Use average fill volume...

Page 25: ...leave your hot tub unattended for any reason while the cover is open and accessible to small children and animals To decrease the possibility of contracting a waterborne ill ness e g an infection bact...

Page 26: ...up Holders 2 5 Adjustable Pillows 4 6 Waterfall Control Valve 7 Footwell Filter Suction Covers 6 8 Underwater Light 9 Filter Skimmer Grill 10 Waterfall 11 RX Jets 15 12 FX Jets 16 13 FX Rotational Jet...

Page 27: ...sage selector 1 diverts jets pump N 1 output between jets groups 1a 1b Massage selector 2 diverts jets pump N 2 output between jets groups 2a 2b Jets Without Massage Selector Controls Jets 3 are alway...

Page 28: ...Air Controls Diagram 100 6 45p 3 4 5 1 2 1 2 2 2 2 2 2 2 4 4 5 5 4 4 4 4 3 1 1 3 3 3 3 Air Controls Operation Toggle air controls 1 5 to add air to designated jet groups Spa operation subject to chan...

Page 29: ...4 Adjustable Pillows 4 5 Waterfall 6 Filter Skimmer Grill 7 Massage Selectors with lights 2 8 Footwell Filter Suction Covers 4 9 NX2 Jets 6 10 MX2 Jets 3 11 FX Large Rotational Jets 1 12 FX Jets 12 13...

Page 30: ...s jets pump N 2 output between jets groups 2a 2b Continuously Powered Jets Jets 3 are always on when jets pump N 1 is running Jets 4 are always on when jets pump N 2 is running Waterfall Selector Wate...

Page 31: ...9 6 J 485 Air Controls Diagram 100 6 45p 3 4 1 2 4 2 2 1 4 3 2 4 3 3 4 4 1 3 Air Controls Operation Toggle air controls 1 4 to add air to designated jet groups Spa operation subject to change without...

Page 32: ...4 4 Adjustable Pillows 4 5 Waterfall 6 Filter Skimmer Grill 7 Massage Selectors with lights 2 8 Footwell Filter Suction Covers 4 9 NX2 Jets 6 10 MX2 Jets 3 11 FX Large Rotational Jets 1 12 FX Jets 10...

Page 33: ...age selector 1 diverts jets pump N 1 output between jets groups 1a 1b Massage selector 2 diverts jets pump N 2 output between jets groups 2a 2b Continuously Powered Jets Jets 3 are always on when jets...

Page 34: ...9 J 475 Air Controls Diagram 100 6 45p 3 4 1 2 1 1 2 2 4 2 4 4 4 3 4 1 3 3 3 3 Air Controls Operation Toggle air controls 1 4 to add air to designated jet groups Spa operation subject to change witho...

Page 35: ...Filter Skimmer Grill 7 Massage Selectors with lights 2 8 Footwell Filter Suction Covers 4 9 NX2 Jets 4 10 MX2 Jets 3 11 FX Large Rotational Jets 2 12 FX Jets 12 13 FX Rotational Jets 8 14 RX Jets 8 1...

Page 36: ...selector 1 diverts jets pump N 2 output between jets groups 1a 1b Massage selector 2 diverts jets pump N 1 output between jets groups 2a 2b Continuously Powered Jets Jets 3 are always on when jets pum...

Page 37: ...9 12 J 445 Air Controls Diagram 100 6 45p 3 4 1 2 1 2 3 4 2 2 2 4 3 3 4 1 1 2 3 Air Controls Operation Toggle air controls 1 4 to add air to designated jet groups Spa operation subject to change witho...

Page 38: ...r Grill 7 Massage Selectors with lights 2 8 Footwell Filter Suction Covers 4 9 NX2 Jets 6 10 MX2 Jets 3 11 FX Large Rotational Jets 3 12 FX Jets 9 13 FX Rotational Jets 6 14 RX Jets 8 15 FX Small Jets...

Page 39: ...ts pump N 2 output between jets groups 1a 1b Massage selector 2 diverts jets pump N 1 output between jets groups 2a 2b Continuously Powered Jets Jets 3 are always on when jets pump N 2 is running Jets...

Page 40: ...15 J 435 Air Controls Diagram 100 6 45p 2 3 1 1 1 1 1 2 2 2 3 3 1 1 1 1 1 3 3 3 Air Controls Operation Toggle air controls 1 3 to add air to designated jet groups Spa operation subject to change with...

Page 41: ...ble Pillows 4 6 Waterfall Control Valve 7 Footwell Filter Suction Covers 4 8 Underwater Light 9 Filter Skimmer Grill 10 Waterfall 11 RX Jets 4 12 FX Jets 15 13 FX Rotational Jets 4 14 MX2 Jets 3 15 PX...

Page 42: ...tor 1 diverts jets pump N 1 output between jet groups 1a 1b Jets Without Massage Selector Controls Jets 2 are always on when jets pump N 1 is running Jets 3 are always on when jets pump N 2 is running...

Page 43: ...00 9 18 J 425 Air Controls Diagram 100 6 45p 3 4 1 2 1 1 1 2 2 4 4 4 4 1 3 1 Air Controls Operation Toggle air controls 1 4 to add air to designated jet groups Spa operation subject to change without...

Page 44: ...n order to validate your warranty To register you will need to have the spa serial number Figure 10 2a then you will need to register online at www Jacuzzi com Follow these steps to register your spa...

Page 45: ...lows you to adjust the set temperature of the spa Increase the temperature by tapping in 1 F 0 5 C increments Decrease the temperature by tapping in 1 F 0 5 C increments Note The temperature range for...

Page 46: ...ll vary depending on whether the clock is set to a 12 Hour or 24 Hour configuration page 57 The default setting is 12 Hour Note The time does NOT automatically adjust for daylight saving time The time...

Page 47: ...11 3 Lights Menu From the Home Menu Figure 11 3a tap to enter the Light submenus The LCD screen will display the Light Submenu Figure 11 3b From this menu you can control the hot tub lighting When you...

Page 48: ...lor option The lights have a timeout period of 8 hours At start up the exterior lights flash on and off to indicate a connection 11 4 Music Menu Models equipped with the optional Audio System offer an...

Page 49: ...rd through tracks Rewind Tap to move back through tracks Pause Play Tap to pause and play tracks Track Name Artist Track Will display the artist and track information if it is available If the informa...

Page 50: ...irming the connection 5 If asked for a password enter the password 0000 and then connect 6 If the pairing process is successful your Bluetooth device will show Connected right next to BLUEWAVE The Blu...

Page 51: ...mage 11 7 CLEARRAY on Demand The CLEARRAY on demand feature activates the water purification system Continuously tap to activate the system for 1 hour 2 hours 3 hours or OFF During this time the circu...

Page 52: ...groups Note The massage selector valve s is designed to operate in positions A Combo B and C for optimum performance It is considered normal for sound levels within the valve to vary between positions...

Page 53: ...account 3 Locate the SmartTub sticker next the control panel of the hot tub You can either scan the QR code with the SmartTub app or manually input the serial number located below the QR code on the s...

Page 54: ...etting menus that allow you to pro gram and activate different components of the spa With our ProTouch control panel programming your spa has never been easier In the sec tions that follow we will gui...

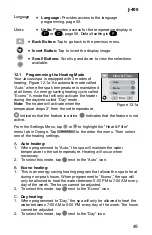
Page 55: ...ve Indicates that the feature is not active From the Settings Menu tap or to highlight the Heat Filter menu tab in Orange Tap Heat Filter to the enter the menu Then select one of the heating settings...

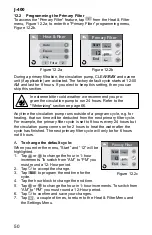
Page 56: ...the primary filter cycle is set to 8 hours every 24 hours but the circulation pump comes on for 2 hours to heat the water after the cycle has finished The next primary filter cycle will only be for 6...

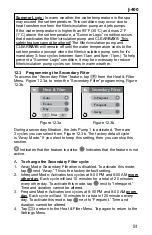
Page 57: ...Filter programming Figure 12 3b During a secondary filtration the Jets Pump 1 is activated There are 3 cycles you can select from Figure 12 3b The factory default cycle is Away Mode If you elect to ke...

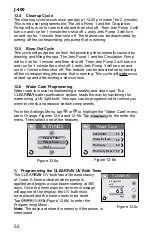
Page 58: ...art up and after exiting a service lock 12 6 Water Care Programming Water care is crucial to maintaining a healthy and clean spa The CLEARRAY water purification system leads the way by sanitizing the...

Page 59: ...ming the Water Change Timer A programmable Water Refresh reminder can be set to remind you when to drain and refill the spa Tap Water Refresh 60 Figure 12 6b to enter the Programming Menu 1 From the W...

Page 60: ...days Refer to Section 13 1 page 59 for cleaning instructions D Programming the ProClarity Depth Filter Timer A programmable filter timer can be set to remind you when to replace the ProClarity Depth F...

Page 61: ...lay will read Spa Wi Fi Setup Successfully Connected Figure 12 7c If the Wi Fi connection setting should need to be updated or connected to a new router follow the steps below 1 From the Settings menu...

Page 62: ...When this feature is activated both the spa and temperature lock are highlighted Orange 2 Tap the first block to select a number Use or to select a number from 0 9 Then move on to the next number unt...

Page 63: ...ur configuration To choose the 24 Hour configuration then tap 24 to change the setting 1 When you enter the menu Time will be highlighted Orange Figure 12 9c 2 Tap the hour block 12 30 to program 3 Ta...

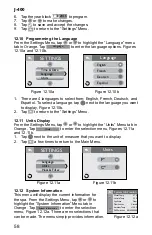
Page 64: ...nge Tap Units to enter the selection menu Figures 12 11a and 12 11b 1 Tap next to the unit of measure that you want to display 2 Tap a few times to return to the Main Menu Heat Filter Language Units S...

Page 65: ...place a suction fitting or suction cover with one rated less than the flow rate marked on the original suction fitting Using improper suction fittings or suction covers can create a body or hair sucti...

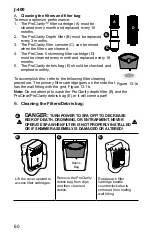
Page 66: ...ter cleaning procedure The primary filter cartridge goes on the side that has the wall fitting with the grid Figure 13 1b Note Do not attempt to wash the ProClarity depth filter B and the ProClear Pro...

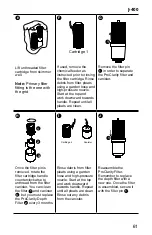
Page 67: ...arity filter and canister H 1 2 3 Once the filter pin is removed rotate the filter cartridge handle counterclockwise to unthread from the filter canister You can clean the filter 1 and canister 3 but...

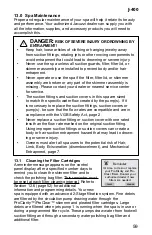
Page 68: ...the filter cover clips as shown you can flip the filter skimmer and use the back side to extend usage N Spa Shell Reinstall the skimmer shield over the filters Then turn power to spa back on 13 2 Drai...

Page 69: ...m the holding clip then pull down to remove Figure 13 2a Place the panel in a safe location to prevent from damaging it Repeat the steps to remove the other corner panel Note The optional corner exter...

Page 70: ...circulation pump filter to ease the flow 6 After the hot tub has drained close the slice valve by pushing it downward and sliding the handle to the side Remove the adapter and reinstall the Quick drai...

Page 71: ...etergent soap solution and a clean towel 13 6 Cleaning the Control Panel To clean simply wipe control panel with a micro fiber cloth that is used for cleaning polycarbonate lenses 13 7 Cover Care and...

Page 72: ...ures you should check periodically to be certain that the electrical supply to the spa has not been interrupted In extreme bitter cold weather less than 32 F we recommend that the circulation pump is...

Page 73: ...pulling outward Tip hose down and allow it to drain and then reinstall hose and clamp 10 Loosen hose clamp at bottom of CLEARRAY system and pull hose off of CLEARRAY fitting twist the hose back and fo...

Page 74: ...H is a measure of relative acidity or alkalinity of water and is measured on a scale of 0 to 14 The midpoint of 7 is said to be neutral above which is alkaline and below which is acidic In spa water i...

Page 75: ...i dealer can advise you on the use of these additives Jacuzzi chemicals are for use in the U S only 14 4 CLEARRAY Ultraviolet Water Purification System Your new hot tub has our water purification syst...

Page 76: ...of CLEARRAY System and connection may vary by model 1 Turn the breaker to the spa OFF DRAIN YOUR SPA Note If you are only replacing the UV bulb then the spa does not have to be drained You will need t...

Page 77: ...tz tube by wiping until clear using a paper towel or a dry cotton cloth If needed a household tub and shower lime removal product can be used WARNING Do not use abrasive cleaners as they can scratch t...

Page 78: ...rn the pump and breaker OFF BEFORE proceeding to step 15 15 Reconnect the UV bulb socket 7 to the power cord socket 11 make sure you use the latex glove provided when handling the UV bulb WARNING DO N...

Page 79: ...is malfunctioning closed Contact your authorized dealer or service organization 3 Flow Restriction Heater is disabled check for dirty filter Consult the owner s manual for additional information Note...

Page 80: ...danger No corrective action is necessary If condition persists contact your authorized dealer or service organization 12 Overheat protection DO NOT ENTER THE WATER Spa water temperature is above accep...

Page 81: ...cceptable limits If condition persists provide shade for equipment side of spa Contact your authorized dealer or service organization Note The heater icon will be blinking and the error icon will be d...

Page 82: ...cess the extended temperature you need press and hold your finger over the temperature reading for about 5 seconds The temperature reading will start to blink to indicate the system is ready Tap to ra...

Page 83: ...service center 2 If motor operates but no water flows to jets A Pump may not be properly primed See instructions below B Contact dealer or authorized service center AIR LOCK Purge air lock from circu...

Page 84: ...ntact your dealer or authorized service center FILTER CIRCULATION PUMP OFF 1 Verify filter circulation pump is programmed to run page 50 2 Make sure there are no errors preventing the pump from turnin...

Page 85: ...240 VAC No Load Neutral Wire Note service disconnect not shown in this diagram Red L2 Red L2 Pigtail Neutral Bus Ground Black L1 Black L1 Green GFCI Sub Panel Main Panel 2 Pole GFCI Breaker Ground Bo...

Page 86: ...5 J10 J24 ZONE 2 Exterior Lights or Step Light OPTIONAL J23 ZONE 1 COLOR J26 ZONE 4 TOPSIDE C58 C57 K2 GFCI TRIP J8 Q32 HEATER J38 J53 J45 J46 J47 J41 J58 J42 J31 J32 J33 J40 J64 J36 J35 1 2 3 4 FUSE...

Page 87: ...J14 J15 J10 J24 ZONE 2 J23 ZONE 1 J26 ZONE 4 C58 C57 K2 GFCI TRIP J8 F2 F6 Q32 HEATER J66 J38 J53 J45 J46 J47 J41 J58 J42 J31 J32 J33 J40 J64 J36 J35 1 2 3 4 FUSE CIRC OZONE STATUS INDICATOR GRN J7 J...

Page 88: ...5 6 7 8 9 10 OFF OFF ON OFF OFF OFF OFF OFF OFF OFF ON OFF 1 2 3 4 5 6 7 8 9 10 OFF OFF OFF ON OFF OFF OFF OFF OFF OFF ON OFF 1 2 3 4 5 6 7 8 9 10 OFF OFF OFF OFF OFF OFF OFF OFF OFF OFF ON OFF BREAK...

Reviews: